Z02 前端常用知识点
[TOC]
CSS
初始化样式
body,
h1,
h2,
h3,
h4,
h5,
h6,
p,
dl,
dd,
ul,
ol,
li,
form,
input,
textarea,
th,
td,
select,
div,
section,
nav,
span,
i {
  margin: 0;
  padding: 0;
  box-sizing: border-box;
}
em {
  font-style: normal;
}
li {
  list-style: none;
}
a {
  text-decoration: none;
  color: #333;
}
img {
  border: none;
  vertical-align: top;
}
/* img { font-size: 0; } */
input,
textarea {
  outline: none;
}
textarea {
  resize: none;
  overflow: auto;
}
body {
  font-size: 14px;
}文字溢出省略号
单行文字溢出
cssoverflow: hidden; // 溢出隐藏 text-overflow: ellipsis; // 溢出用省略号显示 white-space: nowrap; // 规定段落中的文本不进行换行
多行文字溢出
cssoverflow: hidden; // 溢出隐藏 text-overflow: ellipsis; // 溢出用省略号显示 display: -webkit-box; // -webkit-, 作为弹性伸缩盒子模型显示 -webkit-box-orient: vertical; // -webkit-, 设置伸缩盒子的子元素排列方式:从上到下垂直排列 -webkit-line-clamp: 2; // -webkit-, 显示的行数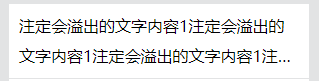
代码:文字溢出省略号
布局
float 布局
flex 布局
认识 Flex 布局
Flex 布局是一种按行或列布局元素的一维布局方法
解决的痛点
- 垂直居中
- 等分宽高
- 多列不等高想占等高的位置
API
容器 container
display: flex | inline-flex。弹性盒子
flex-direction: row | row-reverse | column | column-reverse | unset。调整主轴方向
flex-wrap: wrap | nowrap | wrap-reverse。控制是否换行
flex-flow: 简写:flex-direction + flex-wrap
justify-content: flex-start | flex-end | center | space-between | space-around | space-evenly。调整主轴对齐
align-items: flex-start | flex-end | center | baseline | normal | stretch。调整交叉轴对齐
align-content: flex-start | flex-end | center | space-between | space-around | space-evenly | stretch。堆栈(由 flex-wrap 产生的独立行)多行垂直对齐方式
子元素 items
flex-grow: <非负数>,默认 0。设置 flex 项主轴尺寸的 flex 增长系数
flex-shrink: <非负数>,默认 1。指定了 flex 元素的收缩规则
flex-basis: auto | <宽度 px>。指定了 flex 元素在主轴方向上的初始大小
flex: 缩写:flex-grow | flex-shrink | flex-basis | none | auto
order: number。控制子项目的排列顺序,正序方式排序,从小到大
align-self: flex-start | flex-end | center | baseline | stretch | auto 。对齐当前元素,并覆盖已有的 align-items 的值
Flex 布局的模型
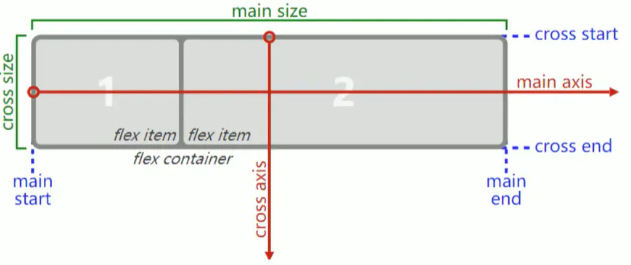
概念:
- main start / main end: 主轴开始 / 结束
- cross start / cross end: 交叉轴开始 / 结束
- main size/ cross size: 主轴 / 交叉轴尺寸
- flex container: flex 容器
- flex item: flex 元素
item 最终 size 的决定因素
优先级:从高到低
- 1、max-width / max-height / min-width / min-height
- 2、flex-basis
- 3、width / height
- 4、内容本身的 size
Flex 布局常见问题
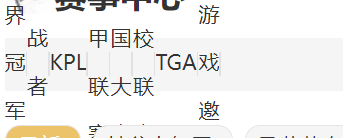
问题: Flex 布局中设置 justify-content 后最后一行不对齐,如图:
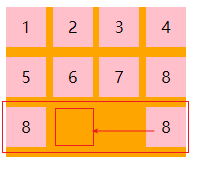
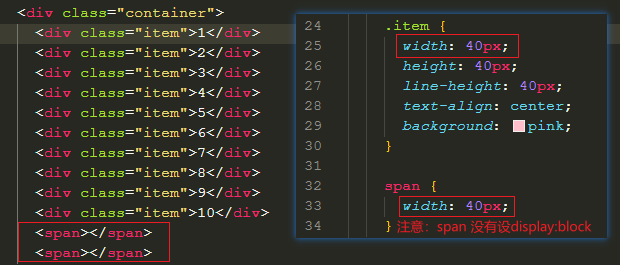
解决: 在 items 最后加上最少 列数 - 2 个 span,span 设置如下
Grid 布局
圣杯布局
####双飞翼布局
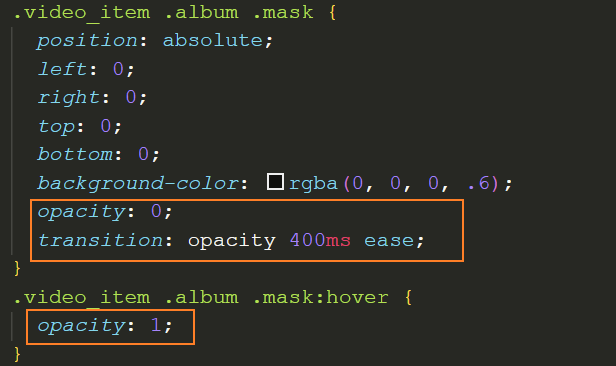
opacity 代替 display 实现动画
display: block不支持transition动画,可以使用opacity代替。当同时使用
opacity和display: block时,会受block影响,出现动画不起效果的情况
flex: 0 时文字挤在一起
图示:
分析:
flex: 0表示:flex-grow: 0; flex-basis: 0,出现文字挤在一起主要就是因为flex-basis: 0解决:
flex: 0 auto,表示:flex-grow: 0; flex-basis: auto图示:

段落(p)字体大小
段落(p)的字体大小最好设置为 font-size: 14px; line-height: 21px;
预设模块
在使用 pinia,node 这些语言时,总是需要不断的下载,导入第三方模块包,很是繁琐。
可不可以在设计之初就提供一个预设功能,让开发者自己将需要的模块事先添加到预设中,使用的时候就不需要再引入了
隐藏滚动条
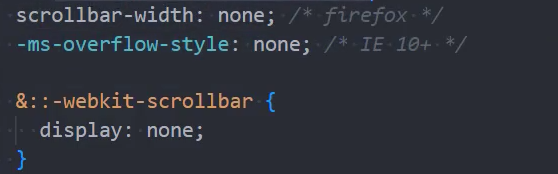
scrollbar-width: none; /* firefox */手写icon【】
HTML
meta 标签
| 属性 | 值 | 描述 | 示例 |
|---|---|---|---|
| charset | UTF-8 等 | 规定 HTML 文档的字符编码 | <meta charset="UTF-8"> |
| name | viewport | <meta name="viewport" content="width=device-width, initial-scale=1.0"> | |
| keywords | |||
| description | |||
| author | |||
| generator | |||
| application-name | |||
| http-equiv | content-type | ||
| refresh | |||
JS
offset、client、scroll
offset 系列
- 获取与当前元素最近的定位父级元素之间的距离
offsetLeft;
offsetTop;- 内容 + padding + border
offsetWidth;
offsetHeight;- 获取距离当前元素最近的定位父级元素
offsetParent;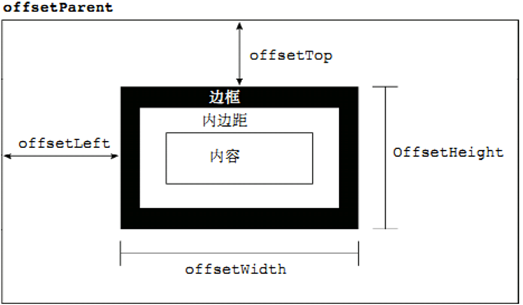
client 系列
- 当前元素 border 的宽度
clientLeft;
clientTop;- 内容 + padding
clientWidth;
clientHeight;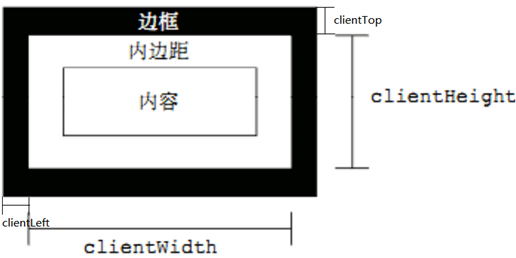
scroll 系列
- 盒子内容滚动出去的距离(包括边框)
scrollLeft;
scrollTop;- 整个内容的宽度和高度 可见内容 + 滚动出去的内容
scrollWidth;
scrollHeight;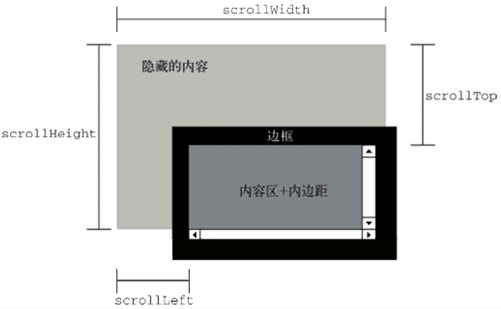
【】Reflect.construct 返回实例
问题: 通过Reflect.construct(Student, ['jack', 4], Person) 创建的实例对象为什么是父类 Person 的实例,而不是子类 Student 的实例?
/* 3. Reflect中的constructor */
class Person {
  constructor(name) {
    this.name = name;
  }
}

class Student extends Person {
  constructor(name, grade) {
    super(name);
    this.grade = grade;
  }
}
const stu =
  Reflect.construct(Student, ["jack", 4], Person) +
  console.log(stu) + // Person {name: 'tom', age: 20}
  console.log(stu instanceof Student) + // false
console.log(stu instanceof Person); // true【】总结判断数据类型的方法
typeof
判断各数据类型是否为false
布尔类型(Boolean):
false:明确表示假的布尔值。
空字符串(String):
'':长度为零的字符串被视为假。
数字类型(Number):
0:数字 0 被视为假。NaN(非数字值):特别注意,NaN是一个奇特的数值类型,它也被视为假。
null:
null:表示空值的关键字。
undefined:
undefined:表示未定义的变量或属性。
判断空数组
[]:js[].length // 0判断空对象
{}:jsObject.keys({}).length // 0
Element-Plus
修改input中placeholder样式
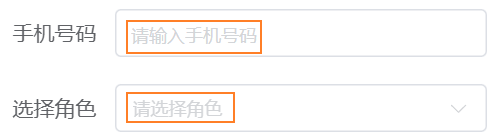
/* input中的placeholder */
.el-input__inner::placeholder,
.el-select__placeholder {
  font-size: 12px;
}Vue
设置用户片段
在 VSCode 中设置用户片段
- 1、模板
<template>
  <div class="${1:home}">${1:home}</div>
</template>

<script setup></script>

<style lang="less" scoped></style>- 2、将模板在 https://snippet-generator.app 网站上转化成 json 格式,设置 trigger:
vuesetup,和简介 - 3、在 VSCode - 文件 - 首选项 - 配置用户代码片段 - [输入 vue.json] - 复制转化后的模板到 vue.json 中
- 4、使用时输入:
vuesetup即可
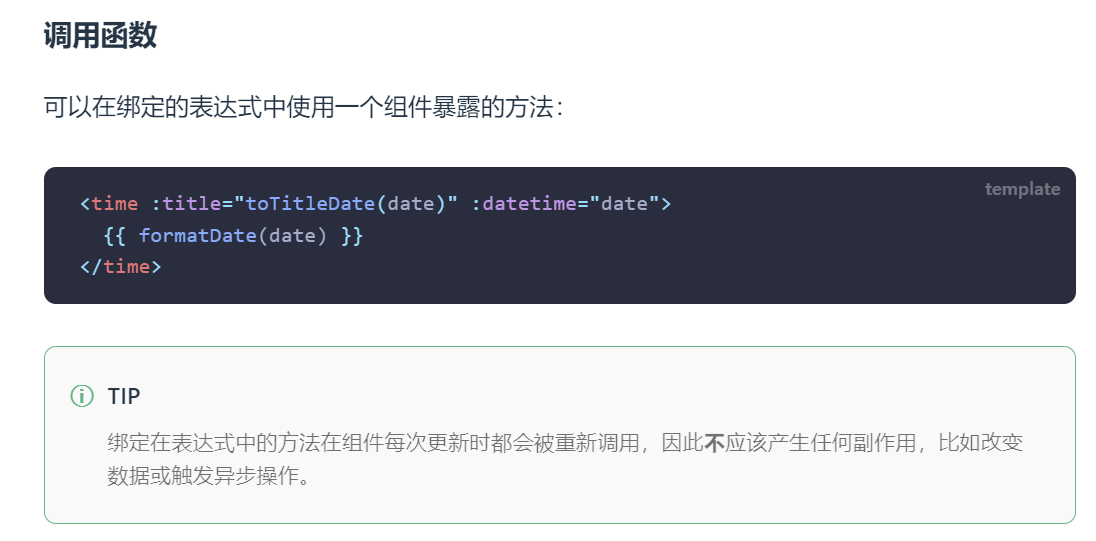
调用函数
疑惑: 不了解Vue文档这里的意思
指令
- 显示文本
- v-text:
返回:,更新元素的文本内容textContent。等同于 - v-html:
返回:,更新元素的innerHTML - v-pre:
返回:,所有 Vue 模板语法都会被保留并按原样渲染。如显示原始双大括号标签及内容。 - 是否显示、条件分支
- v-show:
返回:,基于表达式值的真假性,来改变元素的可见性。通过修改display属性值控制是否显示 - v-if:
返回:,基于表达式值的真假性,来条件性地渲染元素或者模板片段。 - v-else:
返回:,和v-if、v-else-if一起组成条件分支 - v-else-if:
返回:,和v-if、v-else一起组成条件分支 - 循环判断
- v-for:
返回:,基于原始数据多次渲染元素或模板块。 - 绑定
- v-bind:
返回:,动态的绑定一个或多个 attribute,也可以是组件的 prop。缩写:: - v-on:
返回:,给元素绑定事件监听器。缩写:@ - v-model:
返回:,在表单输入元素或组件上创建双向绑定。 - 插槽
- v-slot:
返回:,用于声明具名插槽或是期望接收 props 的作用域插槽。缩写:# - :
返回:,
示例:
    <a v-bind:href="url"> ... </a>
	<a v-on:click="doSomething"> ... </a>

指令: v-bind
参数: href, click
参数值: url, doSomethingReact
模板命令
基本方法
imn→	import 'module'

imp→	import moduleName from 'module'
imd→	import { destructuredModule } from 'module'

exp→	export default moduleName
exd→	export { destructuredModule } from 'module'

dob→	const {propName} = objectToDescruct
dar→	const [propName] = arrayToDescruct

cp→		const { } = this.props
cs→ const { } = this.stateReact片段
1、类组件
rpce
import React, { PureComponent } from 'react'
import PropTypes from 'prop-types'

export class FileName extends PureComponent {
  static propTypes = {}

  render() {
    return <div>$2</div>
  }
}

export default FileNamerce
import React, { Component } from 'react'

export class FileName extends Component {
  render() {
    return <div>$2</div>
  }
}

export default $12、函数组件
rmc
import React, { memo } from 'react'

export default memo(function $1() {
  return <div>$0</div>
})rfce
import React from 'react'

function $1() {
  return <div>$0</div>
}

export default $1rfcp
import React from 'react'
import PropTypes from 'prop-types'

function $1(props) {
  return <div>$0</div>
}

$1.propTypes = {}

export default $1全部命令:https://github.com/ults-io/vscode-react-javascript-snippets/blob/HEAD/docs/Snippets.md
Git
GitHub 常用快捷键
.:个人登录令牌:
ghp_xxx
#
git remote set-url origin
https://ghp_xxx@github.com/PikachuTT/note-web-common.git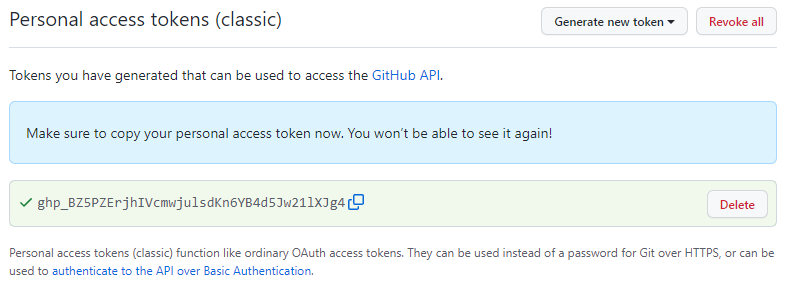
Git 提交时提示 Permission denied
git commit 提交时错误:
$ git commit -m "mr-music - 播放 - 背景、导航栏(完成)"
fatal: could not open '.git/COMMIT_EDITMSG': Permission denied原因:可能某些时候修改了隐藏文件而不再具有对隐藏文件的写入权限
解决:进入.git 文件(隐藏文件)删除“COMMIT_EDITMSG”文件即可
VSCode
Git 提交时 CRLF 冲突
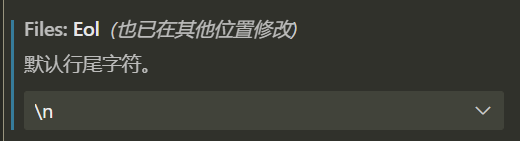
解决:
在 【文件 - 首选项 - 设置 - 搜索 eol】修改 eol 为 \n(LF)
分析:
git 在维护版本库的时候统一使用的是 LF,这样就可以保证文件跨平台的时候保持一致。
在 Linux 下默认的换行符也是 LF,那也就不存在什么问题。
在 Windows 下默认的换行符是 CRLF,那么我们需要保证在文件提交到版本库的时候文件的换行符是 LF
如果你同事中有使用其它系统开发的
你需要先执行上面的操作,再行 以下代码才能解决
git config --global core.autocrlf truetake over
在vscode 的插件中搜索:@builtin typescript,禁用该内置插件
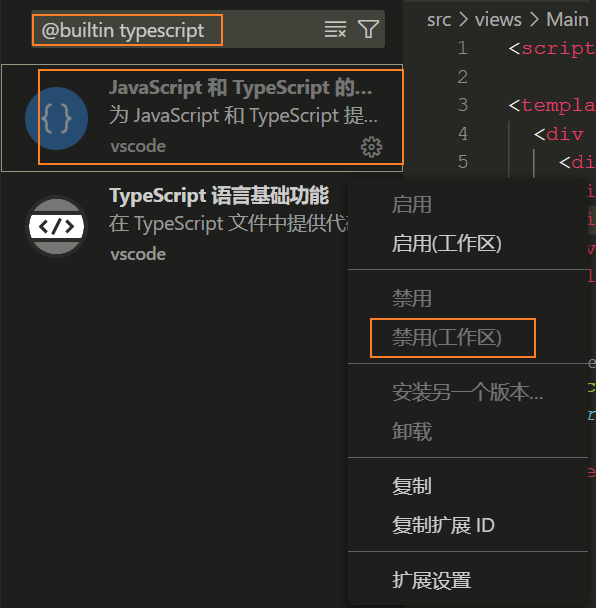
注意: Vue - Official@2.0.8版本已经解决了之前升级为2.x版本时的BUG,无需再使用take over模式了
md
当前可以用作typora高亮的HTML标签有:<q>、<b>。
<del>标签在typora中会使用到,但是在cnblogs中使用的是<s>
webpack【】
115
解决高版本 115 无法重命名问题
高版本: 115br_v8.6.3.5 以上
解决:
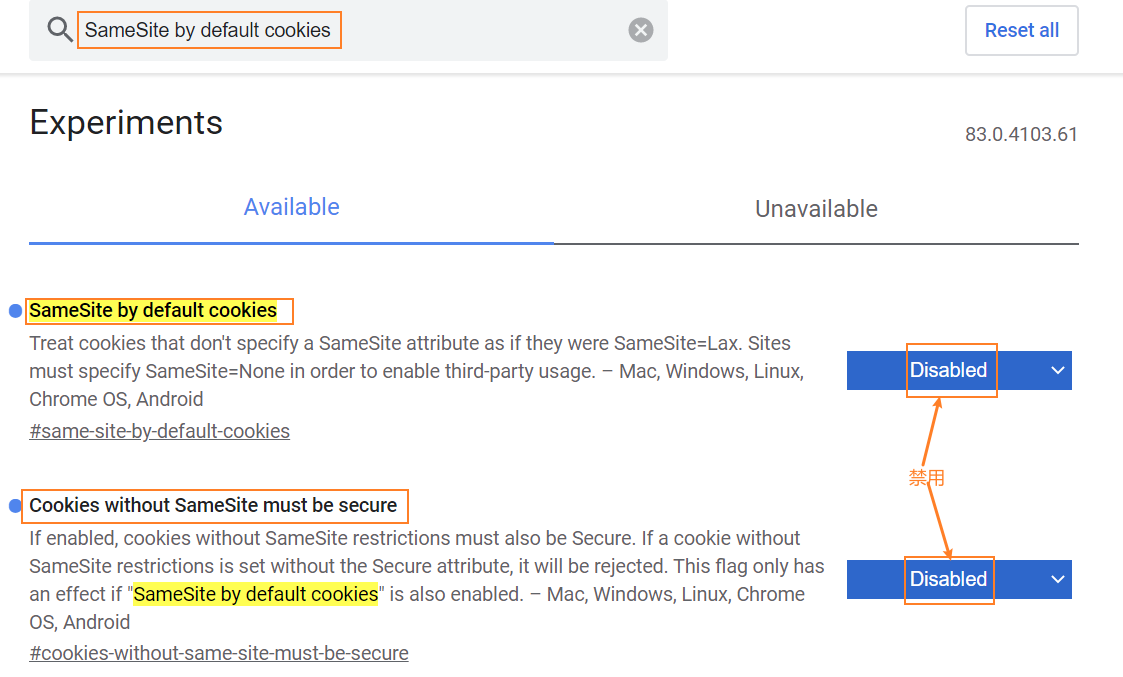
91版本以下:
- 1、打开 chrome://flags/
- 2、搜索
SameSite by default cookies和Cookies without SameSite must be secure - 3、将二者的选项 由 Default 改为 Disabled
- 4、重启浏览器
- 5、注意: 据说从 91 版本开始,此方式失效,未进行测试
- 6、参考地址:
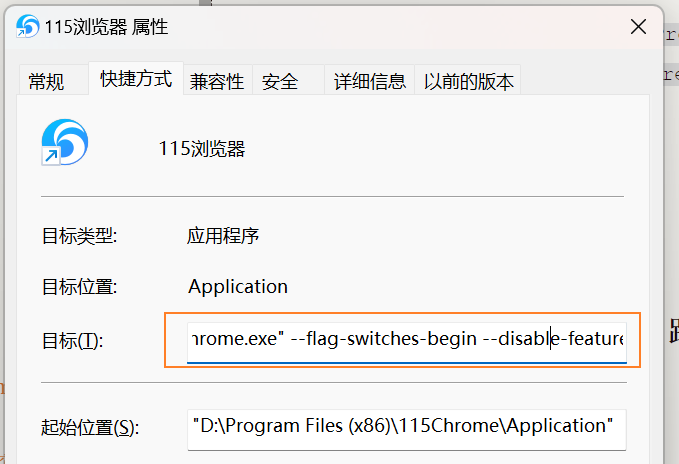
91到94版本:
打开Chrome的快捷方式的属性,在目标后添加:
--flag-switches-begin --disable-features=SameSiteByDefaultCookies,CookiesWithoutSameSiteMustBeSecure --flag-switches-end
或者:
--disable-features=SameSiteByDefaultCookies
94版本以后:
2021年9月,已经彻底移除可视化禁用和命令行禁用的方式,详见官方的SameSite Updates。
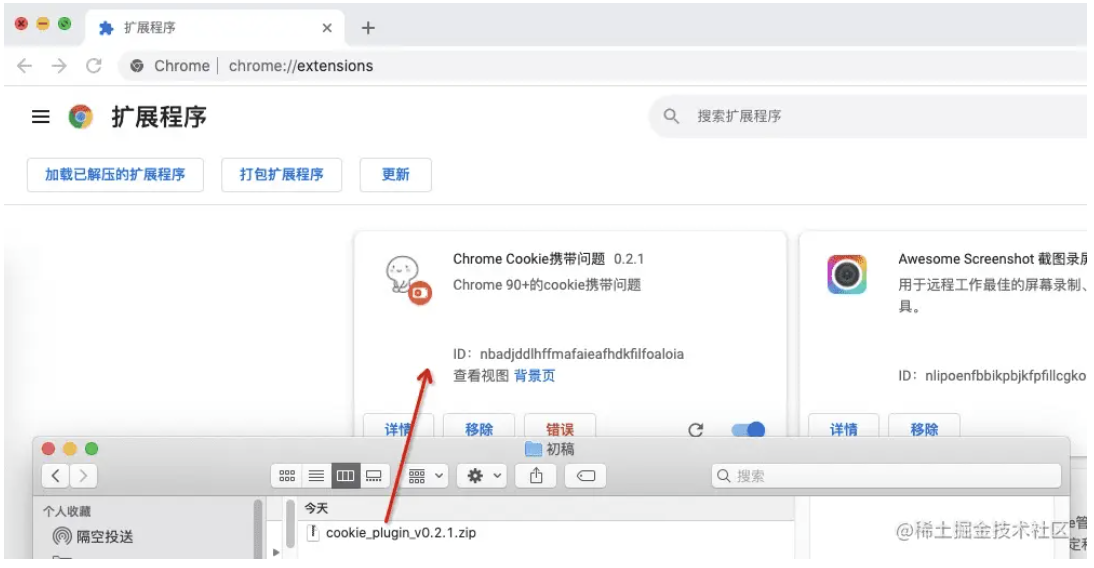
但是Chrome浏览器插件不受跨站跨域的限制,所以对于本地调试的场景,可以通过安装相关cookie透传的插件来解决。
如果需要解决所有用户的这个问题,则需要使用正规的方式解决:前后端地址不跨站,或者使用https+SameSite=None
安装方式
- 打开扩展程序chrome://extensions/
- 将下载的zip插件拖拽进去
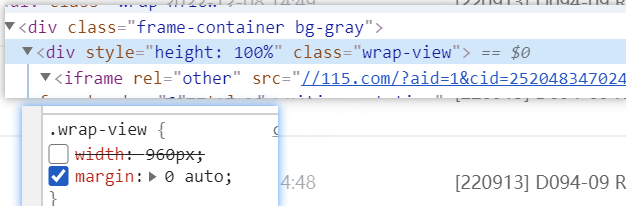
搜索页面宽度修改【】
跨域
React项目跨域问题
~~描述:~~在React项目中,当请求的API在其他服务器上时,会出现跨域错误:
Access to XMLHttpRequest at 'http://codercba.com:9002/song/detail?ids=408332757' from origin 'http://localhost:3000' has been blocked by CORS policy: The 'Access-Control-Allow-Origin' header has a value 'http://localhost:5173' that is not equal to the supplied origin.解决方案一: 在webpack配置文件或craco.config.js中添加代理配置
  webpack: {
    ...
    // 解决跨域问题
    devServer: {
      proxy: {
        '/api': {
          target: 'http://codercba.com:9002', // 实际API资源存储地址
          changeOrigin: true, // 改变代理时主机头的来源
          pathRewrite: {
            '^/api': '' // 改回请求url前的/api前缀
          }
        }
      }
    }
}解决方案二: 在项目根目录添加setupProxy.js文件,并配置代理
const proxy = require('http-proxy-middleware')
const proxy = require('http-proxy-middleware')
module.exports = function(app){
    app.use(
        proxy('/api1',{
            target:'http://codercba.com:9002',
            changeOrigin:true,
            pathRewrite:{'/api1':''}
        }),
        proxy('/api2',{
            target:'http://codercba.com:5000',
            changeOrigin:true,
            pathRewrite:{'/api2':''}
        })
    )
}解决方案三: 安装Chrome插件Allow CORS: Access-Control-Allow-Origin
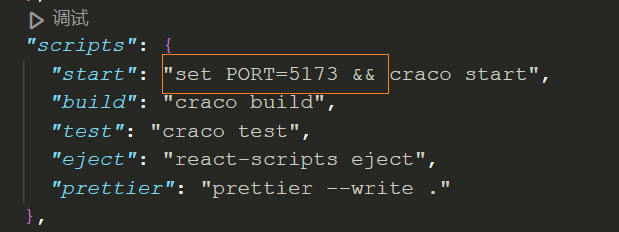
解决方案四: 修改React项目的端口为5173【无效】
手写
手写 call,aplly,bind
函数对象原型关系
函数 foo 对象的隐式原型 === Function 的显式原型
// 函数foo对象的隐式原型 === Function的显式原型
console.log(foo.__proto__ === Function.prototype); // true

console.log(Function.prototype.apply); // f apply()
console.log(Function.prototype.call); // f call()
console.log(Function.prototype.bind); // f bind()
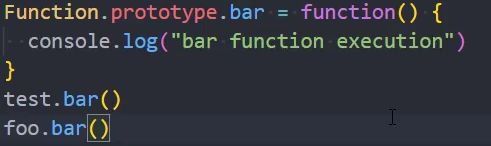
console.log(Function.prototype.apply === foo.apply); // true结论:
- foo 对象中的某些属性和方法是来自 Function.prototype 的
- 在 Function.prototype 中添加的属性和方法,可以被所有的函数获取


在 Function 的原型中添加方法 bar
手写 apply 方法
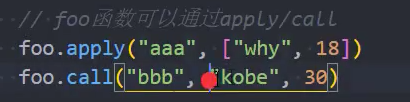
给函数对象添加方法
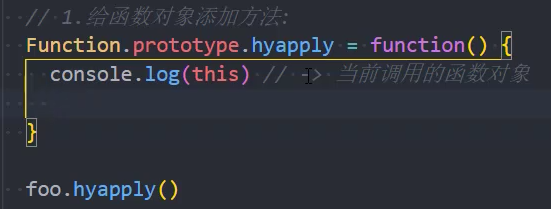
function foo() {
  console.log("foo", this);
}

Function.prototype.mrapply = function (mrthis) {
  // 相当于 mrthis.fn = this
  Object.defineProperty(mrthis, "fn", {
    configurable: true,
    value: this,
  });
  // 隐式调用fn,可以让fn函数的this指向 mrthis
  mrthis.fn();
  // 删除多出来的临时函数fn
  delete mrthis.fn;
};

foo.mrapply({ name: "Tom" });如果传入的参数是一个 String 或者 Number 的类型,需要将其包裹成对象类型,才能在它上面添加属性


调用 mrapply 时,传递参数

    function foo (age, height) {
      console.log('foo', this, age, height)
    }

+    Function.prototype.mrapply = function(mrthis, args) {
      // 当this不是对象时,需要用Object包裹
      mrthis = (mrthis === null || mrthis === undefined) ? window : Object(mrthis)

      // 相当于 mrthis.fn = this
      Object.defineProperty(mrthis, 'fn', {
        configurable: true,
        value: this
      })

      // 隐式调用fn,可以让fn函数的this指向 mrthis
+      mrthis.fn(...args)

      // 删除多出来的临时函数fn
      delete mrthis.fn
    }

+    foo.mrapply({name: "Tom"}, [18, 1.88])
    foo.mrapply(null, [18, 1.88])
    foo.mrapply(undefined, [18, 1.88])
    foo.mrapply(true, [18, 1.88])
    foo.mrapply(123, [18, 1.88])
foo.mrapply('aaaa', [18, 1.88])手写 call 方法
    function foo(age, height) {
      console.log('foo', this, age, height)
    }

+    Function.prototype.mrcall = function(mrthis, ...args) {
      mrthis = (mrthis === null || mrthis === undefined) ? window : Object(mrthis)

      Object.defineProperty(mrthis, 'fn', {
        configurable: true,
        value: this
      })

+      mrthis.fn(...args)

      delete mrthis.fn
    }

+ foo.mrcall({ name: "张飞" }, 20, 1.77)抽取封装公共函数
    /* 抽取封装的函数 */
+    Function.prototype.mrexec = function(mrthis, args) {
      mrthis = (mrthis === null || mrthis === undefined) ? window : Object(mrthis)
      // mrthis.fn = this
      Object.defineProperty(mrthis, 'fn', {
        configurable: true,
        value: this
      })
      mrthis.fn(...args)
      delete mrthis.fn
    }

    /* 手写apply */
    Function.prototype.mrapply = function(mrthis, args) {
      this.mrexec(mrthis, args)
    }

    /* 手写call */
    Function.prototype.mrcall = function(mrthis, ...args) {
      this.mrexec(mrthis, args)
    }

    // 测试
    function foo(age, height) {
      console.log('foo', this, age, height)
    }
    foo.mrapply({name: "Tom"}, [19, 1.66])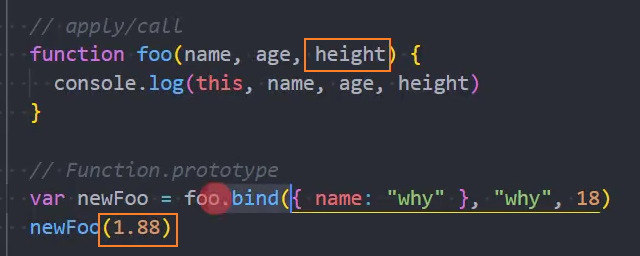
foo.mrcall({name: "Jack"}, 22, 1.99)手写 bind 方法
和 apply, call 不同,bind 执行后是返回一个新的函数 newFoo
基础实现
思路:想办法实现如下:
// 伪代码
{ name: "why" }.foo(name, age) /* 手写bind */
Function.prototype.mrbind = function(mrthis, ...args) {
+ return (...moreArgs) => {
mrthis = (mrthis === null || mrthis === undefined) ? window : Object(mrthis)
Object.defineProperty(mrthis, 'fn', {
configurable: true,
value: this
})
+ const allArgs = [...args, ...moreArgs]
+ mrthis.fn(...allArgs)
+ delete mrthis.fn // 可以删除fn,因为每次调用newFoo,都会重新生成一个mrthis.fn
}
}
// 测试
function foo(name, age, height, address) {
console.log('foo', this, name, age, height, address)
}
const newFoo = foo.mrbind({name: "Jerry"}, '张飞', 45)
console.log(newFoo)
+ newFoo(1.88, '成都')
+ newFoo(1.88, '成都')浅拷贝,深拷贝
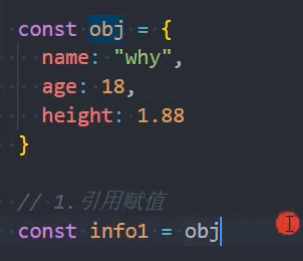
引用赋值
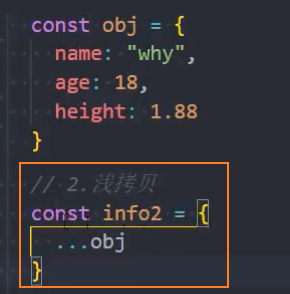
浅拷贝
方式:
- 解构赋值:
const info = {...obj}
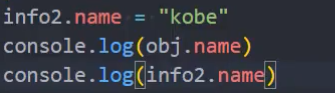
浅拷贝修改 info2.name 后,obj 的 name 依然是"why",被修改的只是 info2
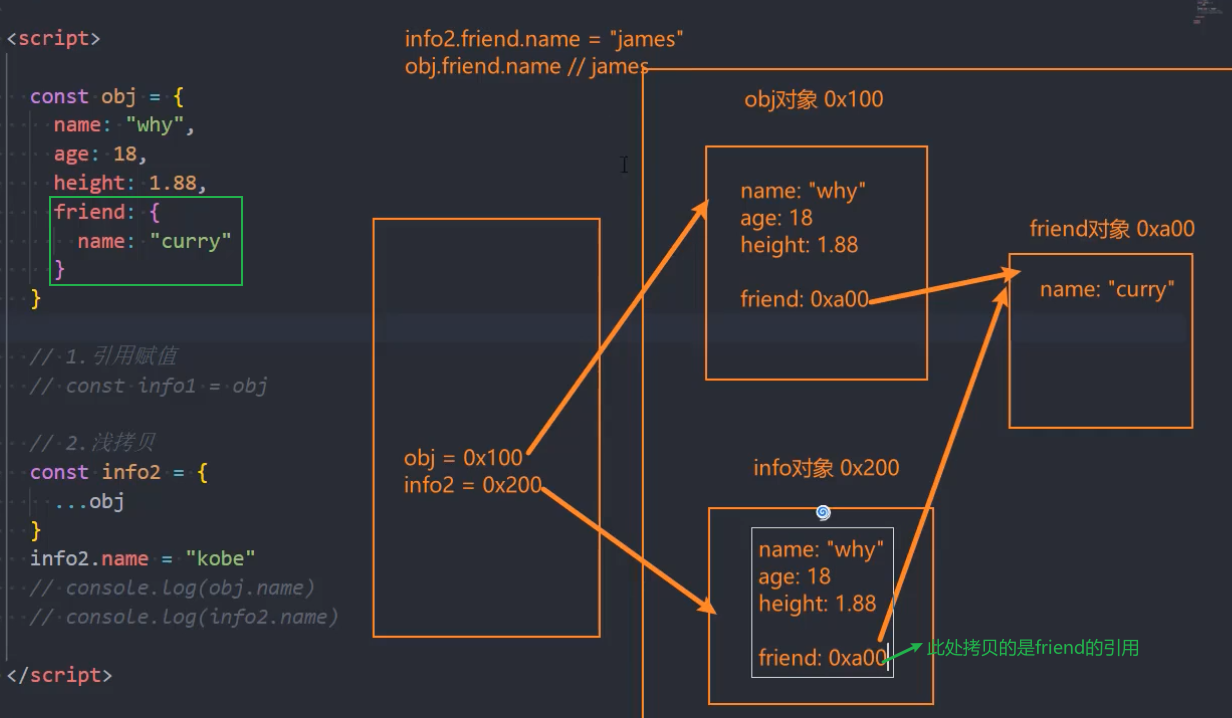
浅拷贝的内存图

如果 obj 对象中有**其他对象(或数组)**时的内存图
深拷贝
方式:
- 1、借助第三方库:
underscore - 2、利用现有 JS 机制:
JSON - 3、自己实现:
2、利用现有 JS 机制:JSON
语法:
const info3 = JSON.parse(JSON.stringify(obj));缺点: 该方法不能实现方法的深拷贝,会忽略 obj 对象中的方法
    const obj = {
      name: 'Tom',
      age: 18,
      friend: {
        name: 'Jack'
      },
      run: function() {
        console.log(this.name + '在跑步~');
      }
    }

    // 利用JSON机制实现深拷贝
+    const info = JSON.parse(JSON.stringify(obj))

    // 测试
    console.log(info)
 	// 修改info的深度属性,obj的深度属性保持不变
+    info.friend.name = '张飞'
+    console.log('obj', obj.friend.name); // obj Jack
+    console.log('info', info.friend.name); // obj 张飞

	// 不能实现方法的深拷贝,会忽略obj对象中的方法
+ info.run() // ncaught TypeError: info.run is not a functionPromise【】
任务: 手写Promise
轮播图【】
任务: 分别使用JS原生、Vue、React手写一个轮播图
猴油
使用插件
jquery
1、通过@require 引入jquery插件的CDN地址
// @require https://cdn.bootcdn.net/ajax/libs/jquery/3.7.1/jquery.min.js2、在代码区添加/* globals jQuery, $, waitForKeyElements */
否则会报以下错误:

3、完整代码:
// ==UserScript==
// @name         New Userscript
// @namespace    http://tampermonkey.net/
// @version      2024-04-17
// @description  try to take over the world!
// @author       You
// @match        https://www.ysjsxcs.com/histsory
// @icon         https://www.google.com/s2/favicons?sz=64&domain=ysjsxcs.com

+ // @require      https://cdn.bootcdn.net/ajax/libs/jquery/3.7.1/jquery.min.js

// @grant        none
// ==/UserScript==

// 在页面加载完成后执行代码
(function() {
+ /* globals jQuery, $, waitForKeyElements */

// 在页面加载完成后执行代码
$(document).ready(function() {
    // 使用 jQuery 选择器选择元素,并添加点击事件
    $('#showbook').click(function() {
        // 弹出消息框
        alert('Button clicked!');
    });
});

})()axios
1、通过@require 引入axios插件的CDN地址
// @require https://cdn.bootcdn.net/ajax/libs/axios/1.5.0/axios.min.js2、在代码区添加/* globals axios */
否则会报以下错误:
3、代码:
  /* 请求bannedActress */
  getBannedActress()
  function getBannedActress() {
    axios.get('http://120.26.226.124:8000/moment/26').then((res) => {
      console.log(res)
    })
}问题: 上面的代码报了以下的错误:
userscript.html?name=98%25E5%25A0%2582.user.js&id=b8080489-58aa-4fe3-8893-a06cad3b8401:2 Mixed Content: The page at 'https://wk8v3.app/forum-37-369.html' was loaded over HTTPS, but requested an insecure XMLHttpRequest endpoint 'http://120.26.226.124:8000/moment/26'. This request has been blocked; the content must be served over HTTPS.这是由于访问的API地址,不是https协议。需要升级为https协议
免费图床
TIP
技术栈:
- github + jsdelivr + picgo + typora
- 七牛云 + picgo + typora
github + jsdelivr + picgo + typora
注意:
- github图床仓库内容不能超过1GB,因为github原则上是反对仓库图床化的,超过1GB之后会由人工审核仓库内容,如果仓库被发现用来做图床,轻则删库重则封号
- jsdelivr加速的单文件大小为50MB,这就限制了单张图片大小上限
github
1、首先创建一个图床仓库(image)用来放图片,名称随意。
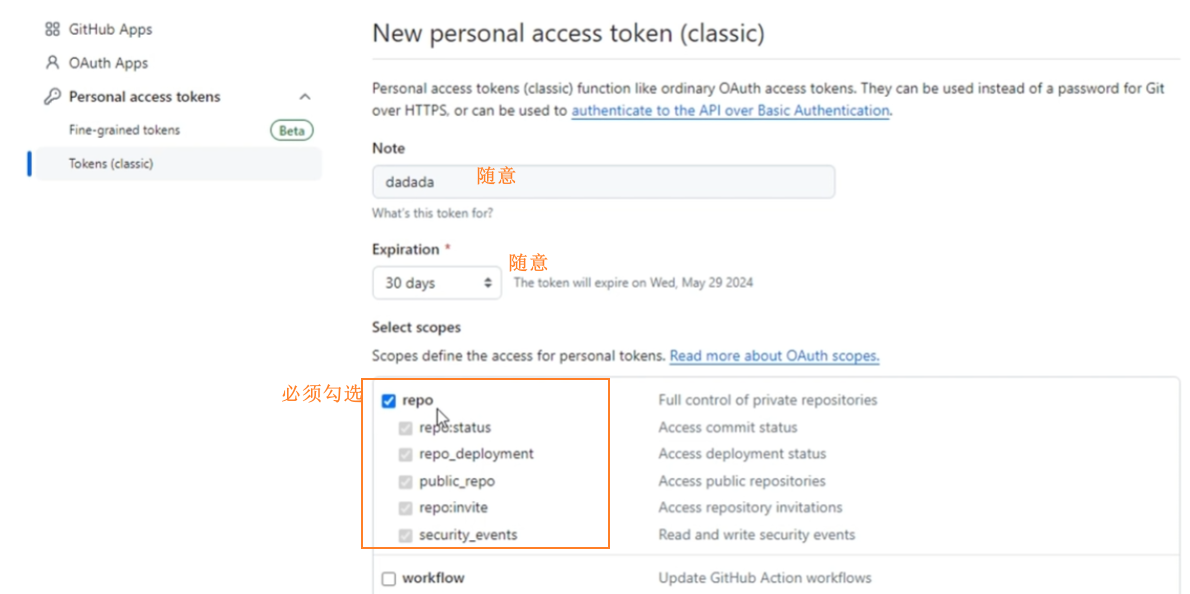
2、访问Github->头像(右上角)->Settings->Developer Settings->Personal access tokens->generate new token,创建的Token名称随意,但必须勾选repo项。
注意: Token只会显示一次,必须记牢,如果忘了就只能重新配置
picgo
1、安装picgo:https://github.com/Molunerfinn/PicGo
2、设置picgo:
设置github图床
注意: jsdelivr的地址格式为:
https://cdn.jsdelivr.net/gh/【github号】/image@main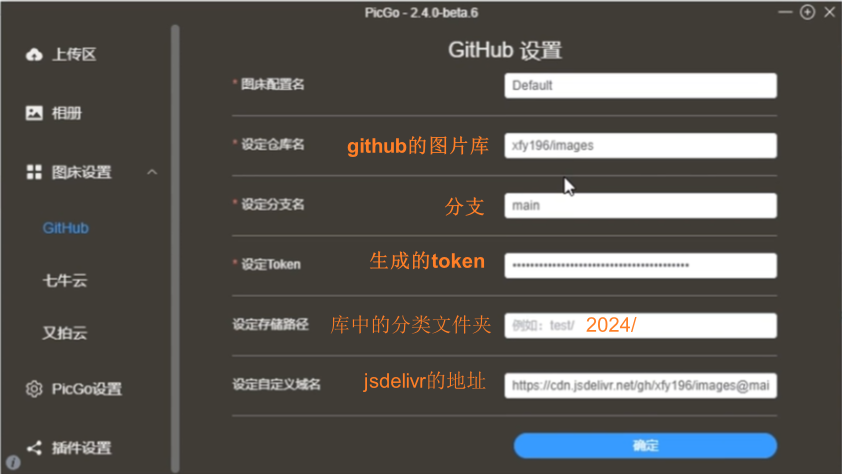
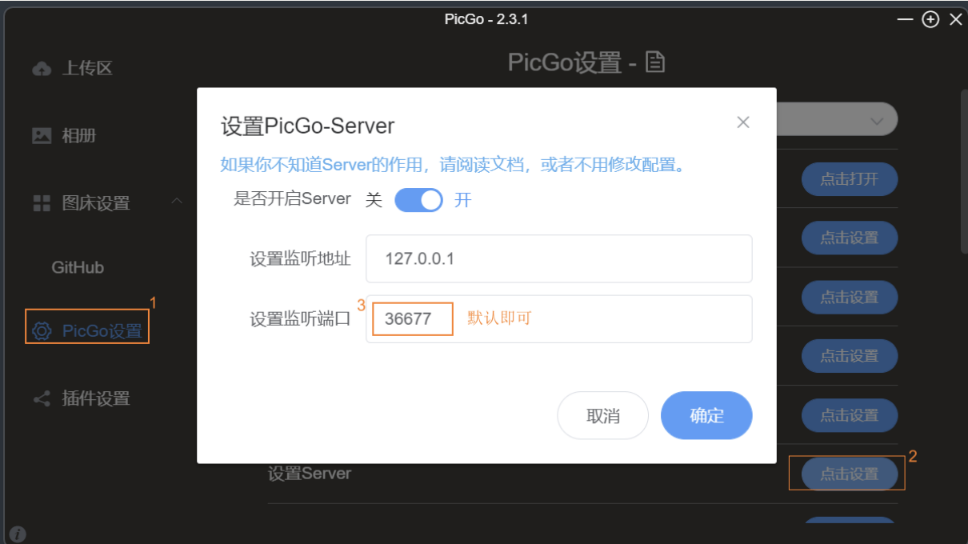
设置server端口(默认36677即可)
只选中github

typora
1、选择文件 - 偏好设置 -图像,设置picgo为贴图时的默认插件

2、设置完毕
七牛云 + picgo + typora
七牛云
TIP
七牛云会给实名注册用户分配每个月10G的免费空间
1、注册和实名认证(略)
2、新建图床空间:
对象存储 Kodo -> 空间管理 -> 新建空间
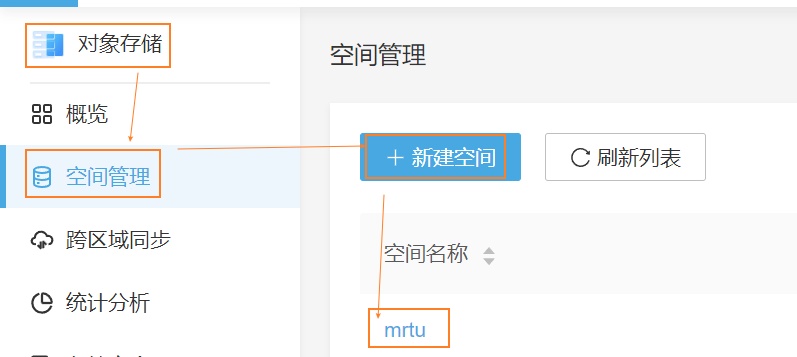
新建空间选项:
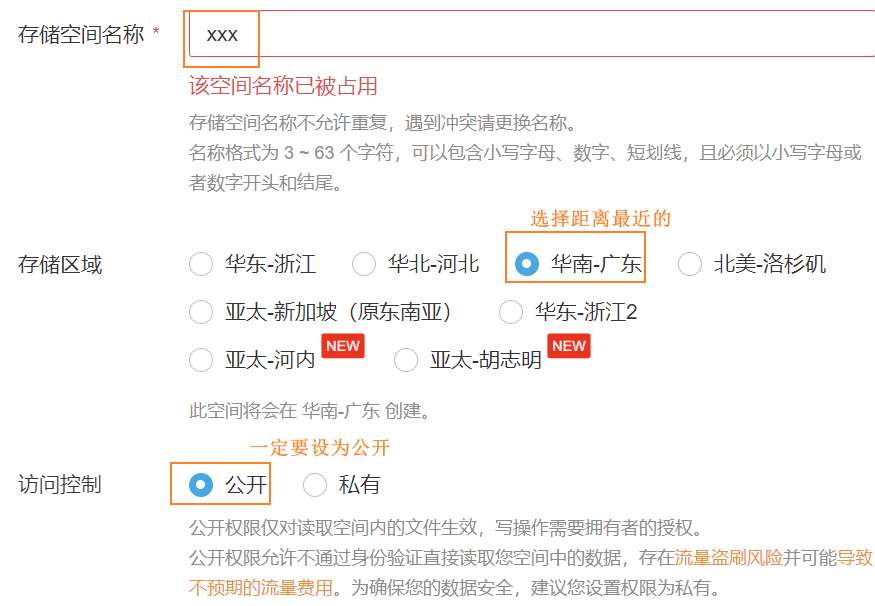
3、绑定域名
注意: 新建空间成功后会提供一个临时的域名(30天),所以一定要配置一个自己的域名(需要备案)
HTTP / HTTPS费用:https://www.qiniu.com/prices/qcdn

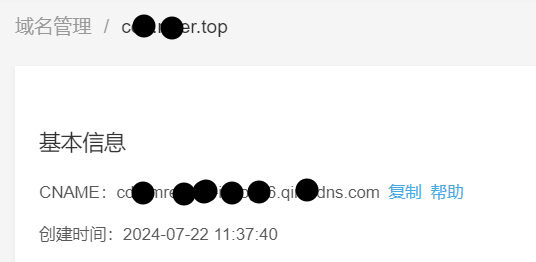
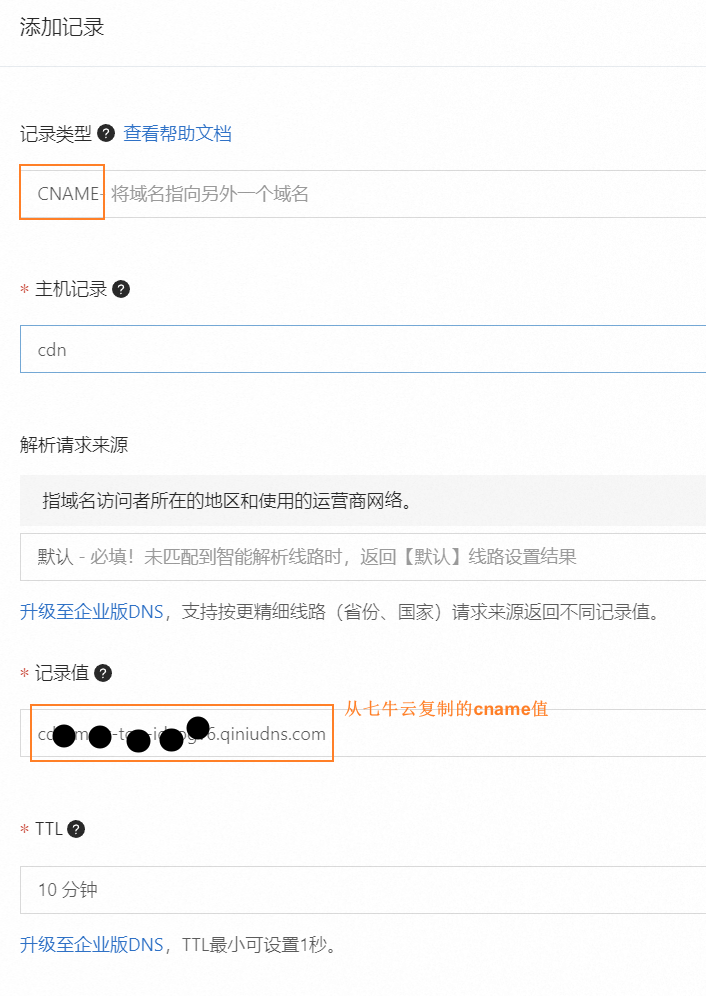
4、解析域名,配置CNAME
在七牛云赋值绑定域名的CNAME
去阿里云(域名厂商)解析绑定的域名,并添加CNAME
5、配置成功
picgo
1、安装picgo: https://github.com/Molunerfinn/PicGo
2、设置picgo:
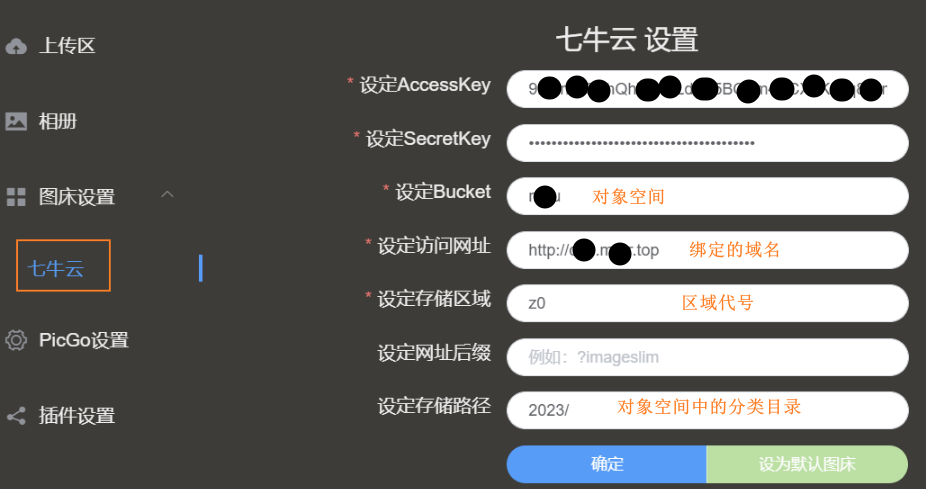
设置七牛云图床
- AccessKey/SecretKey:在
头像 -> 密钥管理中 - 存储区域:在 picgo文档 中可以查看存储区域代号
z0对应的存储区域
设置server端口(默认36677即可)
typora
见:typora