Z03 服务器部署
[TOC]
个人服务器
信息
阿里云
IP 地址: 120.26.226.124
管理中心: https://ecs.console.aliyun.com/server/i-bp17uisr9ib2554gf1ib/detail?regionId=cn-hangzhou
实例配置: CPU_2 核 内存_2GB
系统盘: 40GB
带宽: 3M
到期时间: 2026-03-25 23:59:59
续费价格: 99 元 / 年
百度云【过期】
IP 地址: 180.76.178.61
管理中心: https://console.bce.baidu.com/ls/#/ls/instance/detail?instanceId=i-NGhdILhy
实例配置: CPU_1 核 内存_2GB
系统盘: 60GB
到期时间: 2024-03-30 21:09:19
续费价格:
- 当前时间:2023-11-18
- 80 / 月
- 796.8 / 年(83 折)
连接服务器
在控制台输入以下命令:
ssh root@120.26.226.124配置
nginx 配置
更新时间:2024-7-22

更新时间:2023-11-18
# For more information on configuration, see:
# * Official English Documentation: http://nginx.org/en/docs/
# * Official Russian Documentation: http://nginx.org/ru/docs/
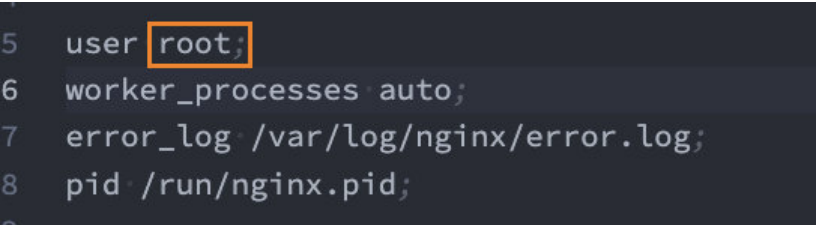
# user nginx;
user root;
worker_processes auto;
error_log /var/log/nginx/error.log;
pid /run/nginx.pid;
# Load dynamic modules. See /usr/share/doc/nginx/README.dynamic.
include /usr/share/nginx/modules/*.conf;
events {
worker_connections 1024;
}
http {
log_format main '$remote_addr - $remote_user [$time_local] "$request" '
'$status $body_bytes_sent "$http_referer" '
'"$http_user_agent" "$http_x_forwarded_for"';
access_log /var/log/nginx/access.log main;
sendfile on;
tcp_nopush on;
tcp_nodelay on;
keepalive_timeout 65;
types_hash_max_size 2048;
include /etc/nginx/mime.types;
default_type application/octet-stream;
# Load modular configuration files from the /etc/nginx/conf.d directory.
# See http://nginx.org/en/docs/ngx_core_module.html#include
# for more information.
include /etc/nginx/conf.d/*.conf;
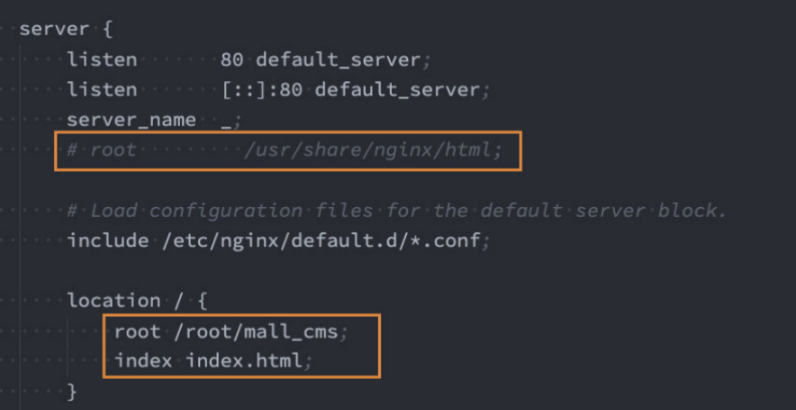
server {
listen 80 default_server;
listen [::]:80 default_server;
server_name _;
# root /usr/share/nginx/html;
# Load configuration files for the default server block.
include /etc/nginx/default.d/*.conf;
location / {
# 配置 nginx的跨域问题 CORS
add_header Access-Control-Allow-Origin *;
if ($request_method = 'OPTIONS') {
return 204;
}
root /root/mr-vue3-ts-cms-v1;
index index.html;
}
location /trip {
# 配置 nginx的跨域问题 CORS
add_header Access-Control-Allow-Origin *;
if ($request_method = 'OPTIONS') {
return 204;
}
alias /root/mr-trip;
index index.html;
}
location /trip2 {
# 配置 nginx的跨域问题 CORS
add_header Access-Control-Allow-Origin *;
if ($request_method = 'OPTIONS') {
return 204;
}
alias /root/mr-trip2;
index index.html;
}
location /airbnb {
# 配置 nginx的跨域问题 CORS
add_header Access-Control-Allow-Origin *;
if ($request_method = 'OPTIONS') {
return 204;
}
alias /root/mr-airbnb;
index index.html;
}
location /cms {
# 配置 nginx的跨域问题 CORS
add_header Access-Control-Allow-Origin *;
if ($request_method = 'OPTIONS') {
return 204;
}
alias /root/mr-vue3-ts-cms;
index index.html;
}
location /hy-cms {
# 配置 nginx的跨域问题 CORS
add_header Access-Control-Allow-Origin *;
if ($request_method = 'OPTIONS') {
return 204;
}
alias /root/hy-vue3-ts-cms;
index index.html;
}
error_page 404 /404.html;
location = /40x.html {
}
error_page 500 502 503 504 /50x.html;
location = /50x.html {
}
}
# Settings for a TLS enabled server.
#
# server {
# listen 443 ssl http2 default_server;
# listen [::]:443 ssl http2 default_server;
# server_name _;
# root /usr/share/nginx/html;
#
# ssl_certificate "/etc/pki/nginx/server.crt";
# ssl_certificate_key "/etc/pki/nginx/private/server.key";
# ssl_session_cache shared:SSL:1m;
# ssl_session_timeout 10m;
# ssl_ciphers PROFILE=SYSTEM;
# ssl_prefer_server_ciphers on;
#
# # Load configuration files for the default server block.
# include /etc/nginx/default.d/*.conf;
#
# location / {
# }
#
# error_page 404 /404.html;
# location = /40x.html {
# }
#
# error_page 500 502 503 504 /50x.html;
# location = /50x.html {
# }
# }
}优化
swap
开启 swap
简介: swap 交换空间实际上是一个磁盘分区,在安装操作系统时,默认划分出物理内存的 1~2 倍空间用于交换分区,它类似于 Windows 的虚拟内存。系统会把一部分硬盘空间虚拟成内存使用,将系统内非活动内存换页到 SWAP,以提高系统可用内存。
阿里云 ECS 服务器的 swap 功能默认时没有开启的,因为 swap 功能会增加磁盘 IO 的占用率,降低磁盘寿命和性能,另一方面也可以借此让用户购买更大的内存。启用 swap 分区,一定程度上可以降低物理内存的使用压力,但如果云服务器上运行的应用确实需要更多的内存,还是需要购买物理内存。
启用 swap 分区步骤如下:
1、查看是否启用 swap 分区
free -m
cat /proc/swaps
2、如果未启用 swap 分区功能,则新建一个专门的文件用于 swap 分区
dd if=/dev/zero of=/mnt/swap bs=block_size count=number_of_block注:block_size、number_of_block 大小可以自定义,比如 bs=1M count=1024 代表设置 1G 大小 SWAP 分区

3、设置交换分区文件
通过 mkswap 命令将上面新建出的文件做成 swap 分区
mkswap /mnt/swap注:mkswap 时如果出现如下错误,是因为 SWAP 文件太小,SWAP 文件至少应该大于 40KB,重新执行上一步骤生成更大的文件即可
mkswap: error: swap area needs to be at least 40 KiB

4、修改内核参数 /proc/sys/vm/swappiness
当 swappiness 为 0 时,表示最大限度的使用物理内存,物理内存使用完毕后,才会使用 SWAP 分区;
当 swappiness 为 100 时,表示积极地使用 SWAP 分区,并且把内存中的数据及时地置换到 SWAP 分区。
根据实际需要设置该值即可,如下述方法临时修改此参数,假设我们配置为空闲内存少于 30% 时才使用 SWAP 分区
echo 30 >/proc/sys/vm/swappiness若需要永久修改此配置,在系统重启之后也生效,可修改 /etc/sysctl.conf 文件,增加以下内容
# vim /etc/sysctl.conf

vm.swappiness=30
# sysctl -p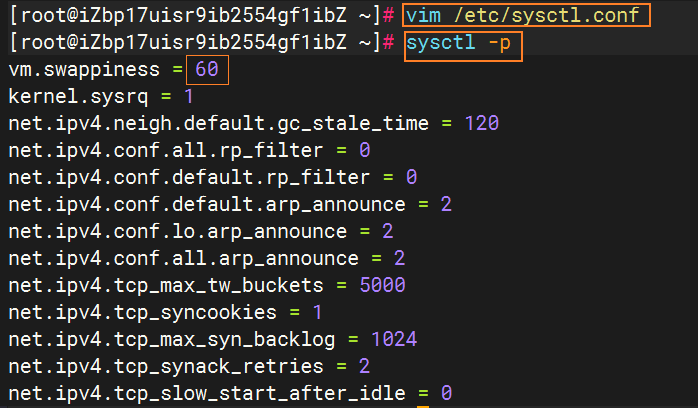
5、启用此交换分区的交换功能
swapon /mnt/swap注:如果在 /etc/rc.local 中有 swapoff -a 需要修改为 swapon -a
6、设置开机时自启用 SWAP 分区
修改文件 /etc/fstab 中的 SWAP 行,添加一行/mnt/swap swap swap defaults 0 0
echo "/mnt/swap swap swap defaults 0 0" >> /etc/fstab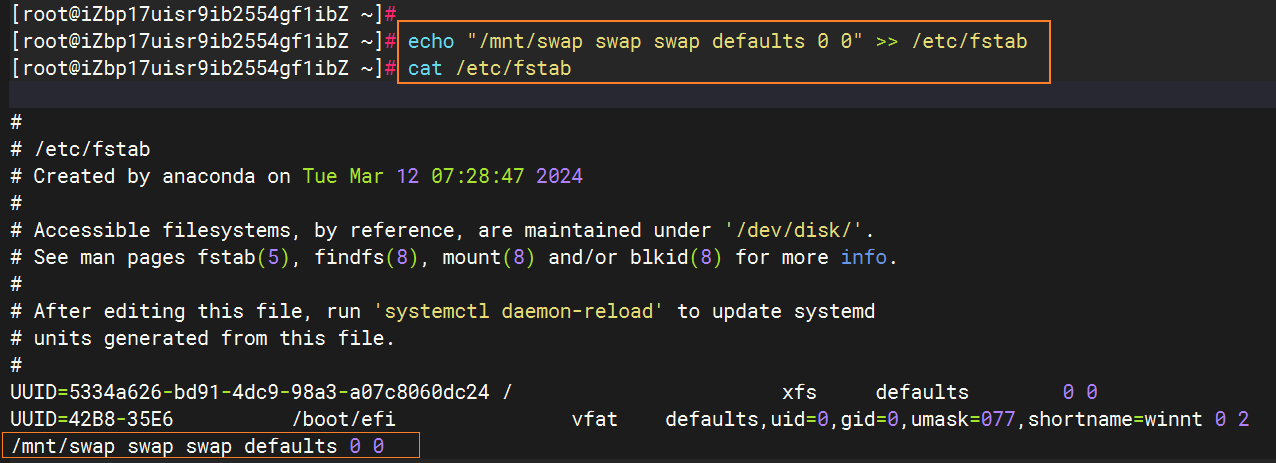
7、检查是否设置成功
cat /proc/swaps

free -m
8、关闭 swap 分区
当系统出现内存不足时,开启 SWAP 可能会因频繁换页操作,导致 IO 性能下降。如果要关闭 SWAP,可以采用如下方法。
使用命令 swapoff 关闭 SWAP
修改 /etc/fstab 文件,删除或注释相关配置,取消 SWAP 的自动挂载#swapoff /mnt/swap
swapoff -a >/dev/null调整 swap 大小
1、关闭 swap 分区
swapoff -a2、重新新建一个专门的文件用于 swap 分区
dd if=/dev/zero of=/mnt/swap bs=1M count=4096
3、确认当前交换空间的使用情况
swapon --show
开启 4K 对齐
TIP
当前的阿里云磁盘已经开启了 4K 对齐
查询块存储设备是否已经 4 KiB 对齐
sudo fdisk -lu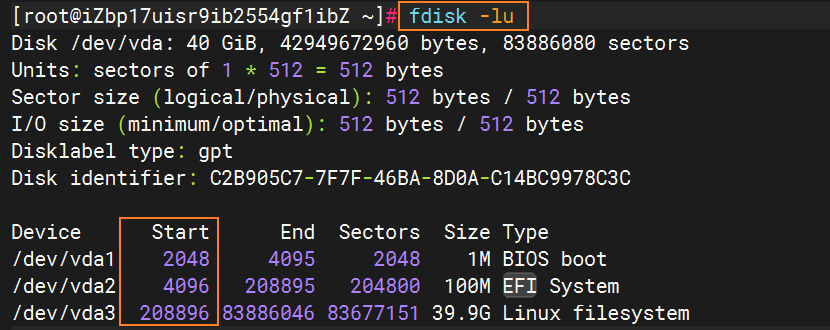
返回的结果中,Start值能被 8 整除即是 4 KiB 对齐。否则,请完成 4 KiB 对齐后再继续性能测试。
磁盘格式化并自动配置 4K 对齐
警告
运行此脚本会自动格式化所有数据盘,如果非新购数据盘,请在操作前,确认已对相关数据盘进行数据备份。
使用 root 用户远程连接 Linux 系统的 ECS 实例。
具体操作,请参见连接方式概述。
下载auto_fdisk.zip压缩包后解压,将解压后脚本并上传到目标服务器。
依次执行如下命令,为脚本添加执行权限,然后运行脚本。
chmod +x ./auto_fdisk.sh
./auto_fdisk.shSSH服务器保活
1、修改配置文件/etc/ssh/sshd_config
vim /etc/ssh/sshd_config

ClientAliveInterval 60 # 每隔60s向客户端发送请求消息,并等待客户端响应
ClientAliveCountMax 10 # 客户端超过10次没响应(10分钟),自动断开2、重启SSH服务
systemctl restart sshd常用命令
磁盘使用情况
# 磁盘使用情况
df -h
top
#
top

top -c自动部署
sh 脚本
自动部署 vitepress 的 shell 脚本
/root/sh-note.sh
#!/bin/bash

# 显示当前工作目录
pwd

# 显示Node.js和npm的版本
node -v
npm -v

# 使用变量来定义路径,以便于修改
REPO_DIR="/usr/mr/note" # 生产环境代码所在的目录
CLONE_DIR="/usr/mr/tmp" # 临时克隆gitee代码的目录

# 清空克隆目录
rm -rf "$CLONE_DIR"/*
rm -rf "$CLONE_DIR"/.*
ls -a "$CLONE_DIR"

# 克隆仓库
git clone https://gitee.com/meRay/note.git "$CLONE_DIR"
if [ $? -ne 0 ]; then
    echo "Git clone failed!"
    exit 1
fi

# 进入克隆的目录并执行npm命令
cd "$CLONE_DIR" || exit 1
npm install
if [ $? -ne 0 ]; then
    echo "npm install failed!"
    exit 1
fi
npm run build
if [ $? -ne 0 ]; then
    echo "npm run build failed!"
    exit 1
fi

# 返回到原始目录(如果需要)
cd - > /dev/null

# 显示构建后的工作目录
pwd

echo '构建成功'

# 清除并复制构建文件到目标目录
rm -rf "$REPO_DIR"/*
cp -rf "$CLONE_DIR"/.vitepress/dist/* "$REPO_DIR"/
# cp -rf ./dist/* "$REPO_DIR"/

# 如果需要,可以添加额外的错误检查执行脚本
1、上传sh-note.sh到服务器的/root/目录
2、直接运行命令:./sh-note.sh。服务器端就是自动克隆、安装依赖、打包、复制打包后的文件到 nginx 目录中
TODO:自动部署私有仓库的代码
现在克隆的是公共仓库的代码,不需要密码、私钥等验证手段。
jenkins部署
域名【】
绑定域名
HTTPS
[root@iZbp17uisr9ib2554gf1ibZ etc]# certbot certonly --email 1497161283@qq.com --server https://acme-v02.api.letsencrypt.org/directory --agree-tos --manu
al --preferred-challenges=dns -d *.mrer.top
Saving debug log to /var/log/letsencrypt/letsencrypt.log
Requesting a certificate for *.mrer.top

- - - - - - - - - - - - - - - - - - - - - - - - - - - - - - - - - - - - - - - -
Please deploy a DNS TXT record under the name:

_acme-challenge.mrer.top.

with the following value:

-zCVGtjvb3_tvq8WqAiZqdONCJrPfEnUZqR0MwueijA

Before continuing, verify the TXT record has been deployed. Depending on the DNS
provider, this may take some time, from a few seconds to multiple minutes. You can
check if it has finished deploying with aid of online tools, such as the Google
Admin Toolbox: https://toolbox.googleapps.com/apps/dig/#TXT/_acme-challenge.mrer.top.
Look for one or more bolded line(s) below the line ';ANSWER'. It should show the
value(s) you've just added.

- - - - - - - - - - - - - - - - - - - - - - - - - - - - - - - - - - - - - - - -
Press Enter to Continue

Successfully received certificate.
Certificate is saved at: /etc/letsencrypt/live/mrer.top/fullchain.pem
Key is saved at:         /etc/letsencrypt/live/mrer.top/privkey.pem
This certificate expires on 2024-07-17.
These files will be updated when the certificate renews.

NEXT STEPS:
- This certificate will not be renewed automatically. Autorenewal of --manual certificates requires the use of an authentication hook script (--manual-auth-hook) but one was not provided. To renew this certificate, repeat this same certbot command before the certificate's expiry date.

- - - - - - - - - - - - - - - - - - - - - - - - - - - - - - - - - - - - - - - -
If you like Certbot, please consider supporting our work by:
 * Donating to ISRG / Let's Encrypt:   https://letsencrypt.org/donate
 * Donating to EFF:                    https://eff.org/donate-le
- - - - - - - - - - - - - - - - - - - - - - - - - - - - - - - - - - - - - - - -运行项目
通用
mr
入口地址: http://mr.mrer.top
项目内容: 是个人网站的入口站点,所有其他的项目都会汇总在这里
接口:
接口文档: 【不需要】
开发文档:
vue
mr-trip
入口地址: http://vue.mrer.top/trip
项目内容:
接口: http://codercba.com:1888/api
接口文档: https://documenter.getpostman.com/view/12387168/UzXPxcSi#a1abe5ea-9692-450c-b0a4-621d6b4e0950
开发文档:
mr-vue3-ts-cms-2403
入口地址: http://vue.mrer.top/cms2403
项目内容:
接口文档: https://documenter.getpostman.com/view/12387168/TzzDKb12
开发文档:
mr-vue3-ts-consult-patient-2405
入口地址: http://vue.mrer.top/cp2405【TODO】
项目内容:
接口: https://consult-api.itheima.net
接口文档: https://apifox.com/apidoc/shared-aeb0d03e-c713-4f55-afaf-21cddf542751
开发文档: https://zhousg.github.io/patient-h5-note/project/
react
mr-airbnb【有问题】
问题: 目前链接失效中
入口地址: http://react.mrer.top/airbnb
项目内容:
接口: http://codercba.com:1888/airbnb/api
接口文档: https://documenter.getpostman.com/view/12387168/2s7YfKDwcn
开发文档:
mr-react18-ts-music【有问题】
入口地址: http://react.mrer.top/music
项目内容:
接口:
接口文档:
- https://binaryify.github.io/NeteaseCloudMusicApi/#/?id=neteasecloudmusicapi
- https://neteasecloudmusicapi.vercel.app/【国外】
开发文档:
小程序
mr-mp-mall-2408
入口地址: http://mp.mrer.top/mall
项目内容: 蘑菇街商城
接口: http://codercba.com:7888/api/hy66
接口文档: https://documenter.getpostman.com/view/12387168/UzXPxcSi#a1abe5ea-9692-450c-b0a4-621d6b4e0950
开发文档: http://note.mrer.top/doc/web/S11-05 小程序-uni-app-项目:mr-mall.html#首页接口
后端
mr-coderhub-2402
问题: 目前没有设置 nginx 地址
解决: 后端程序不需要设置 nginx 地址
入口地址: http://120.26.226.124/
项目内容:
接口:
接口文档: 【不需要】
开发文档:
其他接口
接口: http://123.207.32.32:8000/home/multidata
运行软件
Nginx
TIP
配置文件:/etc/nginx/nginx.conf
安装
后续我们部署会使用 nginx,所以需要先安装一下 nginx:
dnf install nginx启动 nginx:
systemctl start nginx # 启动nginx
systemctl status nginx # 查看nginx状态
systemctl enable nginx # 开机启动nginx配置
我们这里主要配置 nginx 的用户和默认访问目录:
/etc/nginx/nginx.conf配置用户:
通过 Linux 命令创建文件夹和文件:
mkdir /root/mall_cms
cd /root/mall_cms
touch index.html

vi index.html配置访问目录:
部署项目
1、在远程服务器的/root中
mkdir mr-airbnb # 创建文件夹2、在本地打包项目
npm run build3、将打包的目录/build/文件夹中的内容复制(上传)到远程服务器的/root/mr-airbnb/目录中
4、配置 nginx
见:3.2.2 配置 nginx
5、重启 nginx
systemctl restart nginxNode
安装nodejs
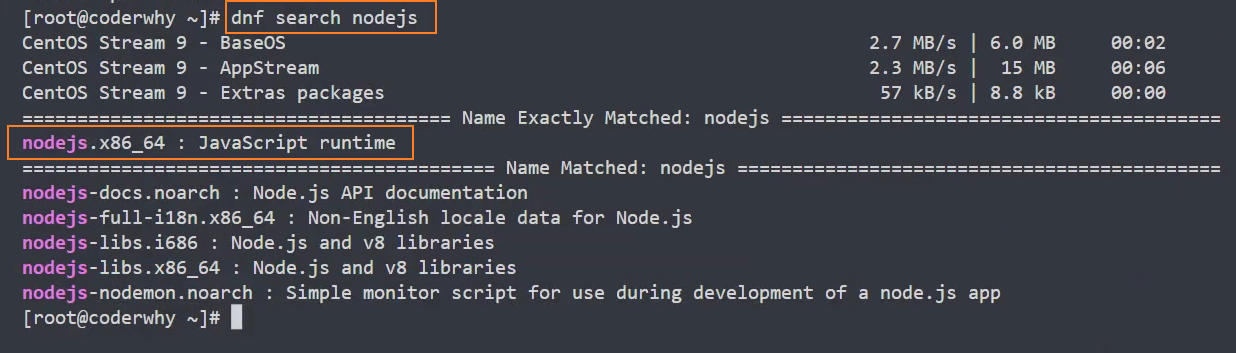
1、使用dnf search nodejs搜索 node
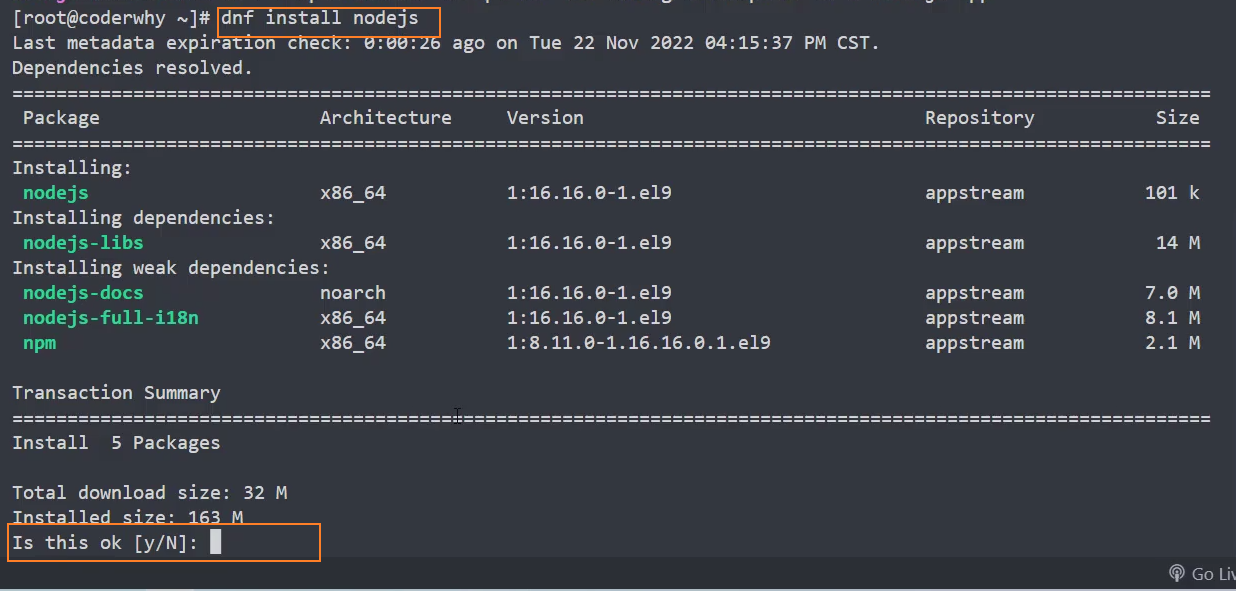
2、安装 node:dnf install nodejs
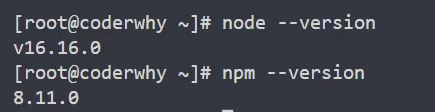
3、查看版本:node --version
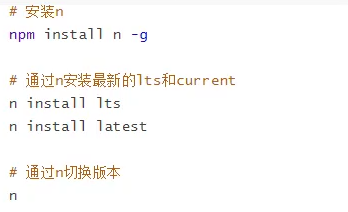
安装n
如果想要控制安装的 node 版本,需要使用 n 来安装 node
1、通过npm i n -g,安装 n
pm2
1、安装 pm2
npm i pm2 -g2、常用 pm2 命令
# 安装
npm i pm2 -g

# 启动某个项目
pm2 start <app.js>

# 启动某个项目 - 指定端口号
pm2 start <app.js> -p <port>

# 启动某个项目 - 自定义名称
pm2 start <app.js> --name <new_name>

# 列出所有管理的项目
pm2 list
pm2 ls

# 停止、重启、删除某个项目
pm2 stop     <app_name|namespace|id|'all'|json_conf>
pm2 restart  <app_name|namespace|id|'all'|json_conf>
pm2 delete   <app_name|namespace|id|'all'|json_conf>

# 显示某个项目的具体信息
pm2 describe <id|app_name>

# 监控
pm2 monit

# 重命名name
pm2 restart <app_name> --name <new_name>3、系统重启后自动启动 pm2 管理的进程
启动 node 项目
shpm2 start <app.js> --name <new_name>保存当前 pm2 进程列表
shpm2 save生成开机启动脚本
shpm2 startup重启系统,验证是否生效
注意: 多个 node 项目需要使用不同的端口号,否则会冲突
问题:
pm2 startup该命令只能在linux系统起作用,在windows系统中会报错:shD:\BaiduSyncdisk\Note>pm2 startup [PM2][ERROR] Init system not found C:\Users\Mr\AppData\Local\pnpm\global\5\.pnpm\pm2@5.3.1\node_modules\pm2\lib\API\Startup.js:209 throw new Error('Init system not found'); ^ Error: Init system not found解决:安装额外的插件 pm2-windows-startup 来解决该问题
sh# 全局安装 pnpm i pm2-windows-startup -g # 生成开机启动脚本 pm2-startup install
4、管理静态站点(vue,react,vitepress)
执行以下命令:
pm2 start node_modules/vitepress/bin/vitepress.js --name <name>说明:
node_modules/vitepress/bin/vitepress.js:为当前项目的打包插件的运行文件,相当于执行vitepress dev或pnpm run dev--name <name>:为管理的进程起名
问题: 管理静态站点时,发现占用的内存过大,有1.4G,怀疑是内存泄漏。
解决:
尝试一:设置启动参数,当内存占用过大时自动重启pm2
shpm2 start <app.js> --max_memory_restart 1024M尝试二:修改
MySQL
TIP
配置文件:
- server:
/etc/my.cnf.d/mysql-server.cnf - client:
/etc/my.cnf.d/client.cnf
数据库文件:/var/lib/mysql
安装
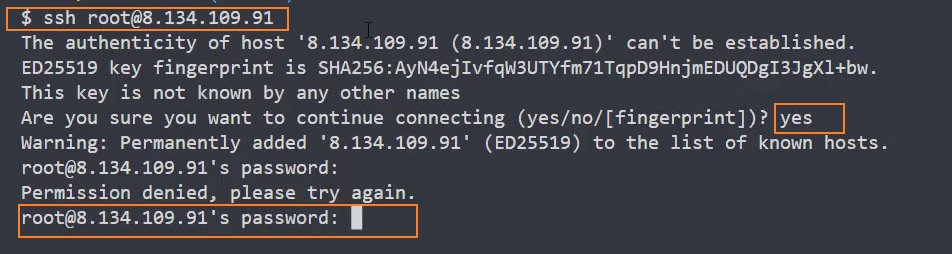
1、通过ssh root@IP地址 登录远程服务器
2、搜索mysql:dnf search mysql-server

3、使用最新的包管理器去安装 mysql-server
dnf install mysql-server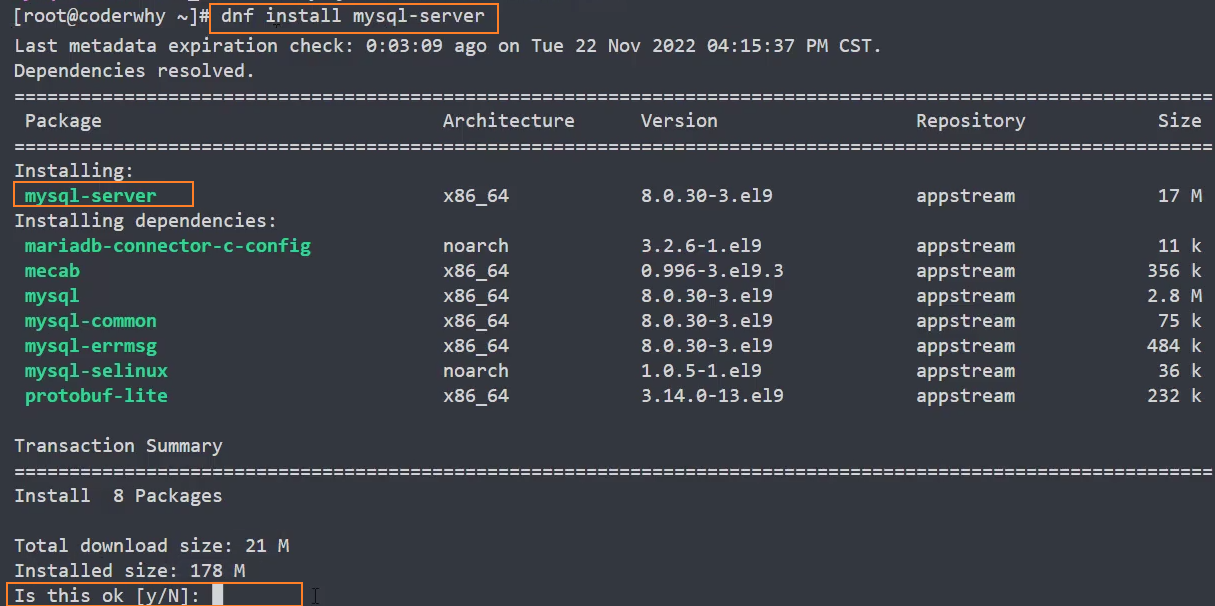
4、启动 mysql
systemctl start mysqld
5、查看 mysql 服务是否正在运行
systemctl status mysqld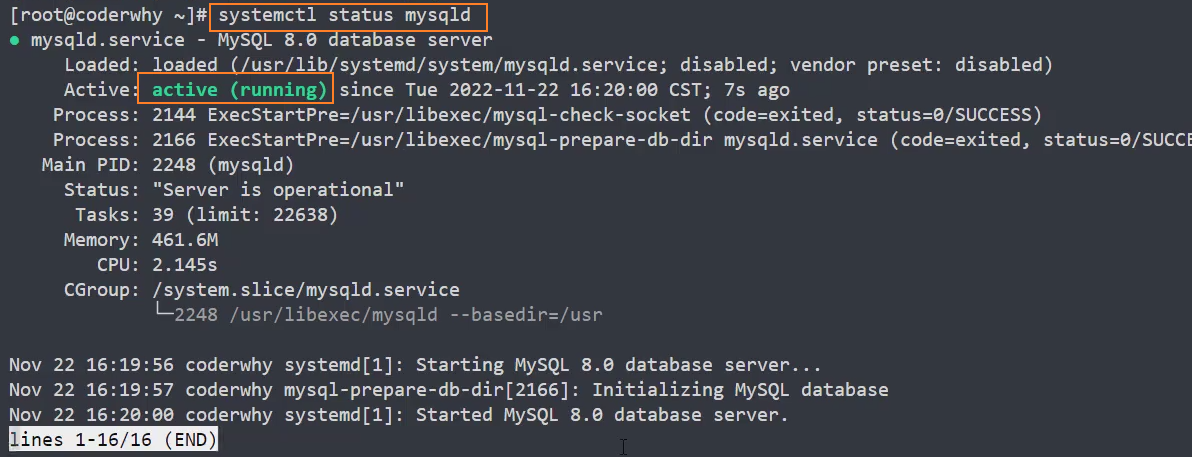
6、启动并设置开机自动启动
systemctl enable mysqld
配置密码
1、运行 mysql_secure_installation
mysql_secure_installation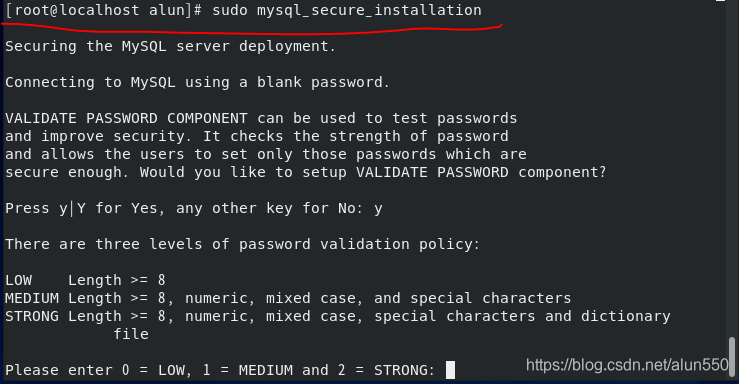
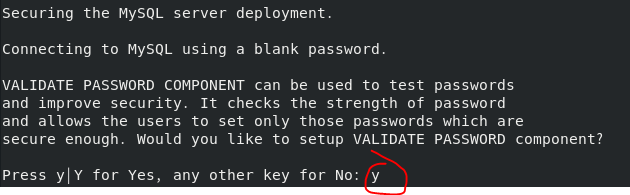
- 第一个要输入的是密码验证策略 —— y
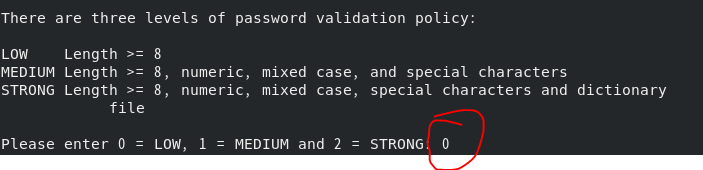
- 第二个是密码策略的选择 —— 0,最低 只需要长度不小于 8 即可
- 第三个输入两次密码
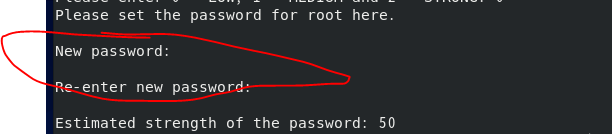
- 第四个确认是否使用钢材输入的密码 —— y

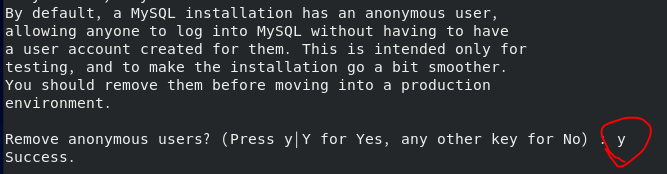
- 第五个提示匿名用户有风险,是否要关闭匿名用户 —— y
- 第六个提示是否关闭远程登录 —— n

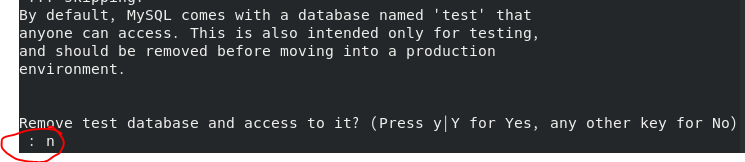
- 第七个提示是否关闭默认的"test"数据库 —— n
- 第八个是否重读权限,使应用生效 —— y

配置远程登录
1、连接数据库
mysql -uroot -p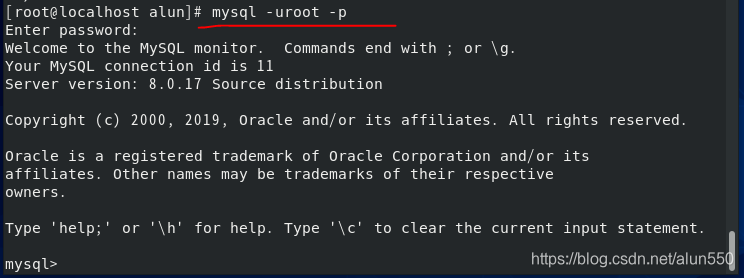
2、执行如下语句,允许任意 IP 访问
# 使用mysql数据库
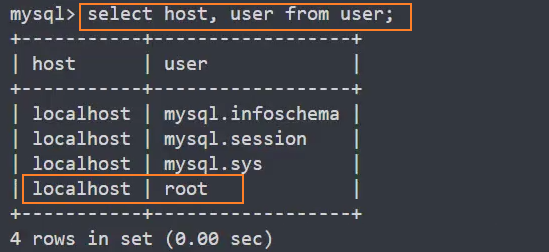
use mysql;
# 查看user表,连接权限,默认看到root是localhost
select host,user from user;
# 修改权限
update user set host='%' where user='root';
# 配置生效
flush privileges;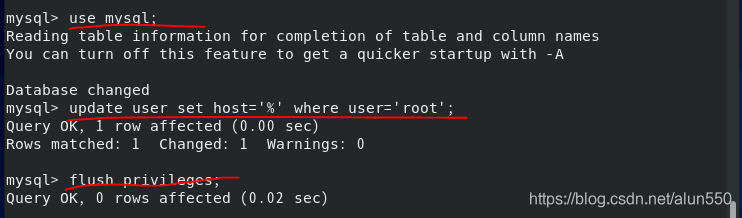
4、退出 mysql
exit
开启 3306 端口
方式一: 使用命令行的方式
sudo firewall-cmd --add-port=3306/tcp --permanent
sudo firewall-cmd --reload
1、关闭 MySQL 主机的反向解析连接地址 dns 的功能,避免解析导致第一次连接过慢
sudo vim /etc/my.cnf
添加如下内容
[mysqld]
skip-name-resolve2、重启服务
sudo systemctl restart mysqld
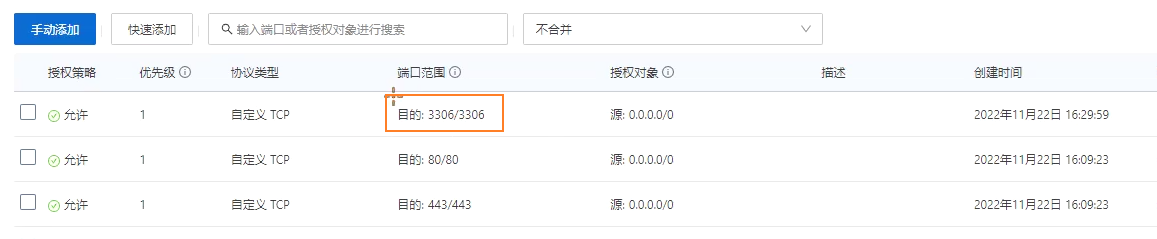
方式二: 使用图形界面的方式
放开服务器的3306端口
迁移数据
1、在 navicate 中,导出数据库coderhub
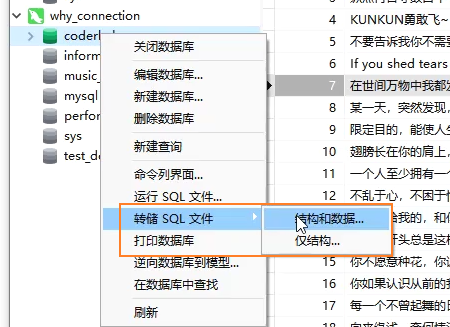
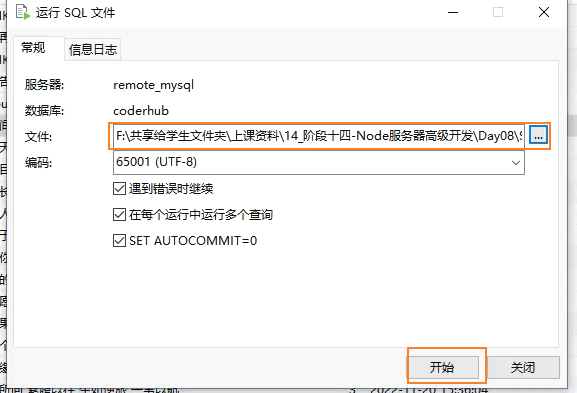
2、在其他 mysql 数据库中,手动新建一个数据库coderhub,在新建的数据库中,运行SQL文件
修改字符集
报错: Server sent charset unknown to the client. Please, report to the developers
原因: 这是由于 MySQL8.0 开始将字符集由原先的utf8(utf8mb3)升级为了utf8mb4
解决:
1、先查看目前的字符集
shshow variables like "character_set_%";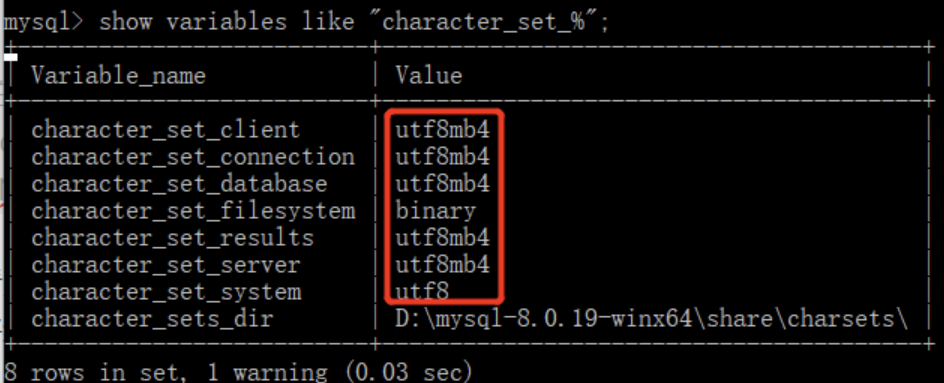
2、修改 mysql 配置文件
/etc/my.cnfsql# # This group is read both both by the client and the server # use it for options that affect everything # [client-server] # # include all files from the config directory # !includedir /etc/my.cnf.d [mysqld] + collation_server = utf8_general_ci + character_set_server = utf8 + default_authentication_plugin = mysql_native_password [mysql] + default-character-set = utf8 [client] + default-character-set = utf83、修改完毕,重启 mysqld
shsystemctl stop mysqld # 或 net stop msyql systemctl start mysqld # 或 net start msyql4、再查看目前的字符集
shshow variables like "character_set_%";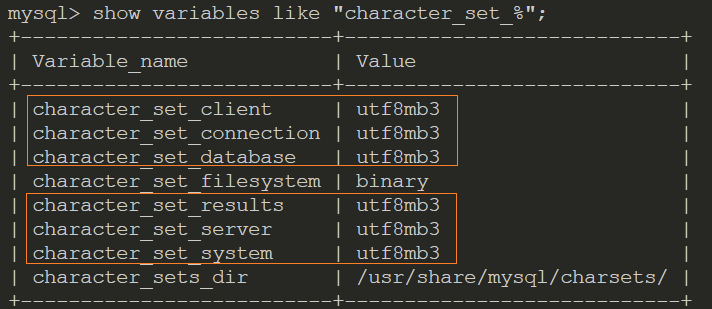
报错: The server requested authentication method unknown to the client
原因: 因为 mysql8 升级了密码的验证方式 caching_sha2_password, 之前一直是mysql_native_password
解决:
1、修改 mysql 配置文件
/etc/my.cnfsql[mysqld] collation_server = utf8_general_ci character_set_server = utf8 + default_authentication_plugin = mysql_native_password2、修改完毕,重启 mysqld
shsystemctl stop mysqld # 或 net stop msyql systemctl start mysqld # 或 net start msyql3、进入 mysql 修改登入 mysql 用户的登录验证方式
shuse mysql; # 修改用户登录验证方式 alter user 'root'@'%' identified with mysql_native_password BY '密码'; #刷新权限 flush privileges;
内存优化
Linux 中正常安装完 MySQL8.0 后,内存占用量为 500M 左右。
如果想要降低内存占用量,可以设置如下:
# /etc/my.cnf.d/mysql-server.cnf

[mysqld]
# 关闭 performance_schema,关闭后内存占用可以降到150M左右
# performance_schema 用于性能分析
performance_schema = offMongoDB
TIP
配置文件: /etc/mongod.conf
数据库文件: /var/lib/mongo
日志文件: /var/log/mongodb/mongod.log
安装
系统:CentOS Stream 9
mongodb 版本:7.0
1、创建 /etc/yum.repos.d/mongodb-org-7.0.repo 文件,以便直接使用 yum 来安装 MongoDB
2、配置mongodb-org-7.0.repo文件
[mongodb-org-7.0]
name=MongoDB Repository
baseurl=https://repo.mongodb.org/yum/redhat/9/mongodb-org/7.0/x86_64/
gpgcheck=1
enabled=1
gpgkey=https://pgp.mongodb.com/server-7.0.asc说明:
redhat/9:此处的 9,指的是 CentOS 的系统版本mongodb-org/7.0:此处的 7.0,指的是 mongodb 的版本
3、执行以下命令进行安装
yum install -y mongodb-org配置
1、阻止 MongoDB 升级
yum当有新版本可用时,exclude 会自动升级包。如果要阻止 MongoDB 升级,请将以下指令添加到/etc/yum.conf
exclude=mongodb-org,mongodb-org-database,mongodb-org-server,mongodb-mongosh,mongodb-org-mongos,mongodb-org-tools2、在配置文件/etc/mongod.conf中修改日志、数据库存放目录
systemLog:
  destination: file
  logAppend: true
  # 日志文件存放目录
  path: /var/log/mongodb/mongod.log

storage:
  # 数据库文件存放目录
  dbPath: /var/lib/mongo

# how the process runs
processManagement:
  timeZoneInfo: /usr/share/zoneinfo

# network interfaces
net:
  port: 27017
  # 开启外网访问则为0.0.0.0
bindIp: 0.0.0.0 # Enter 0.0.0.0,:: to bind to all IPv4 and IPv6 addresses or, alternatively, use the net.bindIpAll setting.启动
1、运行命令
# 启动mongod
systemctl start mongod

# 停止mongod
systemctl stop mongod

# 重启mongod
systemctl restart mongod

# 查看mongod状态
systemctl status mongod

# 开机启动mongod
systemctl enable mongod2、检查目录权限
问题: 当运行systemctl status mongod命令查询,mongod 是否启动时,报以下错误:
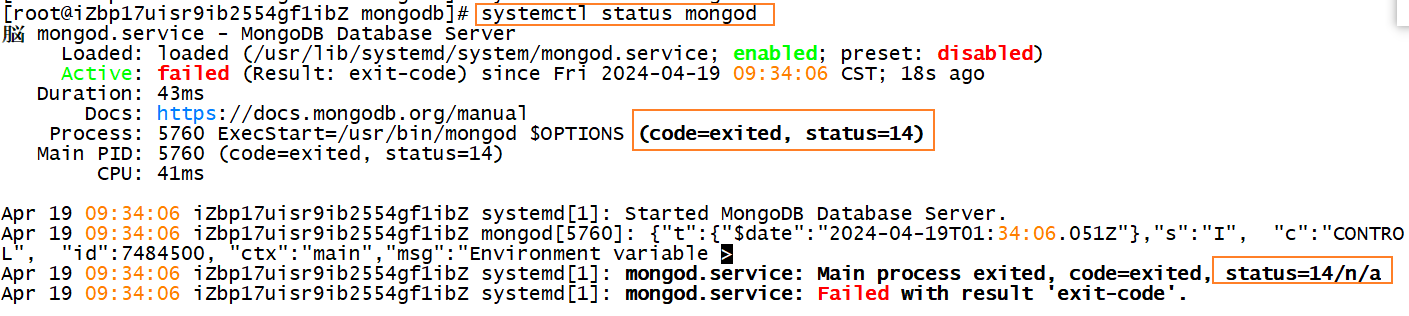
分析: 这是由于没有以下 3 个权限造成的:
数据存储目录(dbpath)权限设置
shchown -R mongod:mongod /var/lib/mongo日志目录(log)权限设置
shchown -R mongod:mongod /var/log/mongodbmongodb-27017.sock文件权限设置shchown mongod:mongod /tmp/*.sock
连接数据库
1、通过 navicate 连接 mongodb 数据库
在服务器安全组中放开
27017端口在配置文件
/etc/mongod.conf中,设置bindIp: 0.0.0.0,让所有 IP 都可以访问数据库在 navicate 中添加连接
Jenkins
TIP
配置文件:/usr/lib/systemd/system/jenkins.service
TODO: 工作目录:``
安装 Java 环境
Jenkins 本身是依赖 Java 的,所以我们需要先安装 Java 环境:
- 这里我安装了 Java1.8 的环境
dnf search java-1.8
dnf install java-1.8.0-openjdk.x86_64注意: 最新的 Jenkins 已经不能使用 java-1.8 了,需要安装最新版的 java

dnf search java
dnf install java-17-openjdk安装 Jenkins
因为 Jenkins 本身是没有在 dnf 的软件仓库包中的,所以我们需要连接 Jenkins 仓库:
dnf search jenkins- wget 是 Linux 中下载文件的一个工具,-O 表示输出到某个文件夹并且命名为什么文件;
- rpm:全称为The RPM Package Manage,是 Linux 下一个软件包管理器;
# 1、使用wget下载jenkins.repo配置yum或apt-get包管理工具
wget –O jenkins.repo -P /etc/yum.repos.d http://pkg.jenkins-ci.org/redhat-stable/jenkins.repo

# 2、如果下载到了 /root下,则需要移动到 /etc中
mv jenkins.repo /etc/yum.repos.d/
# 进入/etc/yum.repos.d/目录
cd /etc/yum.repos.d/

# 3、导入GPG密钥以确保您的软件合法
# 	 也可以将密钥直接写入到jenkins.repo配置文件中:gpgkey=http://pkg.jenkins-ci.org/redhat-stable/jenkins-ci.org.key
rpm --import https://pkg.jenkins.io/redhat/jenkins.io.key
# 或者
rpm --import http://pkg.jenkins-ci.org/redhat/jenkins-ci.org.key编辑一下文件 vi /etc/yum.repos.d/jenkins.repo
vim 编辑命令:
vi 文件路径: 使用 vim 打开文件i: 切换到 INSERT 模式,编辑文件:wq: 保存退出
- 可以通过 vim 编辑
[jenkins]

name=Jenkins-stable

baseurl=http://pkg.jenkins.io/redhat

gpgcheck=1安装 Jenkins
dnf install jenkins # --nogpgcheck(可以不加)启动 Jenkins 的服务:
systemctl start jenkins
systemctl status jenkins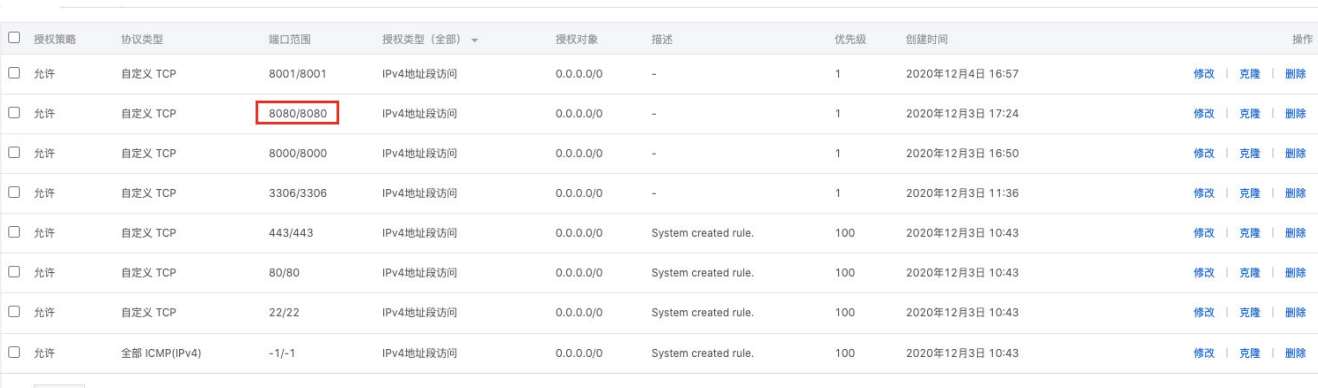
systemctl enable jenkinsJenkins 默认使用 8080 端口提供服务,所以需要加入到安全组中:
Jenkins 配置
打开浏览器,输入:http://8.134.60.235:8080/
- 注意:你输入自己的 IP 地址
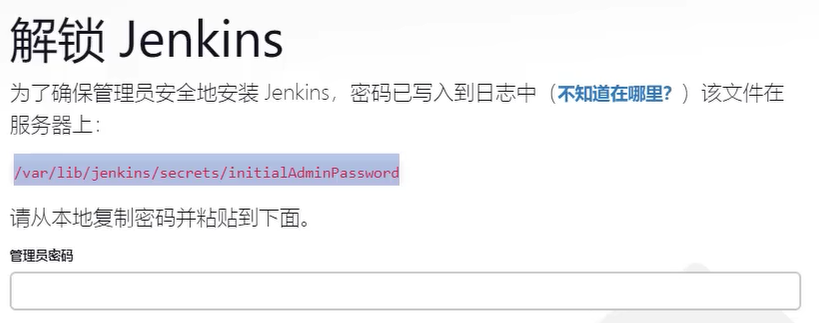
获取输入管理员密码:
- 在下面的地址中
cat /var/lib/jenkins/secrets/initialAdminPassword

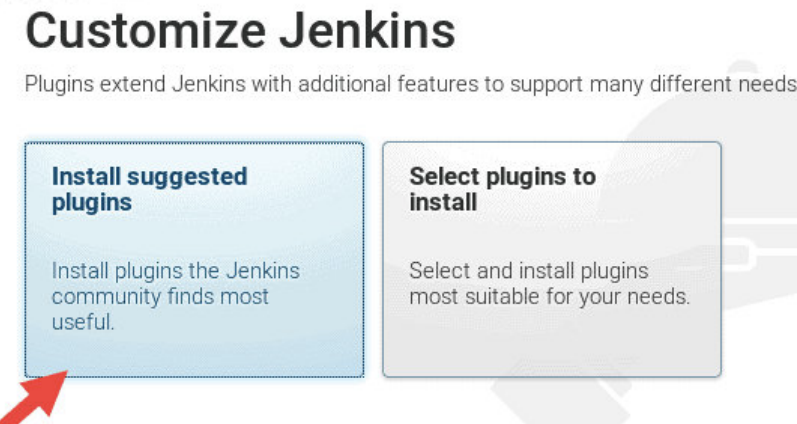
可以安装推荐的插件:
Jenkins 任务
新建任务:

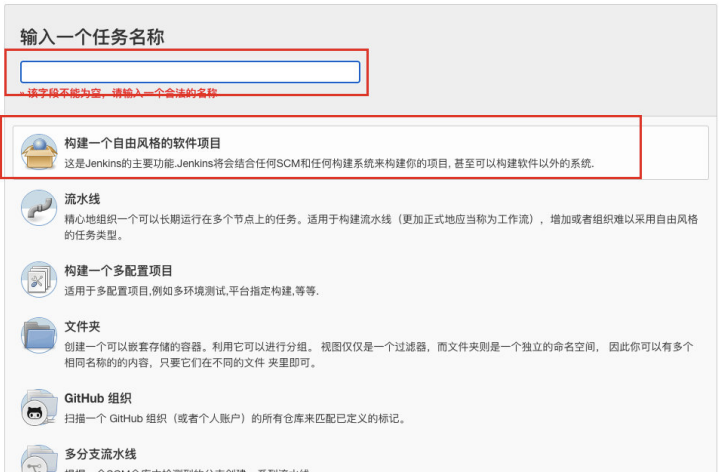
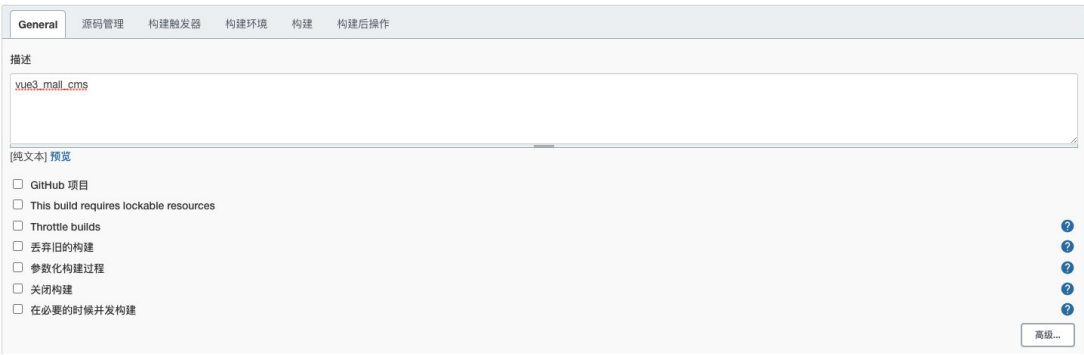
配置项目和保留策略:
安装 git
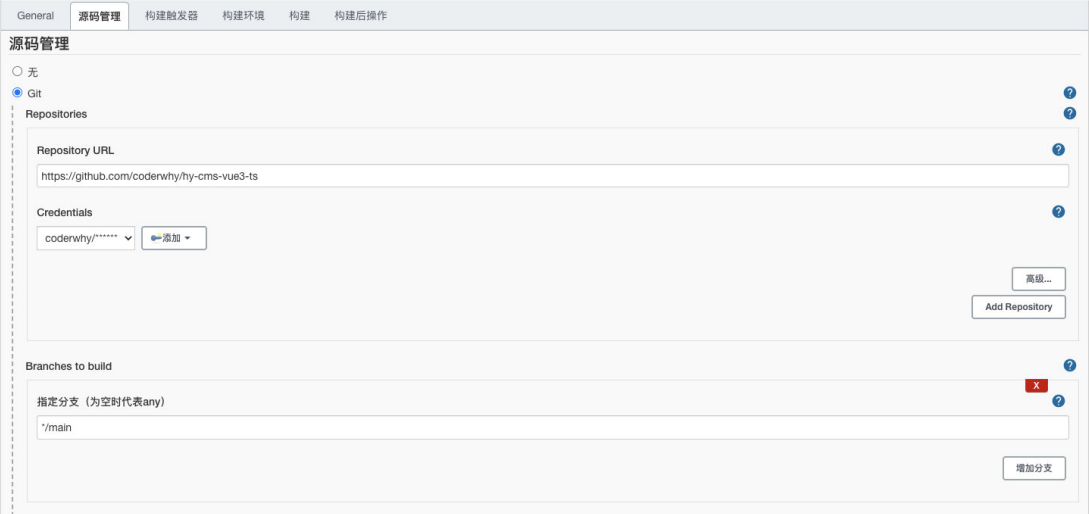
dnf install git源码管理:
注意: 如果是 public 的仓库,可以没有凭证(Credentials);如果是 private 的仓库,需要添加凭证
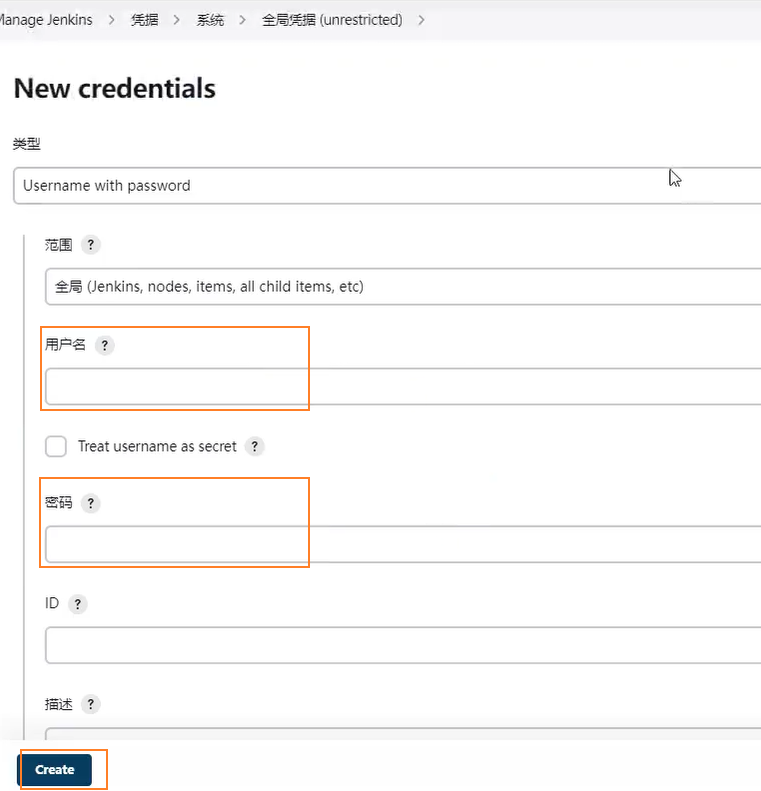
配置凭证
位置: Manage Jenkins / Manage Credentials / System / 全局凭证
构建触发器:
定时构建
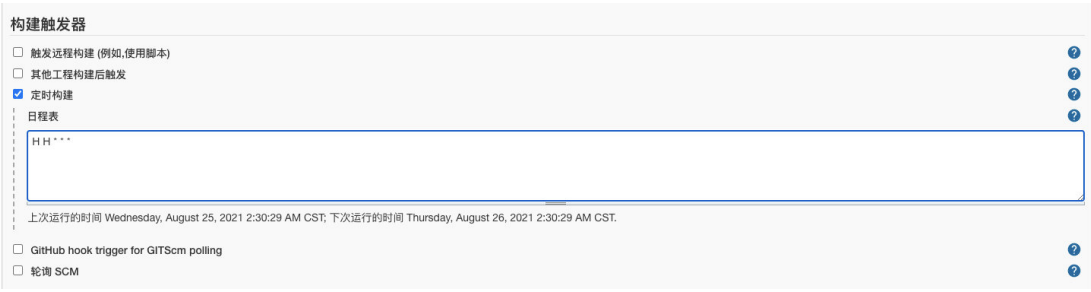
这里的触发器规则是这样的:
定时字符串从左往右分别是:分 时 日 月 周
sh# 每小时的第30分钟构建一次 30 * * * * # 每半小时构建一次OR每半小时检查一次远程代码分支,有更新则构建 H/30 * * * * # 每两小时构建一次OR每两小时检查一次远程代码分支,有更新则构建 H H/2 * * * # 每天凌晨两点定时构建 H 2 * * * # 每月15号执行构建 H H 15 * * # 工作日,上午9点整执行 H 9 * * 1-5 # 每周1,3,5,从8:30开始,截止19:30,每4小时30分构建一次 H/30 8-20/4 * * 1,3,5
TODO: Hook 构建
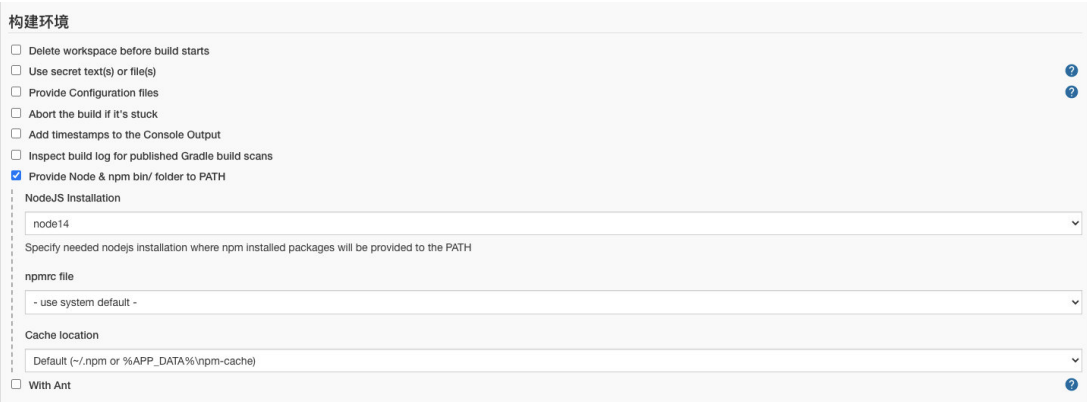
构建环境:
注意:我们需要搭建 Node 的环境
- 第一步:配置 Node 的环境;
- 第二步:安装 Node 的插件;
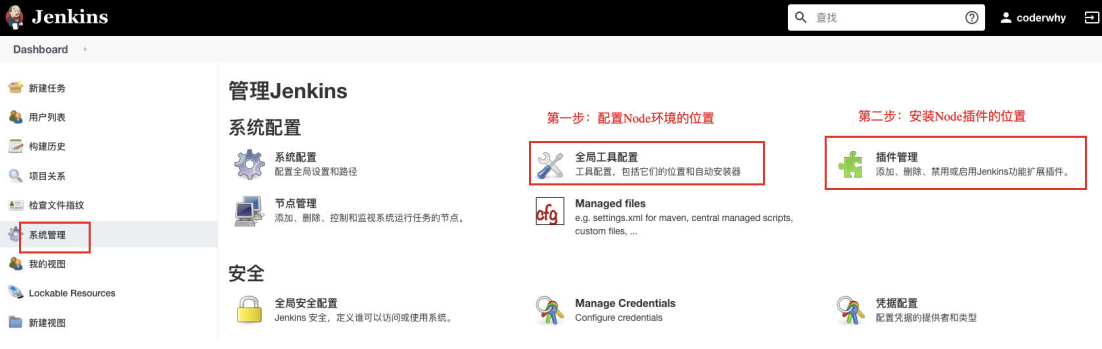
第一步:配置 Node 的环境
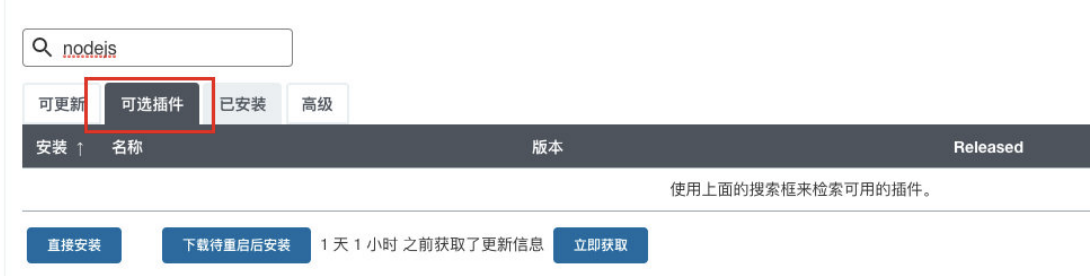
第二步:安装 Node 的插件
- 这里因为我已经安装过了,所以没有搜索到;
构建执行的任务:
- 查看 Node 的版本等是否有问题;
- 执行
npm install安装项目的依赖; - 移除原来 mall_cms 文件的所有内容;
- 将打包的 dist 文件夹内容移动到 mall_cms 文件夹;
pwd
node -v
npm -v

npm install
npm run build

pwd

echo '构建成功'

ls

# 删除/root/mall_cms文件夹里所有的内容
rm -rf /root/mall_cms/*

cp -rf ./dist/* /root/mall_cms/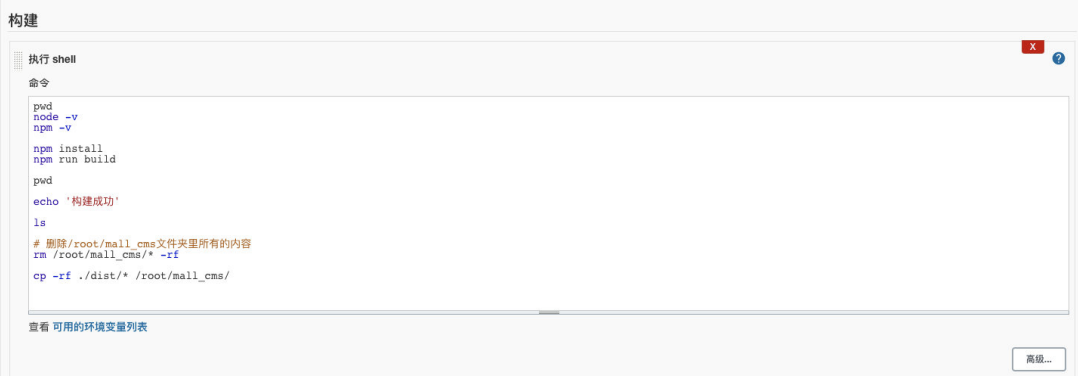
构建权限拒绝
问题: jenkins 构建时报 Permission denied 错误
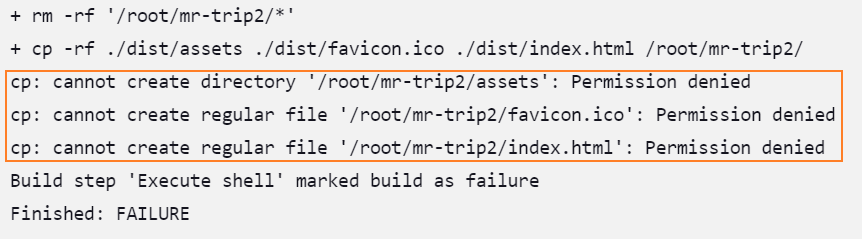
原因: 没有权限进行读、写、创建文件、删除文件等操作
解决 jenkins 对/root/ 目录没有访问权限的方法:
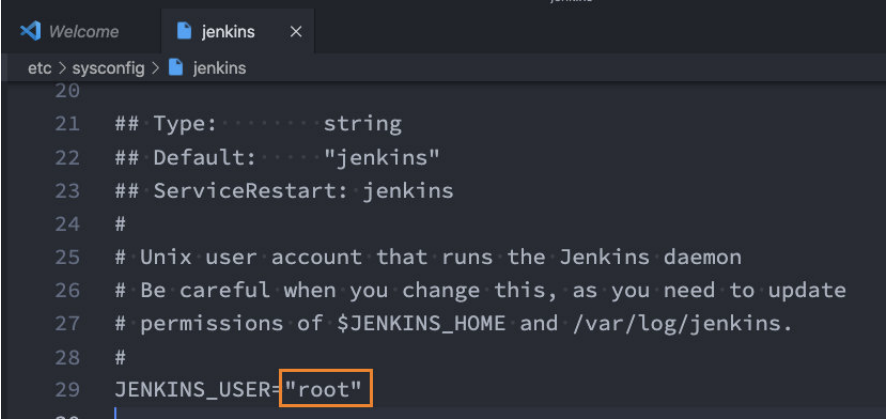
方法一:修改 jenkins 访问用户为root
我们后面会访问 centos 中的某些文件夹,默认 Jenkins 使用的用户是 jenkins,可能会没有访问权限,所以我们需要修改一下它的用户:
修改文件的路径:/etc/sysconfig/jenkins
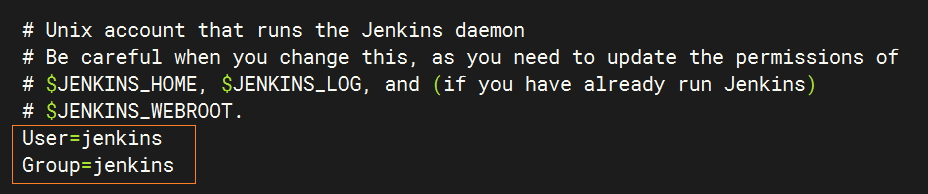
提示
最新的jenkins@2.452.2-1.1中配置文件目录为:/usr/lib/systemd/system/jenkins.service
Jenkins 用户和用户组
修改 jenkins 的 JVM 启动占用内存

之后需要重启一下 Jenkins:
systemctl daemon-reload # 重新加载 systemd 守护程序配置
systemctl restart jenkins # 重启jenkins方法二:将 jenkins 添加到 root 组中
# 将jenkins添加到root组中
sudo usermod -a -G root jenkins

# 重启jenkins
systemctl restart jenkins方法三:给 jenkins 目录权限
# 也可以给jenkins目录权限
sudo chown -R jenkins /xxx/xxx

# 重启jenkins
systemctl restart jenkins方法四:(有效),给工作目录设置所有权限
测试有效的方法:
sudo chmod -R 777 /工作目录构建内存溢出
失败报错: FATAL ERROR: Reached heap limit Allocation failed - JavaScript heap out of memory
失败分析: 服务器内存溢出导致打包失败
尝试一: 增加 node 内存
# 1. 安装increase-memory-limit
npm install -g increase-memory-limit
# 2. 运行
increase-memory-limit
# 3. 在jenkins中重新构建结果:无效,还把服务干崩溃了
尝试二: ( 成功),同样增加 node 内存,不过方法不一样
在package.json的 script.build 中增加 node 内存
  "scripts": {
    "dev": "vitepress dev",
 +   "build": "node --max-old-space-size=4096 node_modules/.bin/vitepress build",
    "preview": "vitepress preview"
}注意:
- 该方法的前提是为服务器设置了 swap(虚拟内存),我给服务器添加了 4G 的虚拟内存。
- 尝试一和尝试三之所以失败,关键就是物理内存不足。
TODO: 延伸:node_modules/.bin/vitepress build 不知道能不能写成&& npx vitepress build
问题: "build": "node xxx node_modules/.bin/vitepress build",这种写法在 linux 环境可以正常 build,但是在 windows 环境中就会报以下错误:basedir=$(dirname "$(echo "$0" | sed -e 's,\\,/,g')")
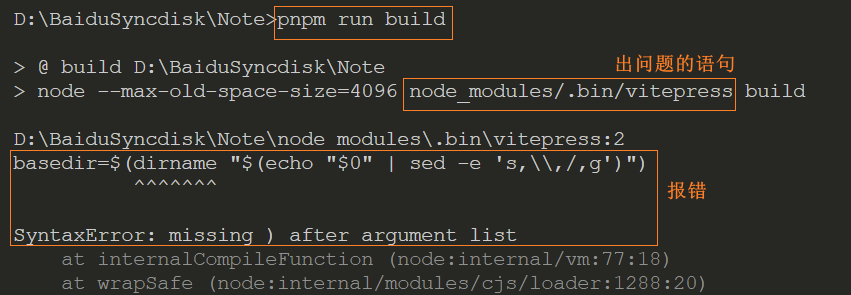
解决:修改打包命令node_modules/.bin/vitepress build为node_modules/vitepress/bin/vitepress build
尝试三: 清除服务器 buff/cache
1、通过 free 查看服务器内存使用情况
[root@ls-XmlqK5Oe ~]# free -h
              total        used        free      shared  buff/cache   available
Mem:          1.9Gi       934Mi        76Mi       2.0Mi       965Mi       893Mi
Swap: 0B 0B 0B2、清除 buff/cache
[root@ls-XmlqK5Oe ~]# echo 1 > /proc/sys/vm/drop_caches
[root@ls-XmlqK5Oe ~]# echo 2 > /proc/sys/vm/drop_caches
[root@ls-XmlqK5Oe ~]# echo 3 > /proc/sys/vm/drop_caches另一种写法:
sudo sync && sudo echo 3 > /proc/sys/vm/drop_caches解释:
sudo:用来以超级用户的权限执行命令,因为sync涉及到写入磁盘,通常需要管理员权限来执行。sync:命令用于强制将所有未写入的系统缓冲区数据写入磁盘。&&:是一个逻辑操作符,在 Bash shell 中表示“并且”,用于连接两个命令,确保第一个命令成功执行后再执行第二个命令。echo 3 > /proc/sys/vm/drop_caches:这一部分是用来修改系统内核参数的,具体作用是清理页缓存。drop_caches:是一个特殊文件,通过写入不同的数字来触发不同的操作:echo 1 > /proc/sys/vm/drop_caches:清理页缓存。echo 2 > /proc/sys/vm/drop_caches:清理目录项和 inode 缓存。echo 3 > /proc/sys/vm/drop_caches:清理页缓存、目录项和 inode 缓存。
3、清除后效果
[root@ls-XmlqK5Oe ~]# free -h
              total        used        free      shared  buff/cache   available
Mem:          1.9Gi       905Mi       806Mi       2.0Mi       264Mi       926Mi
Swap: 0B 0B 0B4、在 jenkins 中重新构建
5、结果: 依然不行
项目部署和 DevOps
传统的开发模式
在传统的开发模式中,开发的整个过程是按部就班就行:
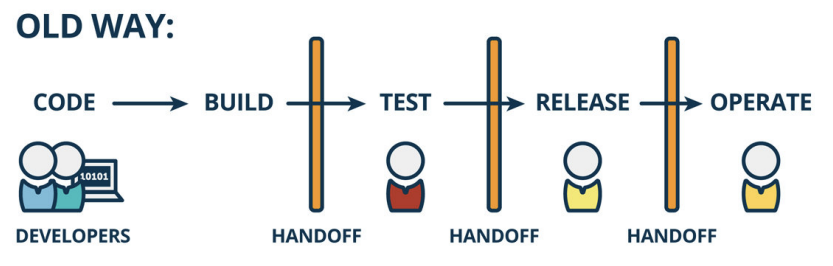
但是这种模式存在很大的弊端:
- 工作的不协调:开发人员在开发阶段,测试和运维人员其实是处于等待的状态。等到测试阶段,开发人员等待测试反馈 bug,也会处于等待状态。
- 线上 bug 的隐患:项目准备交付时,突然出现了 bug,所有人员需要加班、等待问题的处理;
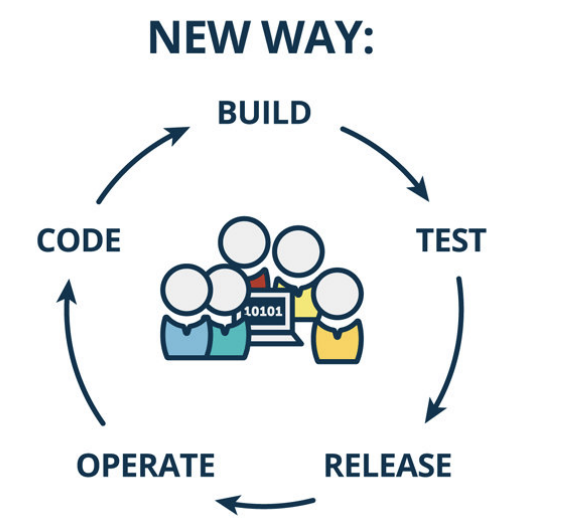
DevOps 开发模式
DevOps 是 Development 和 Operations 两个词的结合,将开发和运维结合起来的模式:

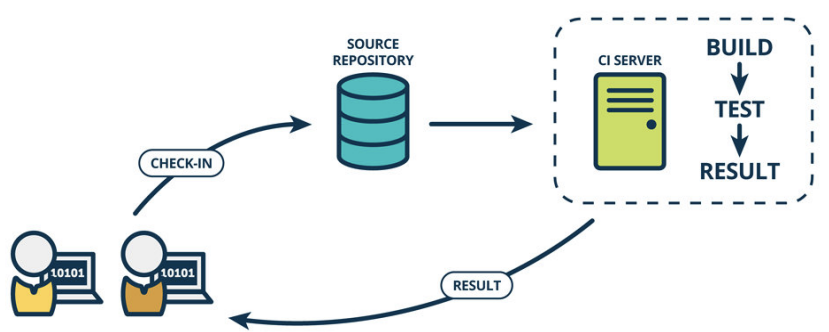
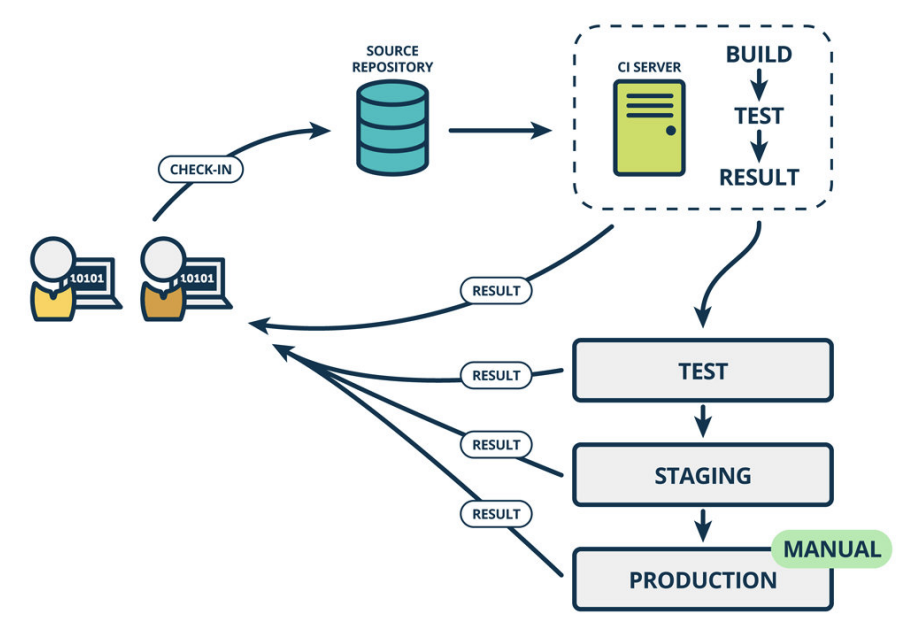
持续集成和持续交付
伴随着 DevOps 一起出现的两个词就是持续集成和持续交付(部署):
- CI 是 Continuous Integration(持续集成);
- CD 是两种翻译:Continuous Delivery(持续交付)或 Continuous Deployment(持续部署);
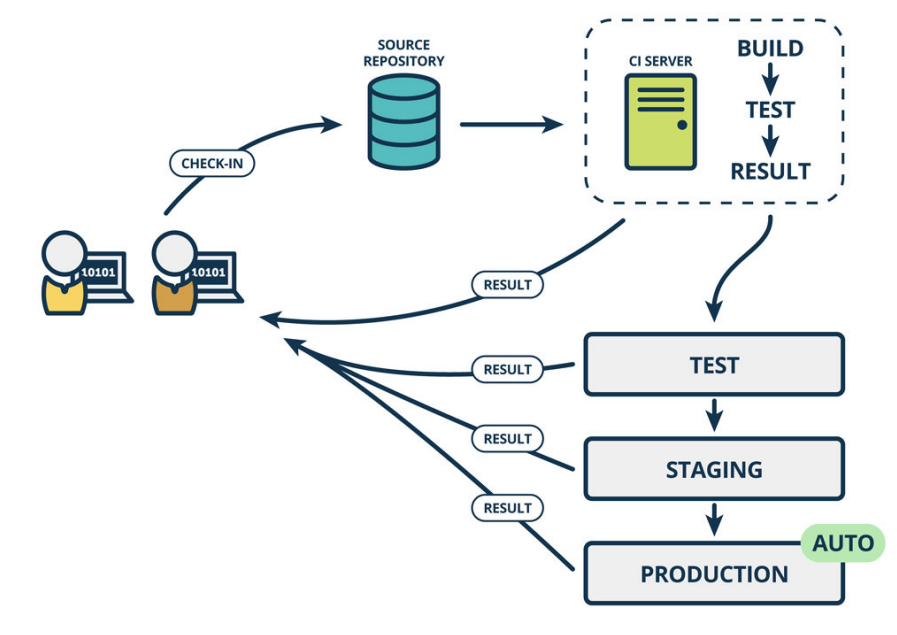
持续集成 CI:
持续交付和持续部署:
自动化部署流程

购买云服务器
注册阿里云的账号
云服务器我们可以有很多的选择:阿里云、腾讯云、华为云。
- 目前在公司使用比较多的是阿里云;
- 我自己之前也一直使用阿里云,也在使用腾讯云;
- 之前华为云也有找我帮忙推广他们的活动;
但是在我们的课程中,我选择目前使用更加广泛的阿里云来讲解:
我们需要注册阿里云账号
注册即可,非常简单
购买云服务器
购买云服务器其实是购买一个实例。
1.来到控制台:
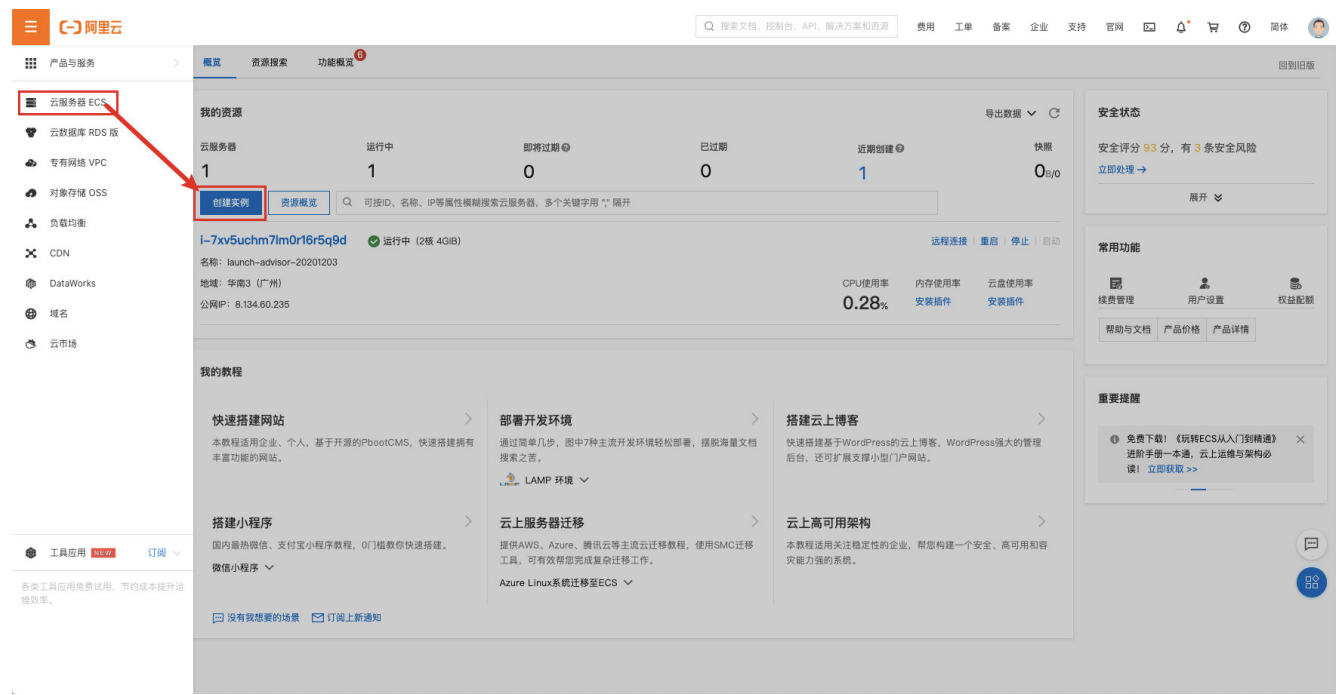
2.创建实例,选择类型和配置
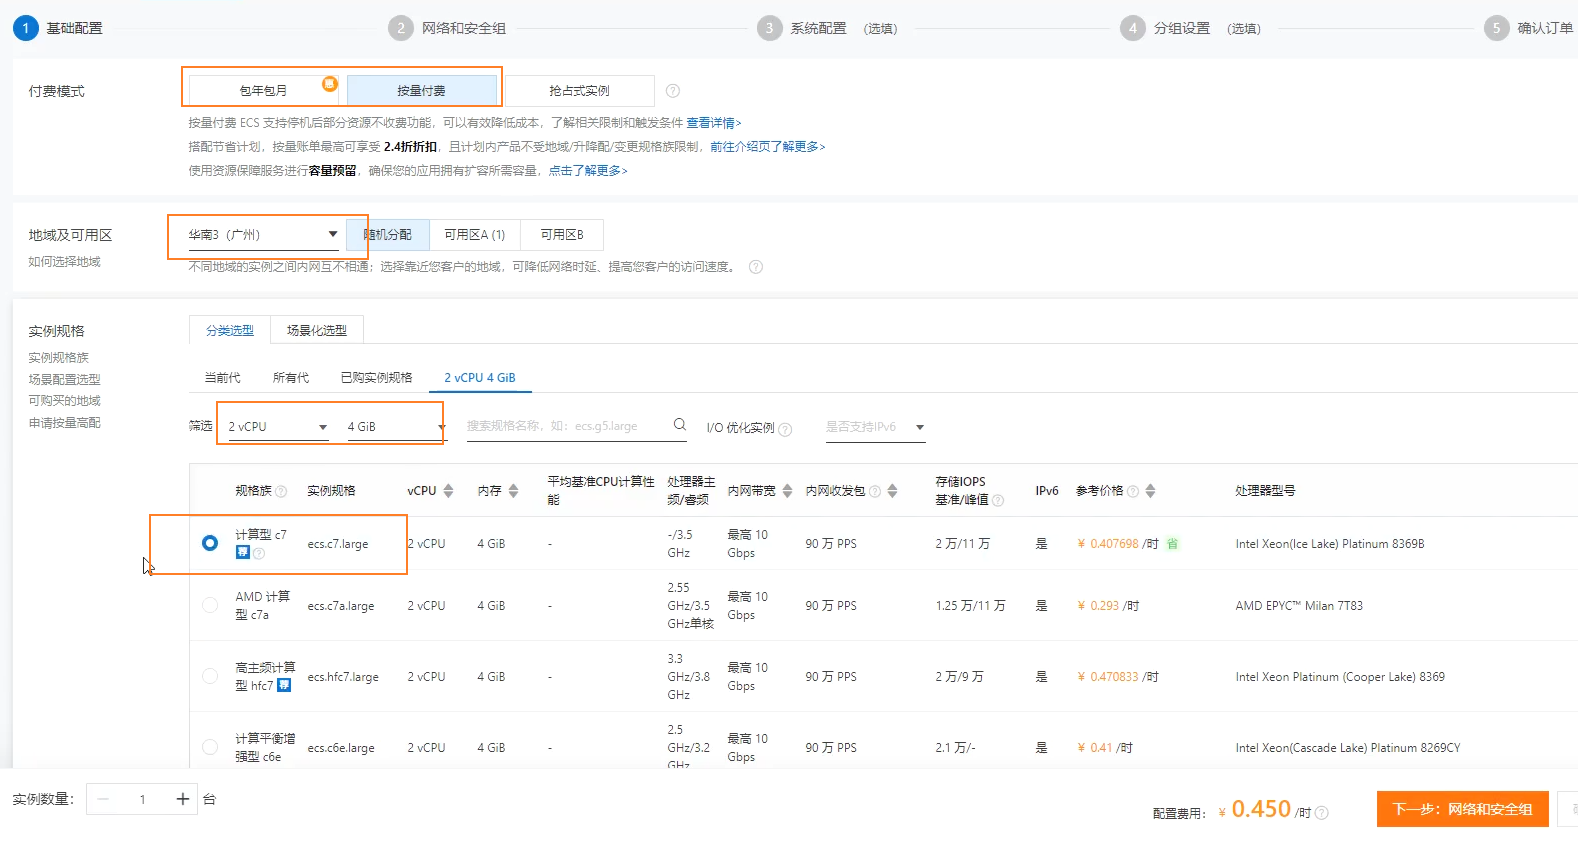
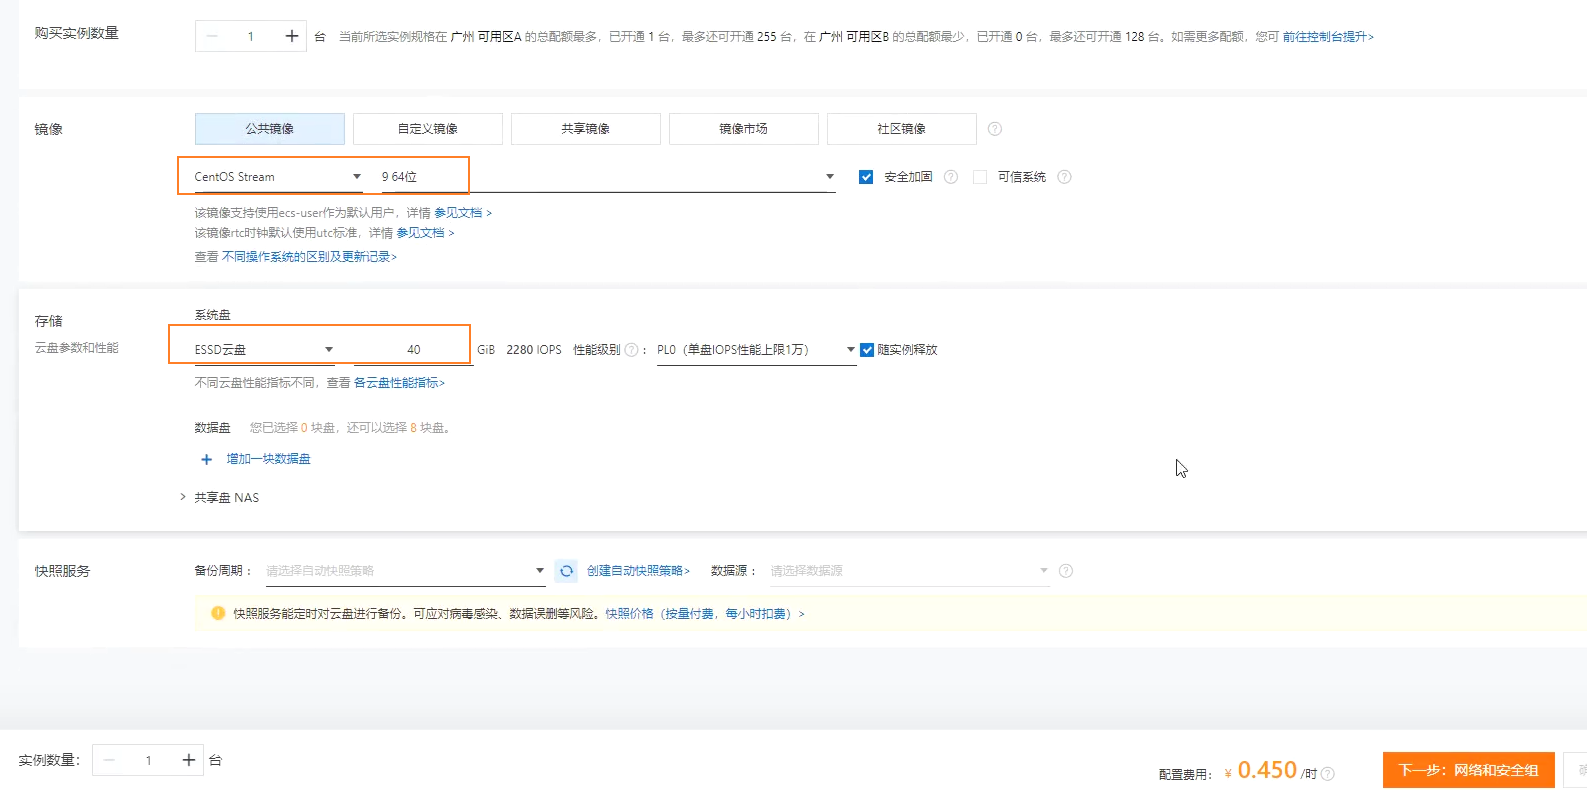
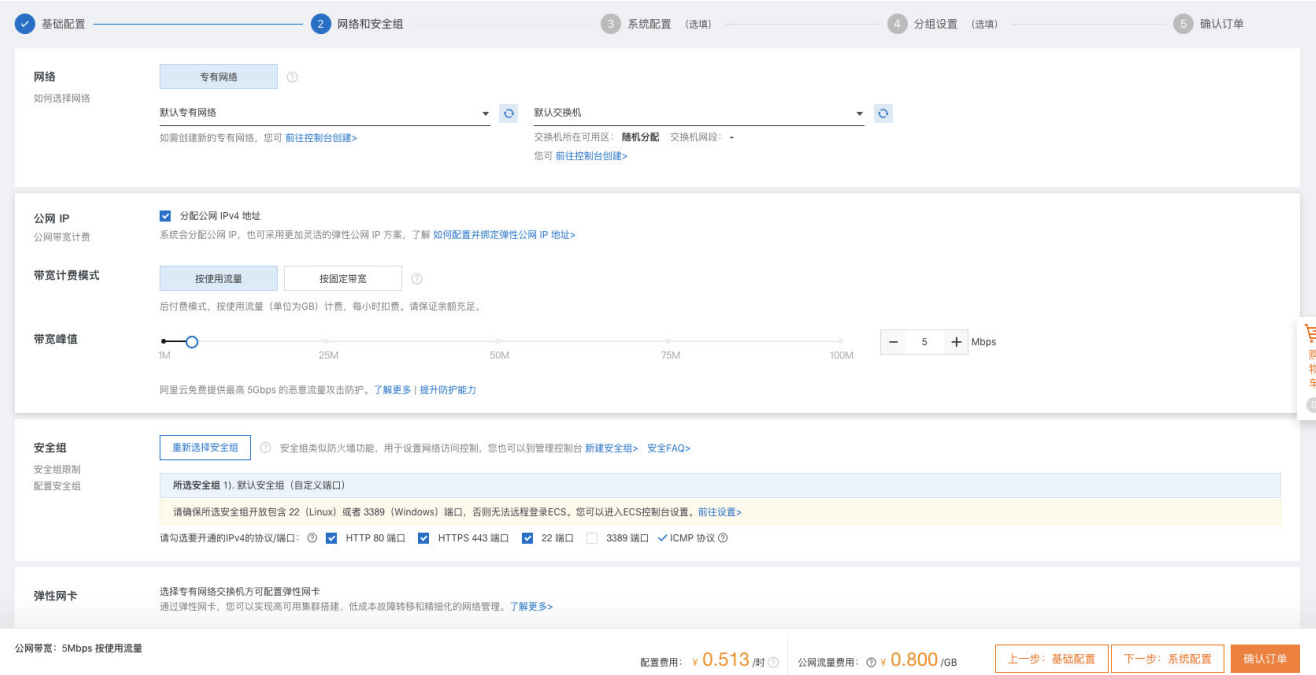
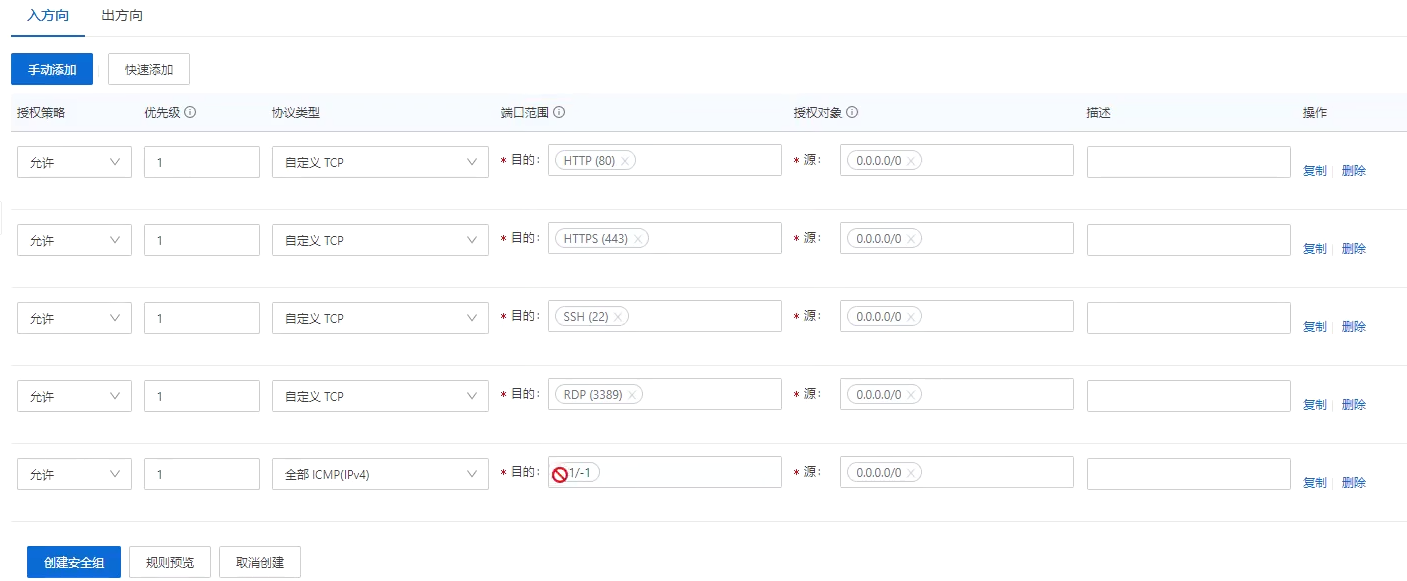
3.配置网络安全组
4.系统配置

5.创建实例

错误日志
部署二级路由前缀
vite
问题: vite 部署时,前缀 /trip2 问题
配置:
1、在
vite.config.js文件中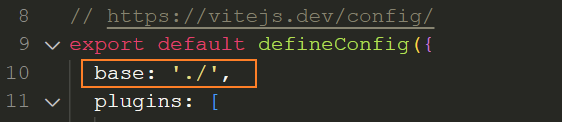
2、在 router 中

3、在 linux 服务器中,设置
nginx.config文件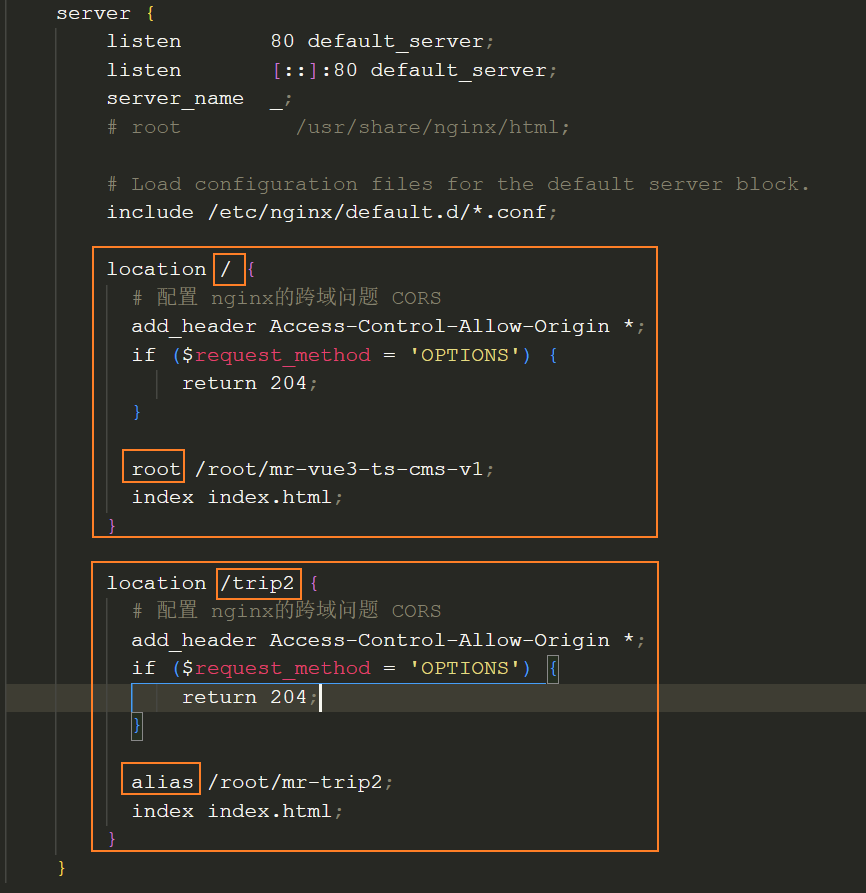
webpack【】
react
Nginx
        location /music {
          # 配置 nginx的跨域问题 CORS
          add_header Access-Control-Allow-Origin *;
          if ($request_method = 'OPTIONS') {
              return 204;
          }

          alias /root/mr-react18-ts-music;
          index index.html;
        }
        # 设置路由前缀,解决无法访问静态资源
+        location /music/static/ {
+          alias /root/mr-react18-ts-music/static/;
+ }项目-package.json
{
    # 其它配置
+  "homepage": "/music"
}项目-router
root.render( +
<BrowserRouter basename="/music/">
  <Provider store="{store}">
    <ThemeProvider theme="{theme}">
      <App />
    </ThemeProvider>
  </Provider>
</BrowserRouter>
)https服务器请求http失败
问题: 在 https 上部署的静态站点,通过 axios 请求 http 服务器上的资源时,会被 block
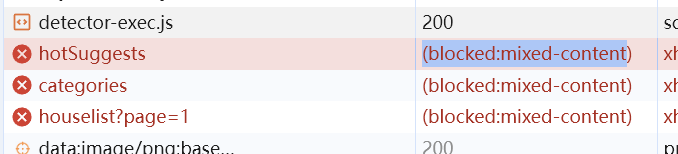
解决:
方法一: 将调用的 http 请求升级成 https 请求并调用(无效,接口服务器没有开启 https)
html<meta http-equiv="Content-Security-Policy" content="upgrade-insecure-requests" />方法二:通过本地的后端代理一下【TODO】。文档:https://cloud.tencent.com/developer/article/1656002
方法三:不要将请求 http 的项目部署在 https 的服务器中