React-项目:爱彼迎
[TOC]
项目介绍
爱彼迎团队:
开发团队国内200多个人;
经历过数年版本迭代最终完成的一个产品;
爱彼迎目前的项目
已经不针对国内房东、订房进行维护,依然可以订阅国外的房屋;
爱彼迎已经退出中国市场,不排除有一天国内的网站不能继续访问;
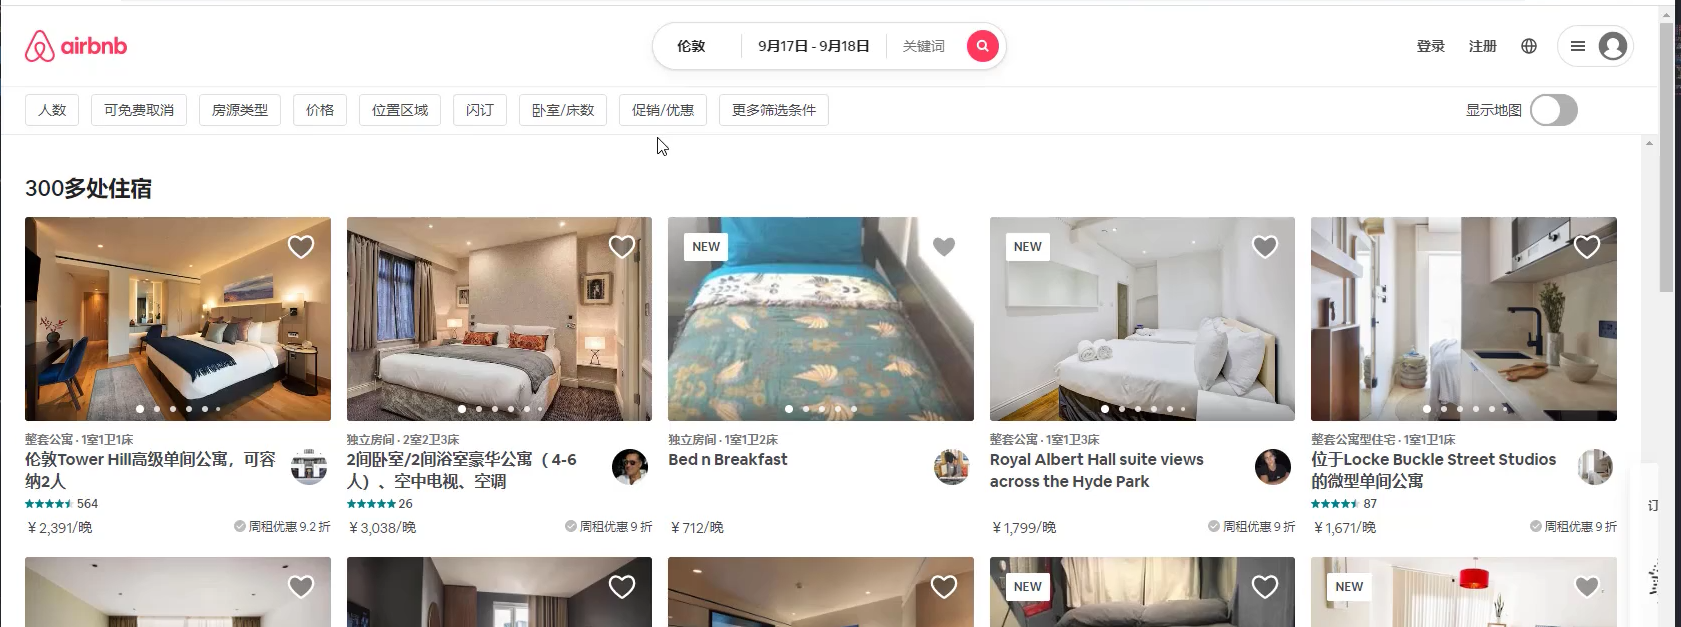
项目本身确实非常美观、好看;
项目核心学习、掌握的知识点:
对于第一个React项目,我们的核心是对前面所学知识进行练习、实战;
掌握React开发的流程、模式、项目架构,项目中会有很多组件、工具等封装、抽取、复用思想;
最重要的是学习React开发的模式和编程的思想,而不是局限于我上课期间所讲的内容,并且大部分样式和布局内容需要大家课程自行完成;
在这个项目过程中,我会尽量将之前所学的所有知识都运用起来,但是我们不会为了用某个知识而用某个知识;
课程中会使用我服务器已经获取到的数据,一是国内的数据更好看,二是担心它数据有一天不再维护,三是我对数据已经进行了大量的整理;
后续我们还会专门学习React+TypeScript项目实战的内容,React本身非常的灵活,对JavaScript本身要求也较高,但是最重要的还是练习;
项目规范
- 文件夹、文件名称统一小写、多个单词以连接符(-)连接;
- JavaScript变量名称采用小驼峰标识,常量全部使用大写字母,组件采用大驼峰;
- CSS采用普通CSS和styled-components结合来编写(全局采用普通CSS、局部采用styled-components);
- 整个项目不再使用class组件,统一使用函数式组件,并且全面拥抱Hooks;
- 所有的函数式组件,为了避免不必要的渲染,全部使用memo进行包裹;
- 组件内部的状态,使用useState、useReducer;业务数据全部放在redux中管理;
- 函数组件内部基本按照如下顺序编写代码:
- 组件内部state管理;
- redux的hooks代码;
- 其他hooks相关代码(比如自定义hooks);
- 其他逻辑代码;
- 返回JSX代码;
- redux代码规范如下:
- redux目前我们学习了两种模式,在项目实战中尽量两个都用起来,都需要掌握;
- 每个模块有自己独立的reducer或者slice,之后合并在一起;
- redux中会保存共享的状态、从服务器获取到的数据状态;
- 网络请求采用axios
- 对axios进行二次封装;
- 所有的模块请求会放到一个请求文件中单独管理;
- 项目使用AntDesign、MUI(Material UI)
- 爱彼迎本身的设计风格更多偏向于Material UI,但是课程中也会尽量讲到AntDesign的使用方法;
- 项目中某些AntDesign、MUI中的组件会被拿过来使用;
- 但是大部分组件还是自己进行编写、封装、实现;
- 其他规范在项目中根据实际情况决定和编写;
创建react项目
1、创建项目:
create-react-app mr-airbnb2、项目配置:
配置项目的icon
配置项目的标题
配置jsconfig.json
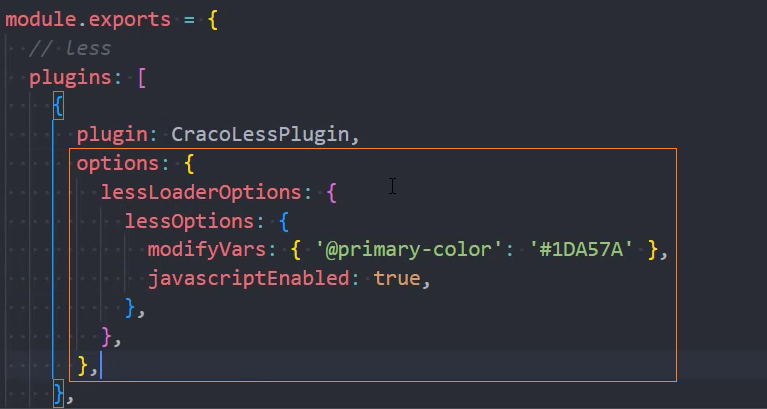
3、通过craco配置别名和less文件:
安装:
安装craco:
npm i @craco/craco@alpha -D安装less:
npm i craco-less@2.1.0-alpha.0 -D创建文件:
craco.config.js配置别名
jsconst path = require('path') function resolve(pathname) { return path.resolve(__dirname, pathname) } module.exports = { webpack: { // 配置别名 alias: { '@': resolve('src') } } }配置less
jsconst path = require('path') + const CracoLessPlugin = require('craco-less') function resolve(pathname) { return path.resolve(__dirname, pathname) } module.exports = { // 配置Less + plugins: [ + { + plugin: CracoLessPlugin + } + ], webpack: { // 配置别名 alias: { '@': resolve('src') } } }修改启动脚本
js"scripts": { + "start": "craco start", + "build": "craco build", + "test": "craco test", "eject": "react-scripts eject" },
目录结构
对项目进行目录结构的划分:
CSS样式的重置
对默认CSS样式进行重置:
normalize.css
安装:
npm i normalize.cssreset.css
js@mainColor: #484848; body, button, dd, dl, dt, form, h1, h2, h3, h4, h5, h6, hr, input, li, ol, p, td, textarea, th, ul { padding: 0; margin: 0; } a { color: @mainColor; text-decoration: none; } img { vertical-align: top; } ul, ol, li { list-style-type: none; }
全家桶–Router配置
1、安装:npm i react-router-dom
2、导入HashRouter
import { HashRouter } from 'react-router-dom';
root.render(
  <HashRouter>
    <App />
  </HashRouter>
);3、配置路由
import { lazy } from "react"
import { Navigate } from "react-router-dom"

import NotFound from "@/views/not-found"
// 路由懒加载
const Home = lazy(() => import('@/views/home'))
const Detail = lazy(() => import('@/views/detail'))
const Entire = lazy(() => import('@/views/entire'))

const routes = [
  { path: '/', element: <Navigate to='/home'/> },
  { path: '/home', element: <Home /> },
  { path: '/entire', element: <Entire /> },
  { path: '/detail', element: <Detail /> },
  { path: '*', element: <NotFound /> }

]
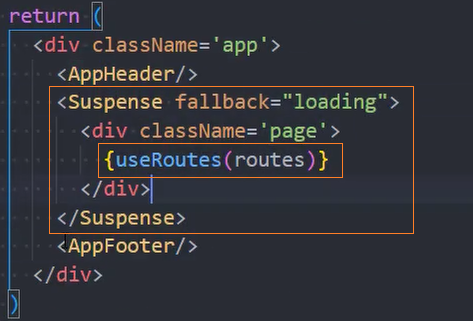
export default routes4、异步加载时使用Suspense包裹App
root.render(
  <Suspense fallback={<div>Loading...</div>}>
    <HashRouter>
      <App />
    </HashRouter>
  </Suspense>
)5、挂载路由
+ import { useRoutes } from 'react-router-dom'
+ import routes from './router'

const App = memo(() => {
  return (
    <div>
      <div className="header">Header</div>
      <div className="pages">
        {/* 挂载路由 */}
+        {useRoutes(routes)}
      </div>
      <div className="footer">Footer</div>
    </div>
  )
})全家桶–Redux状态管理
Redux状态管理的选择:
- 普通方式:目前项目中依然使用率非常高;
- @reduxjs/toolkit方式:推荐方式, 未来的趋势;
1、安装:
- 安装RTK:
npm i @reduxjs/toolkit - 安装react-redux:
npm i react-redux
2、创建store
import { configureStore } from "@reduxjs/toolkit";
import homeReducer from './features/home'

const store = configureStore({
  reducer: {
    home: homeReducer
  }
})

export default store3、创建reducer
RTK方式:
import { createSlice } from "@reduxjs/toolkit";

const homeSlice = createSlice({
  name: 'home',
  initialState: {
    count: 100,
    banners: []
  },
  reducers: {

  }
})

export default homeSlice.reducer普通方式:
constants.js
jsexport const CHANGE_MSG = 'change_msg'createAction.js
jsimport { CHANGE_MSG } from "./constants"; export function changeMsg(msg) { return { type: CHANGE_MSG, msg: msg } }reducer.js
jsimport { CHANGE_MSG } from "./constants" const initialState = { msg: 'hi' } function reducer(state = initialState, action) { switch(action.type) { case CHANGE_MSG: return { ...state, msg: action.msg } default: return state } } export default reducerindex.js
jsimport detailReducer from "./reducer"; import { changeMsg } from "./createAction"; export { detailReducer, changeMsg }
4、导入store到组件树
root.render(
+  <Provider store={store}>
    <Suspense fallback={<div>Loading...</div>}>
      <HashRouter>
+        <App />
      </HashRouter>
    </Suspense>
+  </Provider>
)网络请求-axios
1、安装:npm i axios
2、封装axios
import axios from "axios";

import { BASE_URL, TIMEOUT } from "./config";

class MrRequest {
  constructor(baseURL, timeout = 10000) {
    this.instance = axios.create({baseURL, timeout})
    this.instance.interceptors.response.use(res => {
      return res.data
    }, err => {
      return err
    })
  }
  request(config) {
    return this.instance.request(config)
  }
  get(config) {
    return this.request({...config, method: 'GET'})
  }
  post(config) {
    return this.request({...config, method: 'POST'})
  }
}

const mrRequest = new MrRequest(BASE_URL, TIMEOUT)
export default mrRequest3、配置
export const BASE_URL = 'http://codercba.com:1888/airbnb/api'
export const TIMEOUT = 100004、测试网络请求
const Home = memo(() => {
  const [highScore, setHighScore] = useState({})

  // 测试网络请求
  useEffect(() => {
+    mrRequest.request({
+      url: '/home/highScore'
+    }).then(res => {
+      setHighScore(res)
+    })
+  }, [])

  return (
    <div>
      <h3>Home</h3>
      <div className="high-score">
        <div className="title">{highScore.title}</div>
        <div className="subtitle">{highScore.subtitle}</div>
        <ul className="list">
          {
            highScore.list?.map(item => {
              return (
                <li key={item.id}>{item.name}</li>
              )
            })
          }
        </ul>
      </div>
    </div>
  )
})集成UI组件库
MUI
安装
MUI + styled-components
npm i @mui/material @mui/styled-engine-sc styled-components配置styled-components
 module.exports = {
   //...
+  resolve: {
+    alias: {
+      '@mui/styled-engine': '@mui/styled-engine-sc'
+    },
+  },
};使用MUI

错误:
使用button时报错:

解决:
安装@emotion/react 、 @emotion/styled
npm i @mui/material @emotion/react @emotion/styledAntd
安装
npm i antd配置antd + less
1、引入样式
@import "~antd/dist/antd.less"
// 或者
import 'antd/dist/antd.less'2、配置webpack
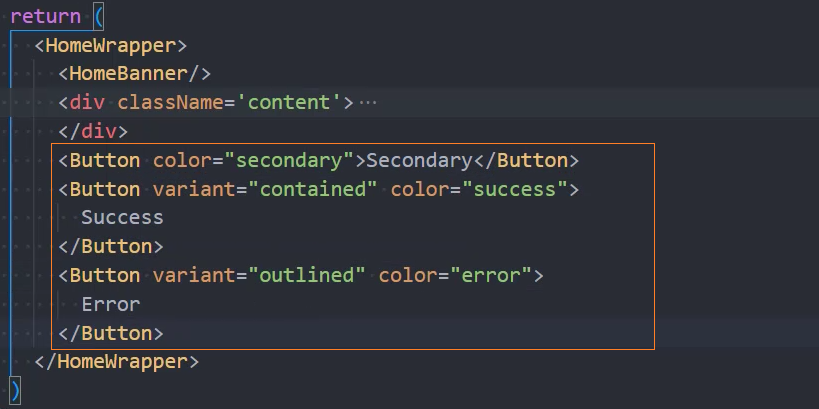
使用antd


组件
AppHeader

页面布局
const AppHeader = memo((props) => {
  return (
    <AppHeaderWrapper>
      <HeaderLeft />
      <HeaderCenter />
      <HeaderRight />
    </AppHeaderWrapper>
  )
})HeaderLeft

const HeaderLeft = memo(() => {
  return (
    <HeaderLeftWrapper>
+      <img className='logo' src={require("@/assets/img/logo.png")} alt="" />
    </HeaderLeftWrapper>
  )
})HeaderCenter
const HeaderCenter = memo((props) => {
return (
<HeaderCenterWrapper>
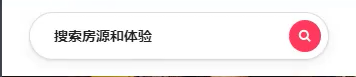
<div className="text">搜索房源和体验</div>
<div className="search">
<IconSearch />
</div>
</HeaderCenterWrapper>
)
})HeaderRight
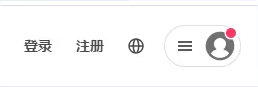
const HeaderRight = memo((props) => {
  return (
    <HeaderRightWrapper>
      <div className="btns">
        <span className="btn">登录</span>
        <span className="btn">注册</span>
        <span className="btn">
          <IconGlobal />
        </span>
      </div>
      <div className="profile">
        <span className='icon icon-list'>
          <IconList />
        </span>
        <span className='icon icon-profile'>
          <IconProfile />
        </span>
      </div>
    </HeaderRightWrapper>
  )
})阴影动画效果
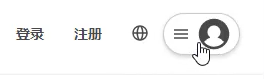
基本写法
.profile {
  transition: box-shadow 200ms ease;
  &:hover {
    box-shadow: 0 2px 4px rgba(0,0,0,.18);
  }
}抽取动画效果
const theme = {
  mixin: {
    boxShadow: `
      transition: box-shadow 200ms ease;
      &:hover {
        box-shadow: 0 2px 4px rgba(0,0,0,.18);
      }
    `
  }
}使用动画效果
  .profile {
    width: 280px;
    padding-left: 15px;
    font-weight: 600;
+    ${props => props.theme.mixin.boxShadow}
}Profile点击面板切换效果
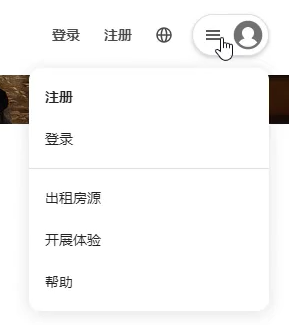
1、布局
      <div className="profile" onClick={e => setIsPanelShow(true)}>
        <span className='icon icon-list'>
          <IconList />
        </span>
        <span className='icon icon-profile'>
          <IconProfile />
        </span>

+        {/* 面板 */}
+        <div className="panel">
          <div className="top">
            <div className="item register">注册</div>
            <div className="item login">登录</div>
          </div>
          <div className="bottom">
            <div className="item">出租房源</div>
            <div className="item">开展体验</div>
            <div className="item">帮助</div>
          </div>
        </div>
</div>2、点击切换显示和隐藏
const HeaderRight = memo((props) => {
  const [isPanelShow, setIsPanelShow] =  useState(false)
        {/* 面板 */}
+        {isPanelShow && (
          <div className="panel">
            ...
          </div>
        )}
})3、点击Profile显示
<div className="profile" onClick={(e) => setIsPanelShow(true)}>4、监听window点击,隐藏面板
注意: 需要在addEventListener最后的参数设置true,表示捕获模式,这样点击window时才会隐藏面板
  useEffect(() => {
    function windowClickHandle() {
      setIsPanelShow(false)
    }
    window.addEventListener('click', windowClickHandle, true)
    return () => {
      window.removeEventListener('click', windowClickHandle, true)
    }
}, [])在网页中嵌入SVG图片
1、将svg保存到组件中,并导出
import React, { memo } from 'react'
import styleStrToObj from '../utils'

const IconMenu = memo(() => {
  return (
    <svg viewBox="0 0 32 32" xmlns="http://www.w3.org/2000/svg" aria-hidden="true" role="presentation" focusable="false" style={styleStrToObj("display: block; fill: none; height: 100%; width: 100%; stroke: currentcolor; stroke-width: 3; overflow: visible;")}><g fill="none" fillRule="nonzero"><path d="m2 16h28"></path><path d="m2 24h28"></path><path d="m2 8h28"></path></g></svg>
  )
})

export default IconMenu2、修改svg中的style为jsx格式的style对象写法
style={styleStrToObj("display: block; fill: none; height: 100%; width: 100%; stroke: currentcolor; stroke-width: 3; overflow: visible;")3、styleStrToObj方法
function styleStrToObj(styleStr) {
  const obj = {}
  const s = styleStr
              .toLowerCase()
              .replace(/-(.)/g, function(m, g) {
                return g.toUpperCase()
              })
              .replace(/;\s?$/g, '')
              .split(/:|;/g)
  for(let i=0; i<s.length; i+=2) {
    obj[s[i].replace(/\s/g, '')] = s[i+1].replace(/^\s+|\s+$/g, '')
  }
  return obj
}

export default styleStrToObj4、修改svg颜色:修改svg的父元素的颜色
    .icon{
      display: inline-block;
+      color: ${props => props.theme.color.second};
}5、在页面中使用该组件
  <span className='icon icon-profile'>
+    <IconProfile />
</span>设置主题色
方式一:CSS原生的方法

方式二:styled-components的方式
1、定义theme
const theme = {
color: {
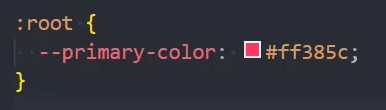
main: '#484848',
second: '#767676'
}
}
export default theme2、使用styled-components 中的ThemeProvider挂载theme到组件树中
root.render(
  <Suspense fallback={<div>Loading...</div>}>
    <Provider store={store}>
+      <ThemeProvider theme={theme}>
        <HashRouter>
          <App />
        </HashRouter>
+      </ThemeProvider>
    </Provider>
  </Suspense>
)3、在组件中使用theme
  .icon{
    display: inline-block;
+    color: ${props => props.theme.color.second};
}AppFooter
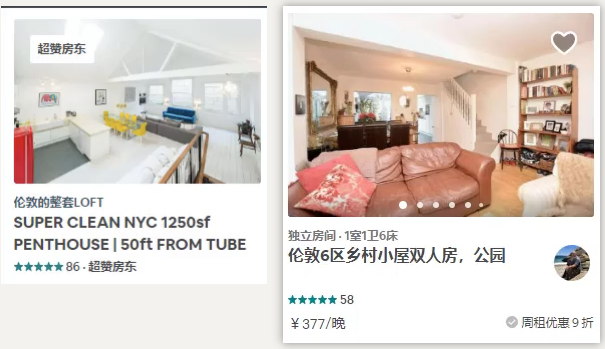
页面布局
const AppFooter = memo(() => {
  return (
    <AppFooterWrapper>
      <div className="container">
        <div className="links">
+          {footerData.map((item, index) => {
            return (
              <dl className="item-group" key={index}>
                <dt className="item-title">{item.name}</dt>
+                {item.list.map((iten, indey) => {
                  return (
+                    <dd className="item-cell" key={indey}>
+                      {iten}
+                    </dd>
                  )
                })}
              </dl>
            )
          })}
        </div>
        <div className="info">
          <div className="left">
            <div className="logo">
              <IconLogo />
            </div>
            <div className="text">
              <div>
                <a href="#">京ICP备16017121号</a>
                <a href="#">京ICP证 160773号</a>
                <img className="icon" src={require('@/assets/img/public_security_bureau_logo.png')} alt="" />
                <a href="#">京公网安备 11010502032345号</a>
                <span>安彼迎网络(北京)有限公司</span>
                <img className="icon" src={require('@/assets/img/electronic_business_license.png')} alt="" />
                <a href="#">营业执照</a>
              </div>
              <div>
                <span>© 2023 Airbnb, Inc. All rights reserved.</span>
                <a href="#">条款</a>·<a href="#">隐私政策</a>·<a href="#">网站地图</a>·
                <span>· 全国旅游投诉渠道 12301</span>
              </div>
            </div>
          </div>
          <div className="right">
            <a className="tag" href="">
              <IconSina />
            </a>
            <a className="tag" href="">
              <IconWeixin />
            </a>
          </div>
        </div>
      </div>
    </AppFooterWrapper>
  )
})模拟数据
[
  {
    "name": "爱彼迎",
    "list": ["工作机会", "爱彼迎新闻", "政策", "无障碍设施"]
  },
  {
    "name": "发现",
    "list": ["信任与安全", "旅行基金", "商务差旅", "爱彼迎杂志", "Airbnb.org"]
  },
  {
    "name": "出租",
    "list": ["为什么要出租?", "房东义务", "开展体验", "资源中心"]
  },
  {
    "name": "客服支持",
    "list": ["帮助", "邻里支持"]
  }
]SectionHeader
import PropTypes from 'prop-types'
import React, { memo } from 'react'
import { SectionHeaderWrapper } from './style'

const SectionHeader = memo((props) => {
+  const { title, subtitle } = props
  return (
    <SectionHeaderWrapper>
      <h2 className="title">{title}</h2>
+      {subtitle && <div className="subtitle">{subtitle}</div>}
    </SectionHeaderWrapper>
  )
})

SectionHeader.propTypes = {
+  title: PropTypes.string,
+  subtitle: PropTypes.string
}

export default SectionHeader使用组件
  return (
    <HomeSectionWrapper>
+      <SectionHeader title={infoData?.title} subtitle={infoData?.subtitle}/>
      <SectionRooms roomList={infoData?.list?.slice(0, 8)}/>
    </HomeSectionWrapper>
)SectionRooms
页面布局
import PropTypes from 'prop-types'
import React, { memo } from 'react'
import { SectionRoomsWrapper } from './style'
import RoomItem from '../RoomItem'

const SectionRooms = memo((props) => {
+  const { roomList } = props
  return (
    <SectionRoomsWrapper>
      {
+        roomList?.map(item => {
+          return <RoomItem key={item.id} itemData={item}/>
+        })
      }
    </SectionRoomsWrapper>
  )
})

SectionRooms.propTypes = {
+  roomList: PropTypes.array
}

export default SectionRooms使用组件
  return (
    <HomeSectionWrapper>
      <SectionHeader title={infoData?.title} subtitle={infoData?.subtitle}/>
+      <SectionRooms roomList={infoData?.list?.slice(0, 8)}/>
    </HomeSectionWrapper>
)RoomItem
页面布局
import PropTypes from 'prop-types'
import React, { memo } from 'react'
import { RoomItemWrapper } from './style'
import { Rate } from 'antd'

const RoomItem = memo((props) => {
  const { itemData } = props
  return (
    <RoomItemWrapper>
      <div className="inner">
+        {/* 1. 设置长款一样的图片 */}
        <div className="cover">
          <img src={itemData.picture_url} alt="" />
        </div>
        <div className="tag">
          <span className="text">{itemData.verify_info.messages.join(' · ')}</span>
        </div>
        <div className="title">{itemData.name}</div>
        <div className="price">
          <div className="bottom">
+            {/* 2. 引入Antd组件 */}
            <Rate
              allowHalf
              value={itemData.star_rating ?? 5}
              style={{ fontSize: '12px', color: itemData.star_rating_color }}
            />
            <span className="reviews-count">{itemData.reviews_count}</span>
+            {/* 3. 只有当 bottom_info 有值时才显示comment */}
            {itemData.bottom_info && <span className="comment"> · {itemData.bottom_info?.content}</span>}
          </div>
        </div>
      </div>
    </RoomItemWrapper>
  )
})

RoomItem.propTypes = {
  itemData: PropTypes.object
}

export default RoomItem设置长款一样的图片
        <div className="cover">
          <img src={itemData.picture_url} alt="" />
</div> .cover {
position: relative;
+ padding: 66.6666% 5px 5px 5px;
img {
position: absolute;
top: 0;
left: 0;
width: 100%;
height: 100%;
}
}传递样式变量到css
const theme = {
  color: {
    main: '#484848',
    second: '#767676',
+    third: '#222222'
  }
}
export default theme .title {
font-weight: 600;
+ color: ${props => props.theme.color.third};
margin-top: 8px;
}调整rating的间距
    .ant-rate {
      li {
+        margin-inline-end: 0;
      }
}使用组件
const SectionRooms = memo((props) => {
const { roomList } = props
return (
<SectionRoomsWrapper>
{
roomList?.map(item => {
+ return <RoomItem key={item.id} itemData={item}/>
})
}
</SectionRoomsWrapper>
)
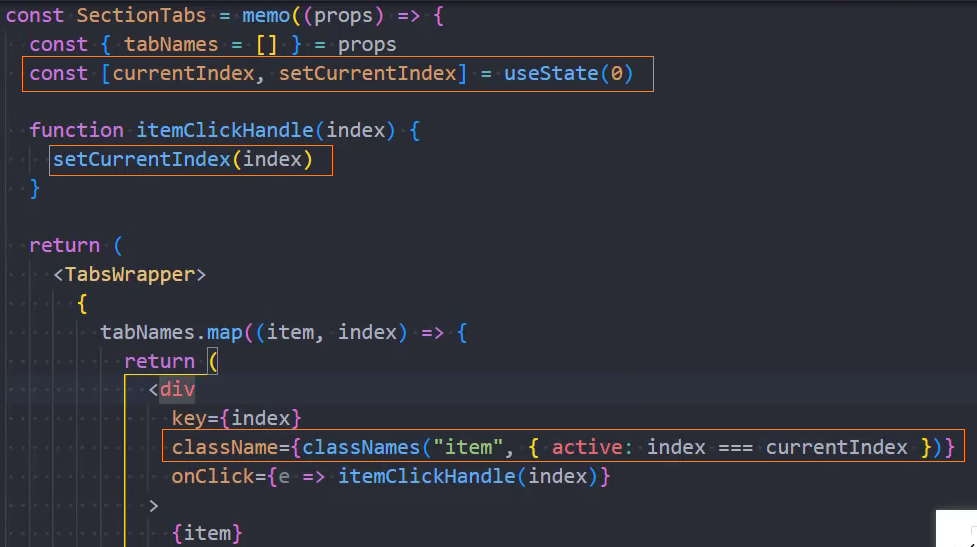
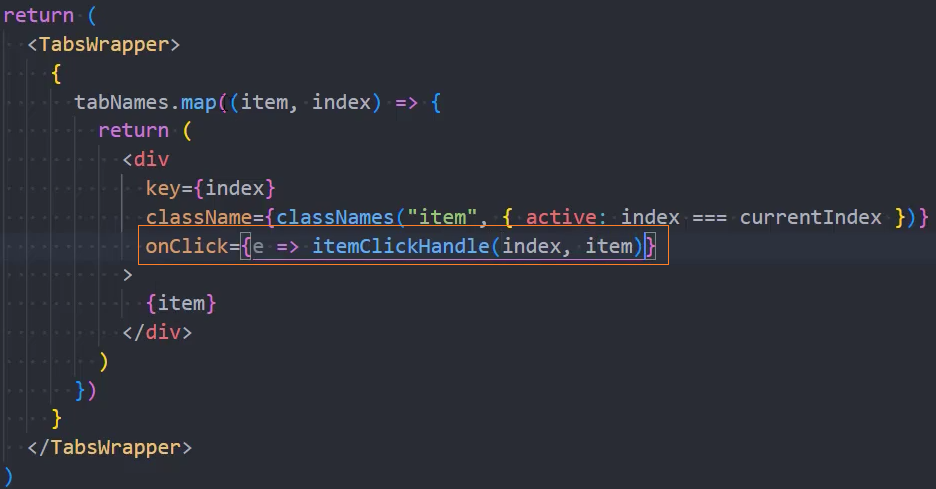
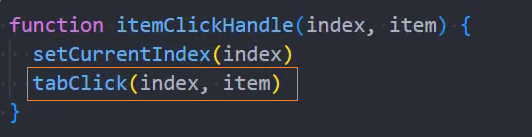
})Section-tabs
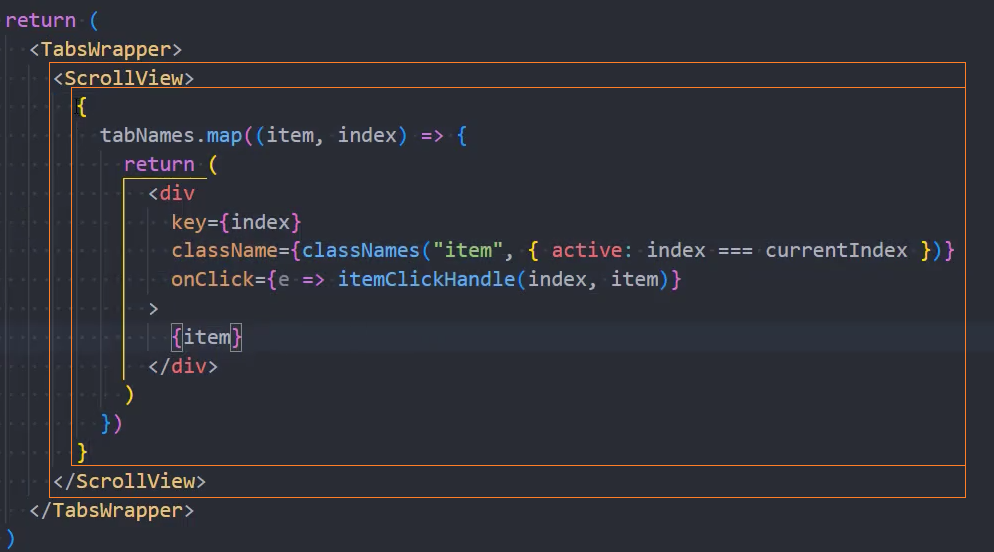
使用组件

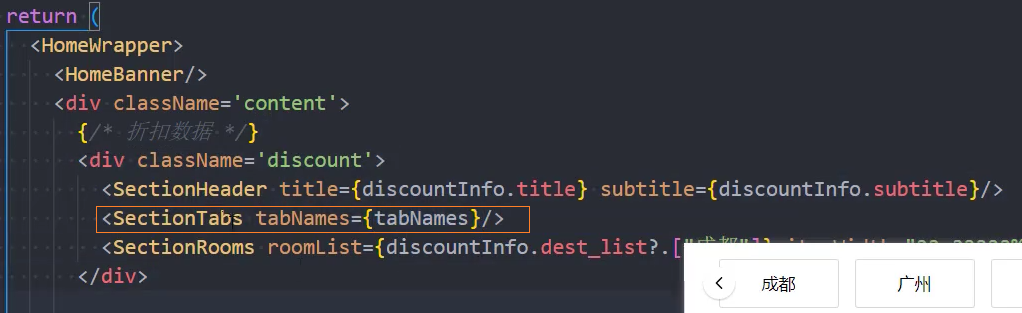
页面布局
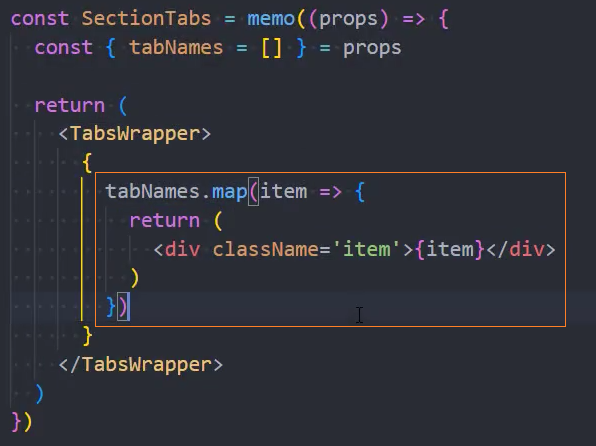
点击item,切换rooms

1、点击事件
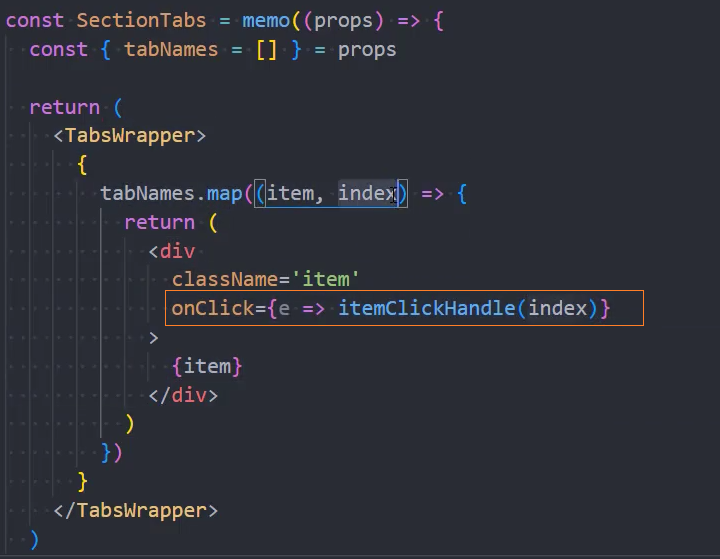
2、导入classnames
npm i classnames3、高亮点击的item

4、暴露内部切换事件
组件外部
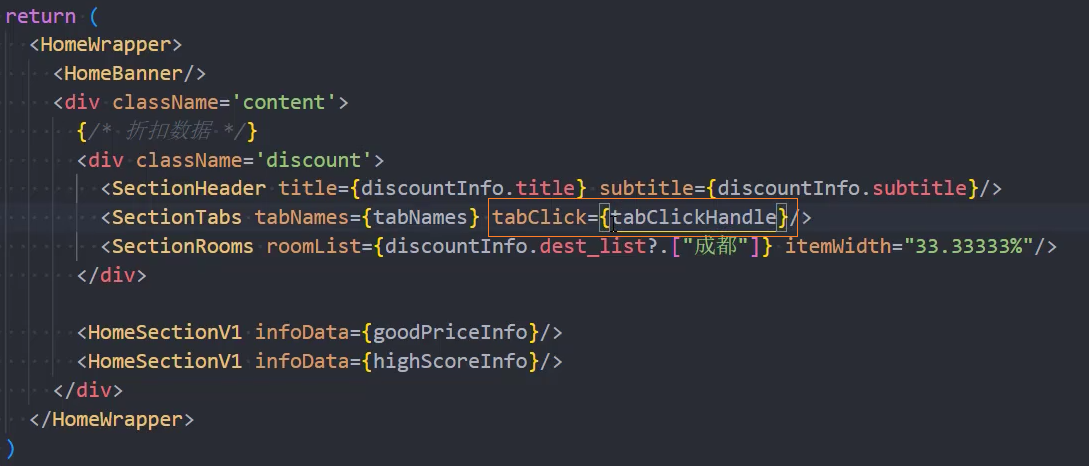
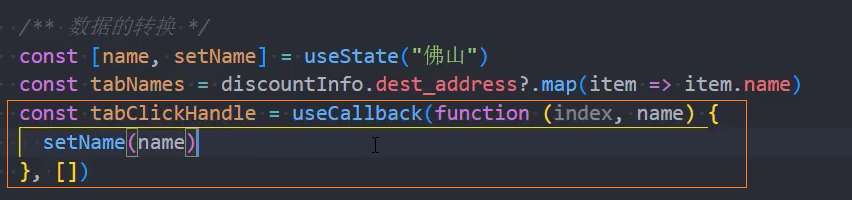

组件内部
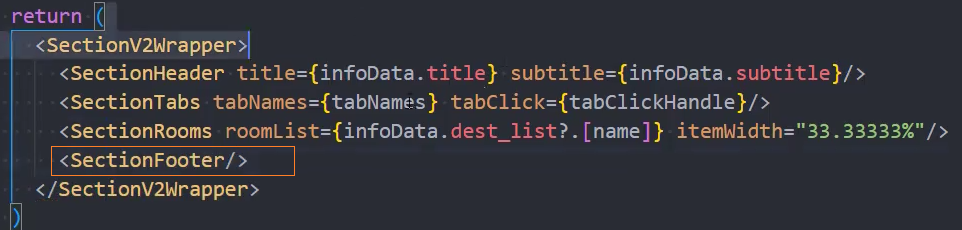
5、抽取带tabs的HomeSectionV2
见:组件:HomeSectionV2
tabs滚动效果
见:组件:ScrollView
SectionFooter
使用组件

页面布局
1、显示全部
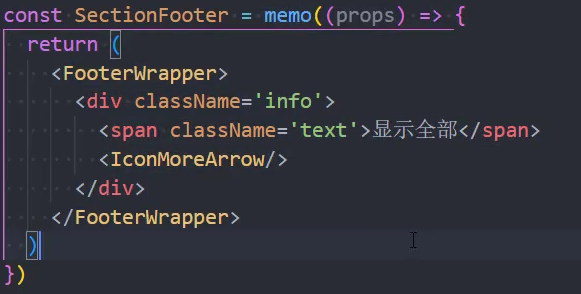
2、查看更多xxx房源

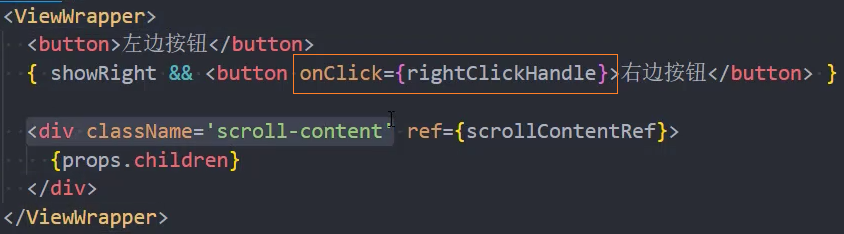
ScrollView


使用组件
页面布局
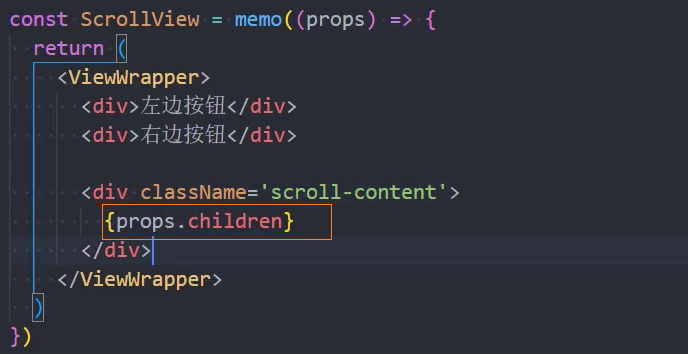
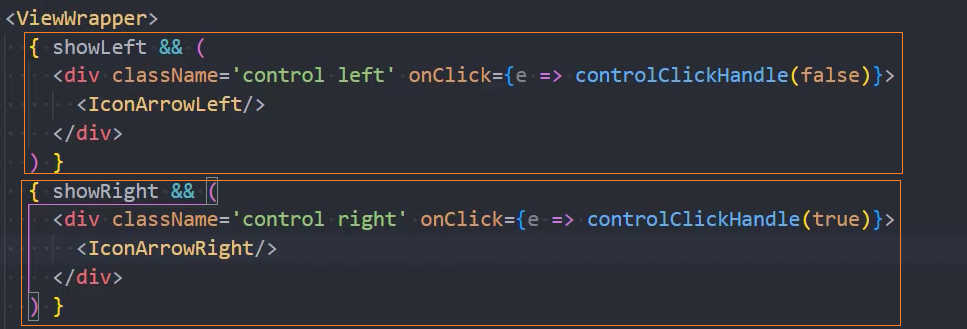
右边按钮
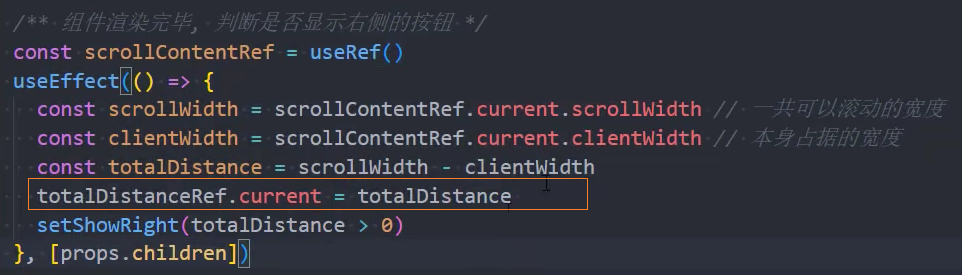
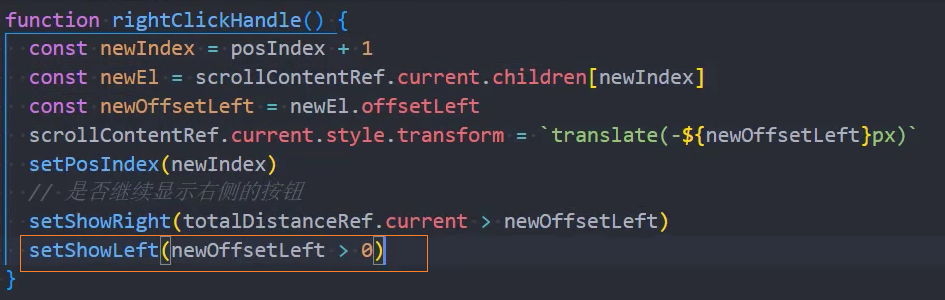
当scrollWidth - clientWidth的值大于0时,显示右边按钮
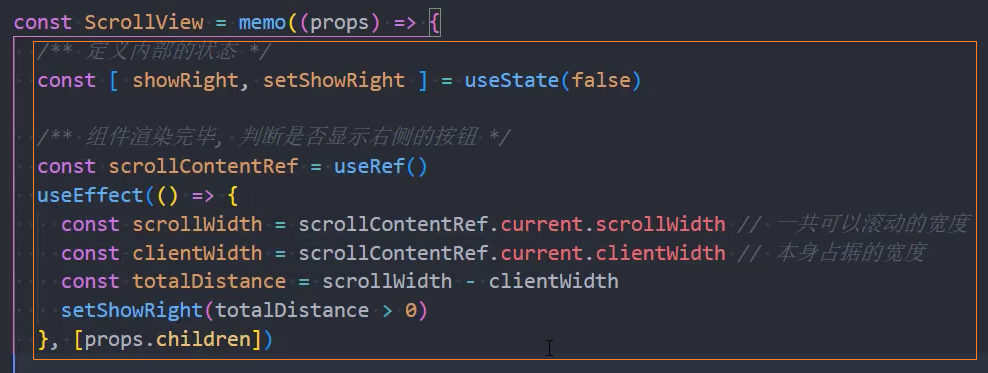
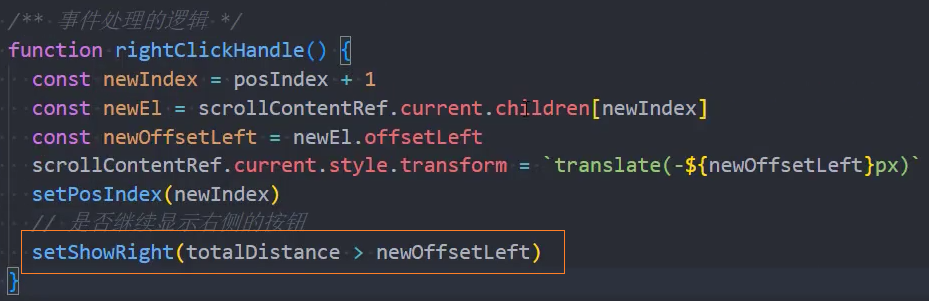
点击[右边按钮],向左滚动1个item的距离
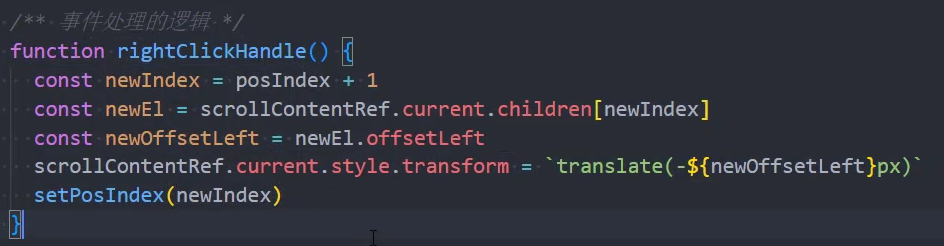
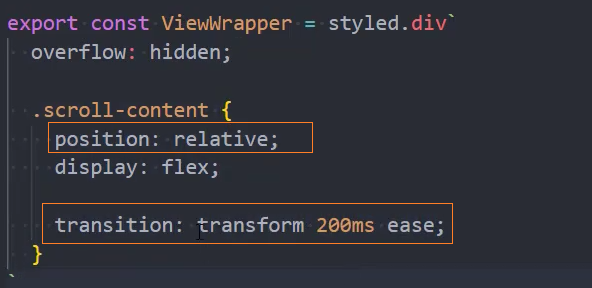
添加滚动动画
当totalDistance - newOffsetLeft的值大于0时,显示右边按钮,否则隐藏右边按钮

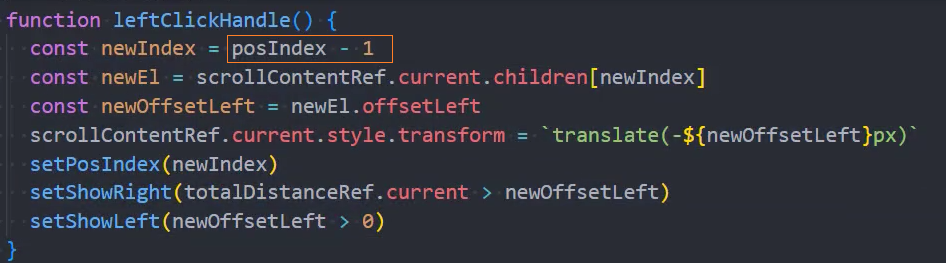
左边按钮
1、显示、隐藏左边按钮
当newOffsetLeft > 0 时显示左边按钮
点击右边按钮时
点击左边按钮时
2、抽取点击按钮的处理函数

按钮样式
Home
组件:HomeSection
页面布局
import PropTypes from 'prop-types'
import React, { memo } from 'react'
import { HomeSectionWrapper } from './style'
import SectionHeader from '../SectionHeader'
import SectionRooms from '../SectionRooms'

const HomeSection = memo((props) => {
+  const { infoData } = props
  return (
    <HomeSectionWrapper>
+      <SectionHeader title={infoData?.title} subtitle={infoData?.subtitle}/>
+      <SectionRooms roomList={infoData?.list?.slice(0, 8)}/>
    </HomeSectionWrapper>
  )
})

+ HomeSection.propTypes = {
+  infoData: PropTypes.object
+ }

export default HomeSection使用组件
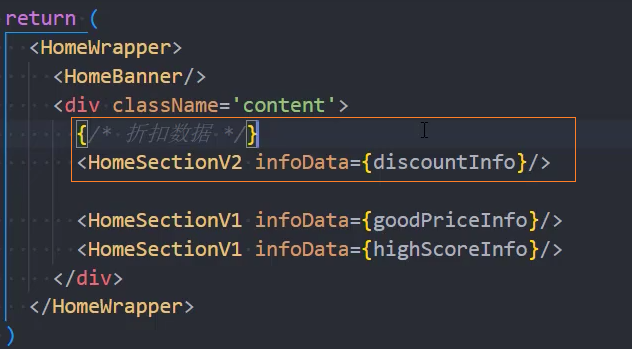
  return (
    <HomeWrapper>
      <HomeBanner />
      <div className="content">
+        <HomeSection infoData={goodPrice}/>
+        <HomeSection infoData={highScore}/>
+        <HomeSection infoData={plus}/>
      </div>
    </HomeWrapper>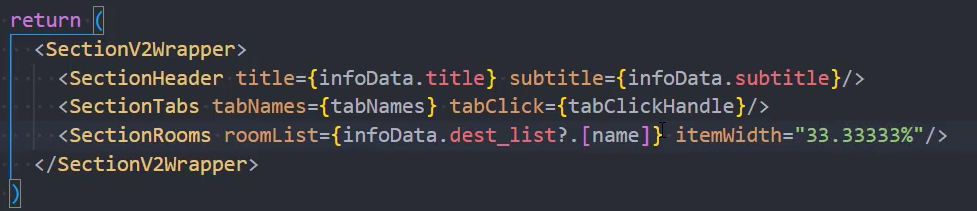
)组件:HomeSectionV2
使用组件
页面布局
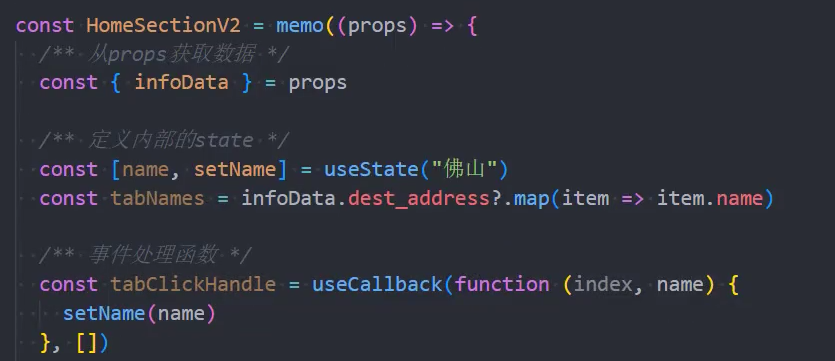
useState默认值
由于useState(initial)的initial只有在组件第一次渲染时才有效,但是此时第一次传递的是空字符串''

上面的方法无法提供默认值
解决方法:控制第一次discountInfo没有值时,不能渲染

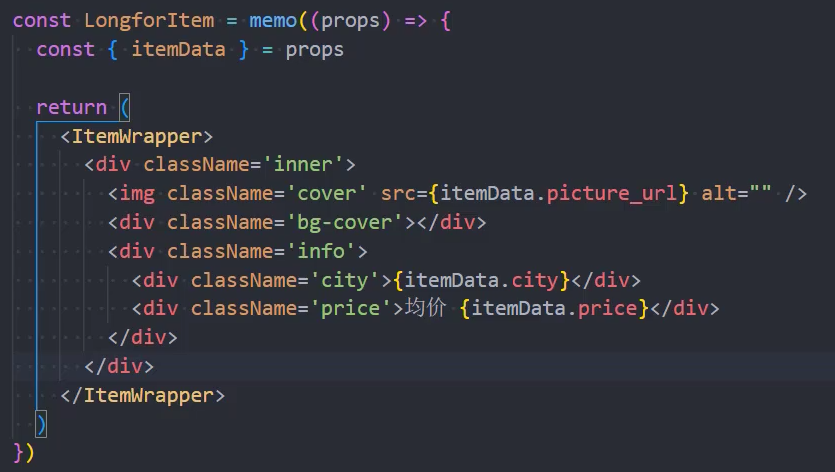
组件:HomeLongfor
使用组件

页面布局

组件:LongforItem
Banner
见:webpack中引入图片
webpack中引入图片
1、在img的src中引入图片
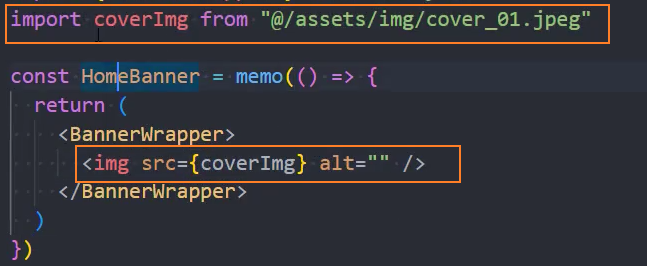
2、在background的url中引入图片
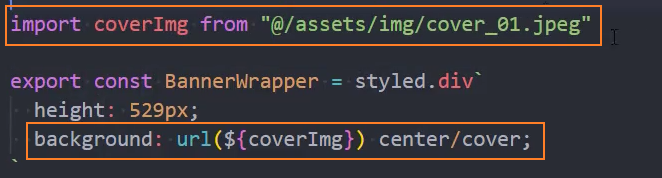
或者直接在模板字符串中使用require()函数导入
export const HomeBannerWrapper = styled.div`
  height: 529px;
  background: url(${require('@/assets/img/cover_01.jpeg')}) center/cover;
`高性价比
API:http://codercba.com:1888/airbnb/api/home/goodprice
页面布局
const Home = memo(() => {
  const dispatch = useDispatch()

  // 网络请求
  useEffect(() => {
    dispatch(fetechHomeDataAction())
  }, [dispatch])

  // 获取redux store
  const { goodPrice } = useSelector(state => ({
    goodPrice: state.home.goodPrice
  }))

  return (
    <HomeWrapper>
      <HomeBanner />
      <div className="content">
        <HomeSection infoData={goodPrice}/>
      </div>
    </HomeWrapper>
  )
})HomeSection见:组件:HomeSection
获取数据
1、在service中发送网络请求
// 高性价比
export const getHomeGoodprice = () => {
  return mrRequest.get({ url: '/home/goodprice' })
}2、redux
export const fetechHomeDataAction = createAsyncThunk('homedata', (payload, { dispatch }) => {
  // 高性价比
+  getHomeGoodprice().then((res) => {
+    dispatch(changeGoodPriceAction(res))
  })
})
const homeSlice = createSlice({
  name: 'home',
  initialState: {
    goodPrice: {}
  },
  reducers: {
+    changeGoodPriceAction(state, { payload }) {
+      state.goodPrice = payload
+    }
  }
})3、在组件中派发异步事件
const Home = memo(() => {
  const dispatch = useDispatch()

  // 网络请求
  useEffect(() => {
+    dispatch(fetechHomeDataAction())
  }, [dispatch])
})4、从redux中获取数据到组件中
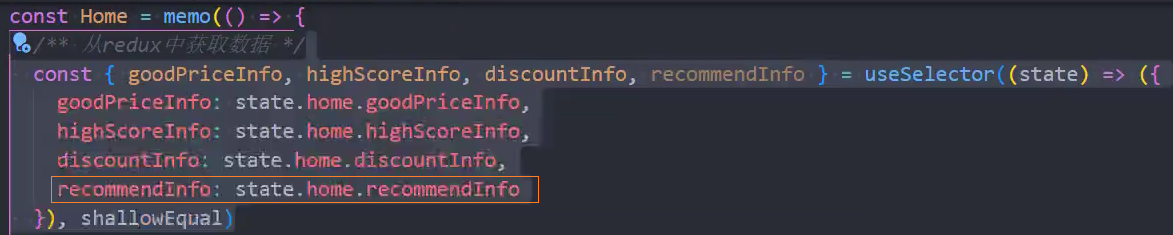
const Home = memo(() => {
  // 获取redux store
+  const { goodPrice } = useSelector(state => ({
+    goodPrice: state.home.goodPrice
+  }), shallowEqual)

  return (
    <HomeWrapper>
      <div className="content">
+        <HomeSection infoData={goodPrice}/>
      </div>
    </HomeWrapper>
  )
})高分房源
API: http://codercba.com:1888/airbnb/api/home/highscore
获取数据
1、services
// 高分房源
export const getHomeHighScore = () => {
  return mrRequest.get({ url: '/home/highscore' })
}2、store/modules/home.js
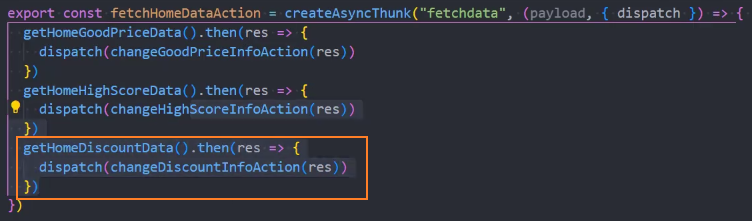
在createAsyncThunk 中同时发送多个异步请求,可以通过dispath 将获得的res保存到state中
export const fetechHomeDataAction = createAsyncThunk('homedata', (payload, { dispatch }) => {
  // 高性价比
  getHomeGoodprice().then((res) => {
    dispatch(changeGoodPriceAction(res))
  })

  // 高分房源
+  getHomeHighScore().then((res) => {
+    dispatch(changeHighScoreAction(res))
+  })
})
const homeSlice = createSlice({
  name: 'home',
  initialState: {
    goodPrice: {},
    highScore: {}
  },
  reducers: {
    changeGoodPriceAction(state, { payload }) {
      state.goodPrice = payload
    },
+    changeHighScoreAction(state, { payload }) {
+      state.highScore = payload
+    }
  },
})
+ export const { changeGoodPriceAction, changeHighScoreAction } = homeSlice.actions3、在组件中获取highScore数据
const Home = memo(() => {
  // 获取redux store
  const { goodPrice, highScore, plus } = useSelector(state => ({
    goodPrice: state.home.goodPrice,
+    highScore: state.home.highScore
  }), shallowEqual)
})4、在组件中展示数据
const Home = memo(() => {
  return (
    <HomeWrapper>
      <HomeBanner />
      <div className="content">
        <HomeSection infoData={goodPrice}/>
+        <HomeSection infoData={highScore}/>
      </div>
    </HomeWrapper>
  )
})抽取组件
见:Home / 组件:HomeSection
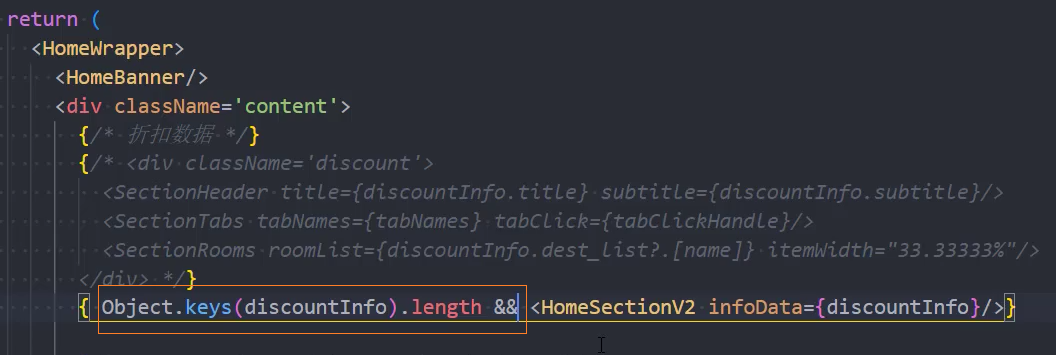
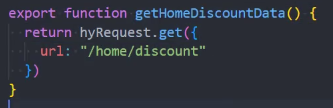
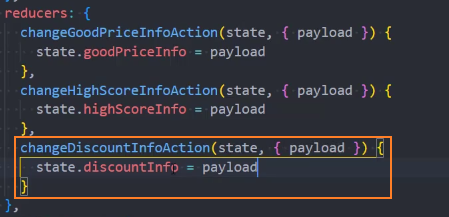
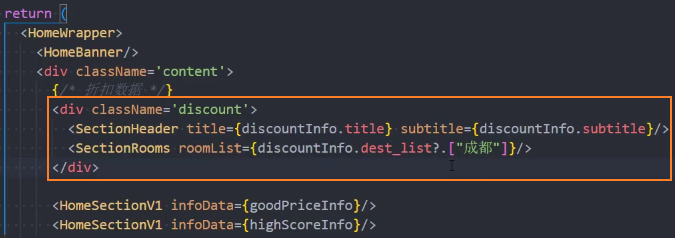
折扣优惠
API: http://codercba.com:1888/airbnb/api/home/discount
获取数据
1、service
2、store
展示页面
1、组件中获取store数据

2、展示discount数据(先写死)
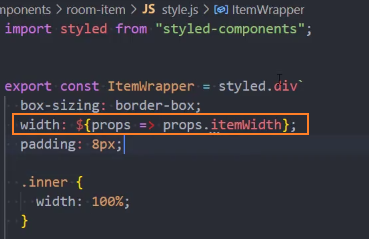
3、修改item宽度
动态传递item宽度
HomeSection
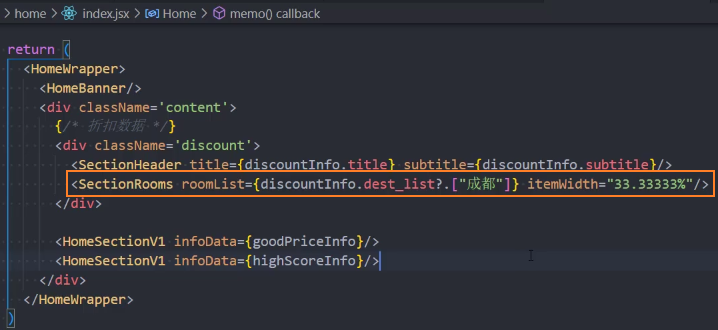
SectionRooms
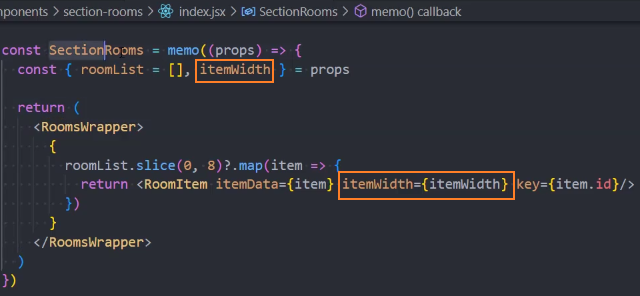
RoomItem
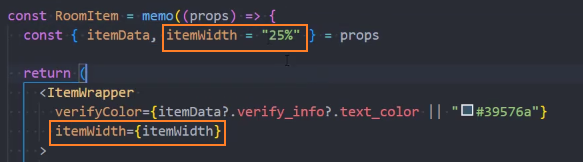
RoomItem的style文件
封装tabs
见:Section-tabs
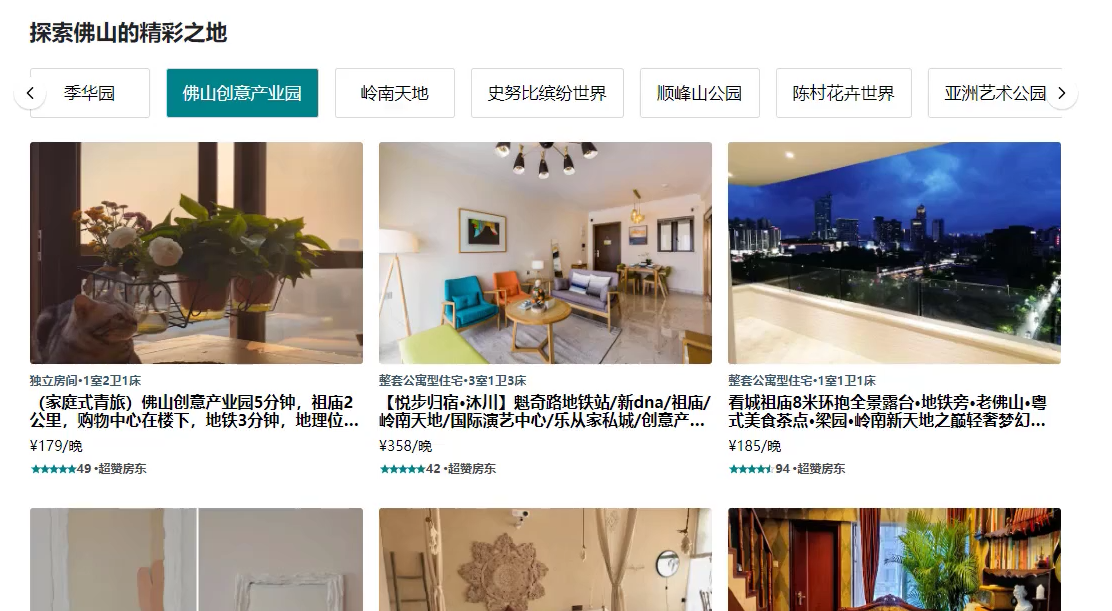
热门推荐
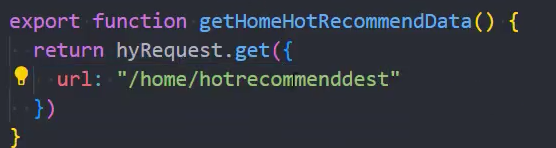
API:http://codercba.com:1888/airbnb/api/home/hotrecommenddest

获取数据
1、services
2、redux


3、Home组件

4、封装SectionFooter
见:组件:SectionFooter
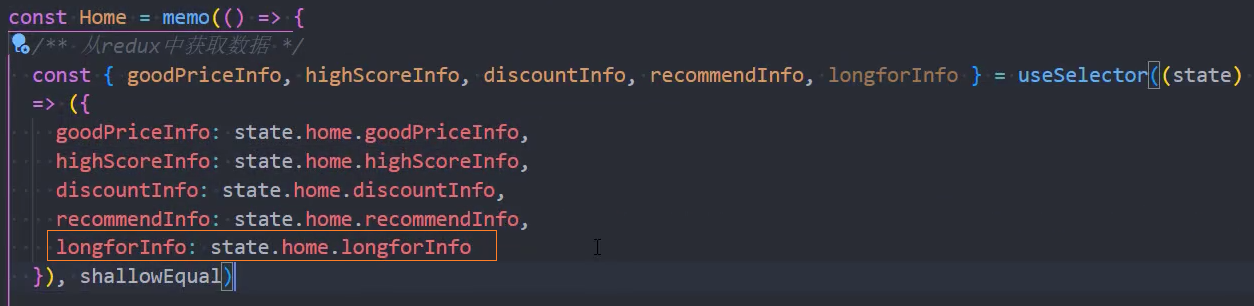
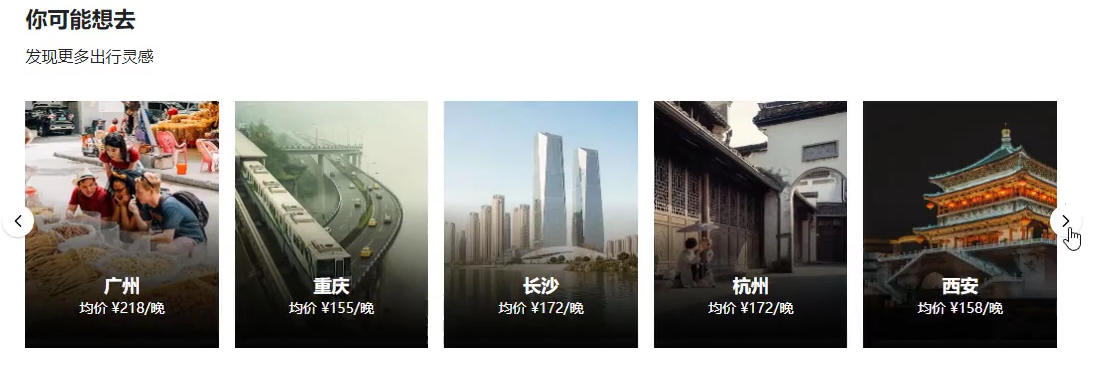
向往城市
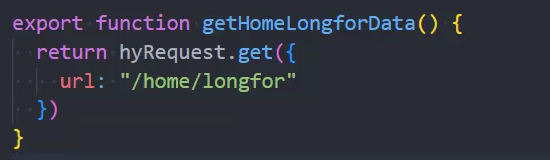
API: http://codercba.com:1888/airbnb/api/home/longfor
获取数据
1、services
2、redux


3、Home组件
见:Home/组件:HomeLongfor
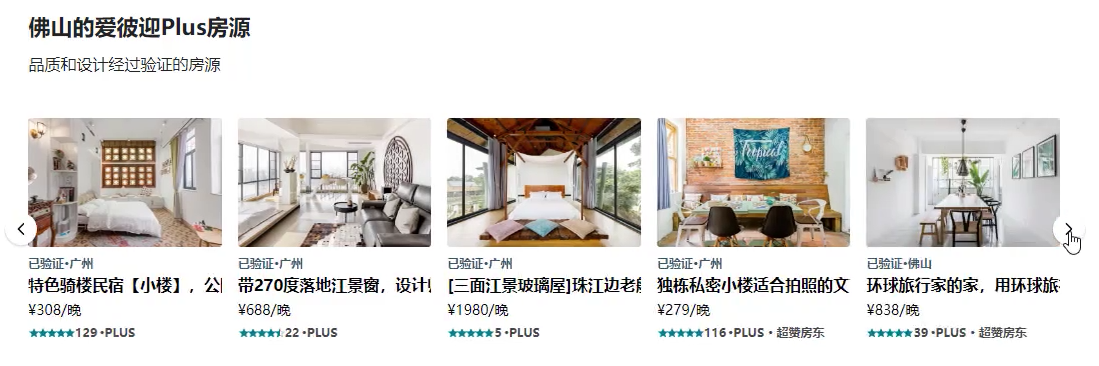
plus房源
API: http://codercba.com:1888/airbnb/api/home/plus
获取数据
1、services
2、redux


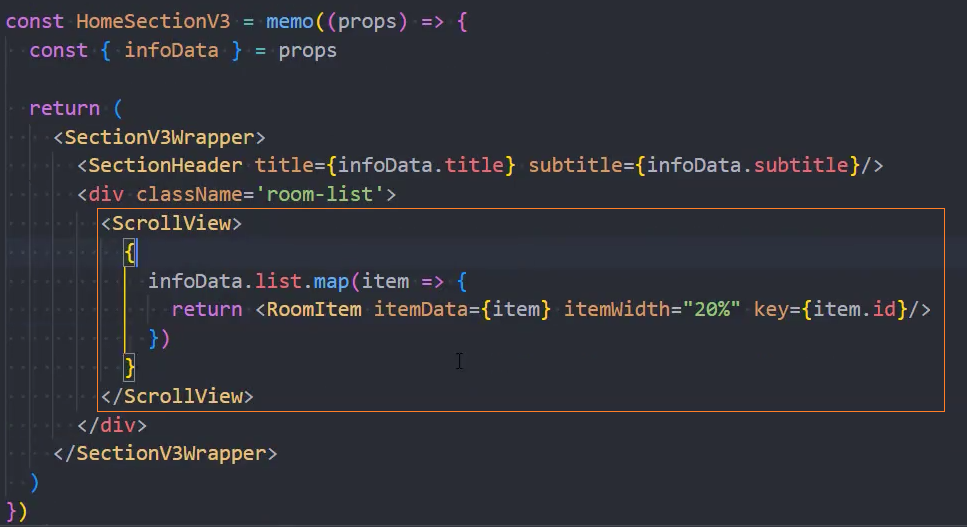
封装:HomeSectionV3
使用组件
页面布局
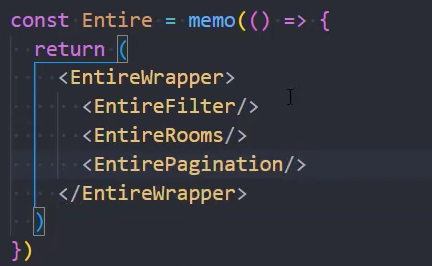
Entire

跳转Entire
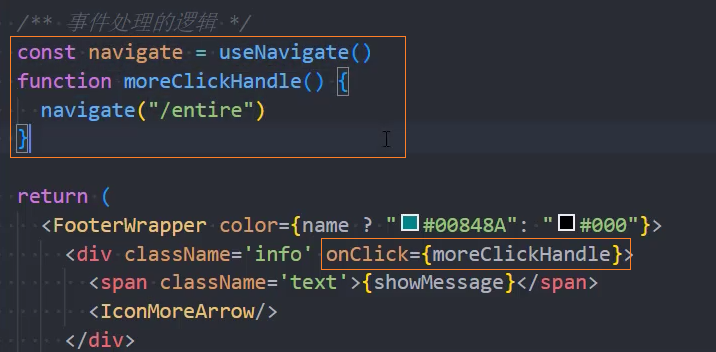
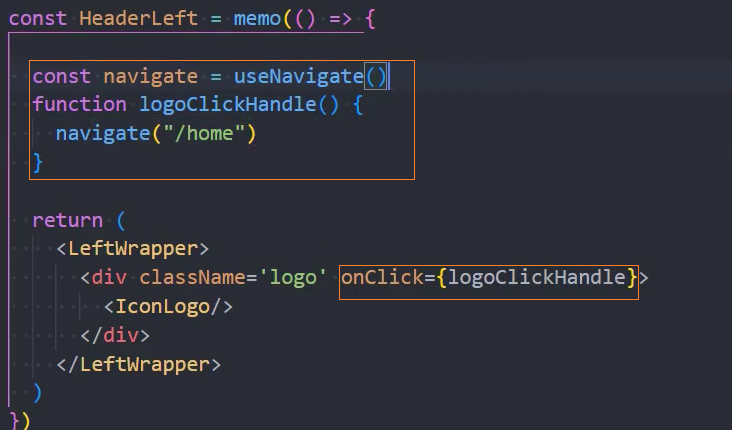
点击logo,回到首页
页面布局
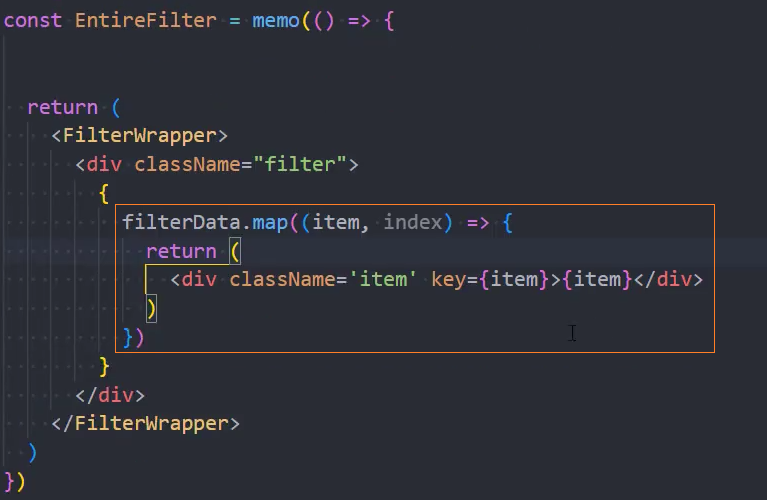
组件:EntireFilter

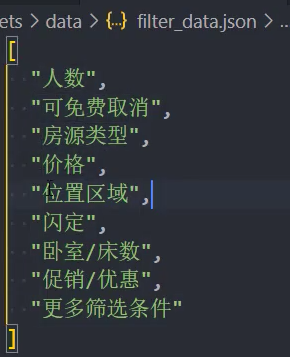
模拟数据
页面布局
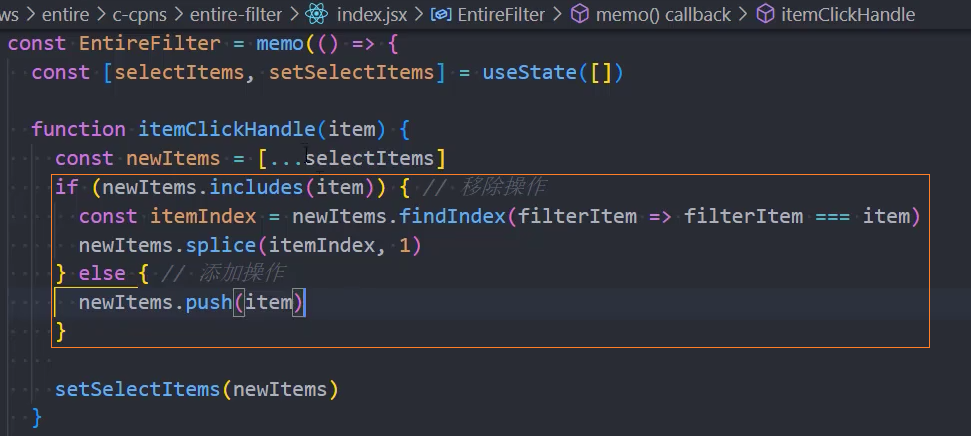
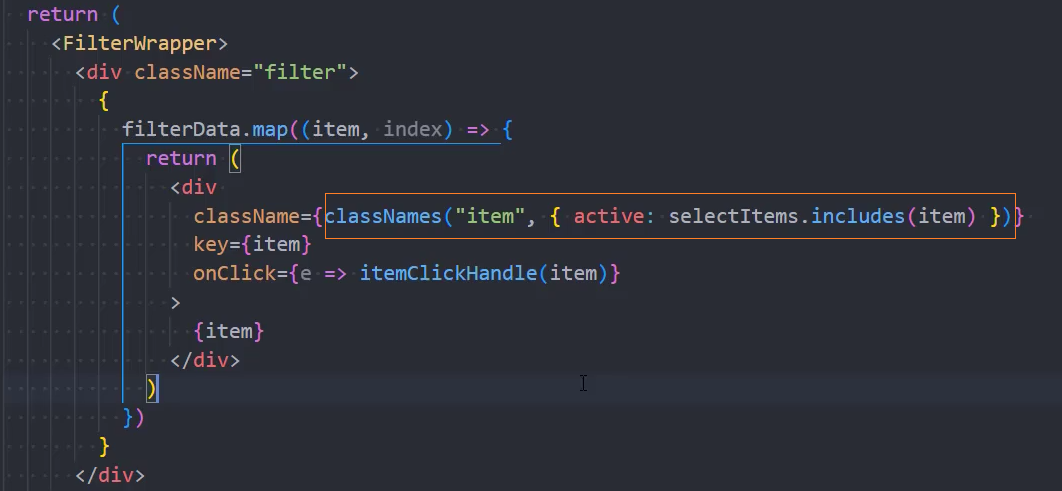
点击选中过滤项
点击过滤项,如果已经存在selectItems中,则移除该项,否则就添加该项到selectItems中
如果当前项存在于selectItems中,则添加active类
组件:EntireRooms
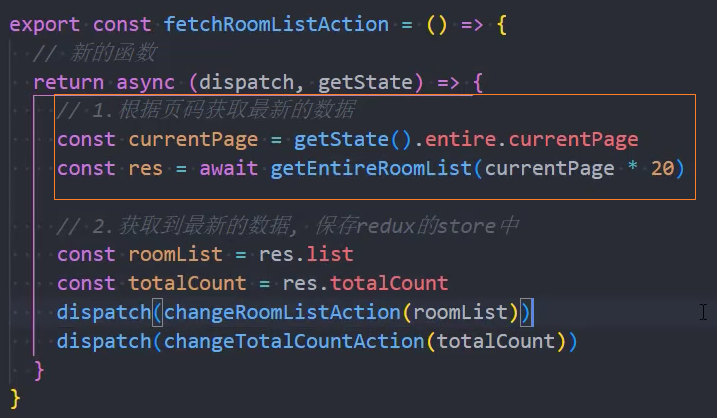
获取数据
1、services
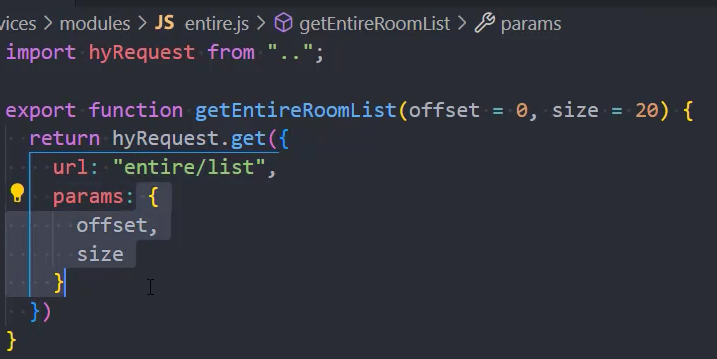
2、redux
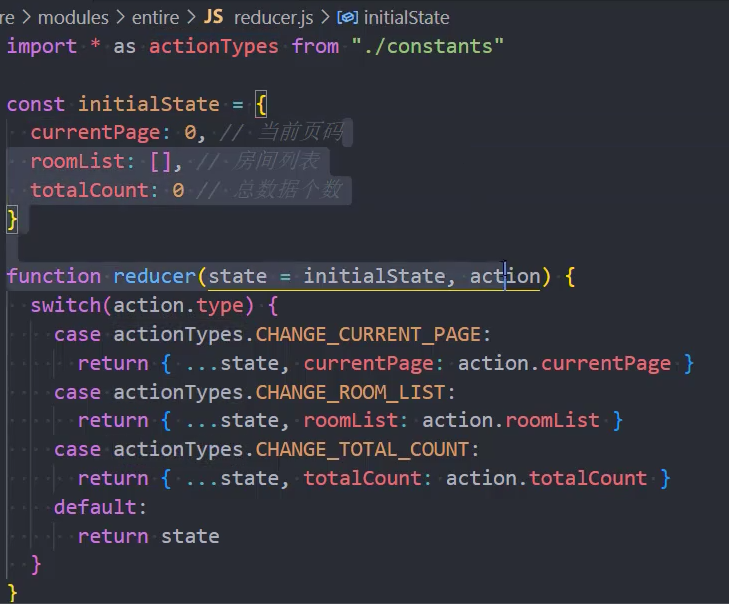
constants

reducer
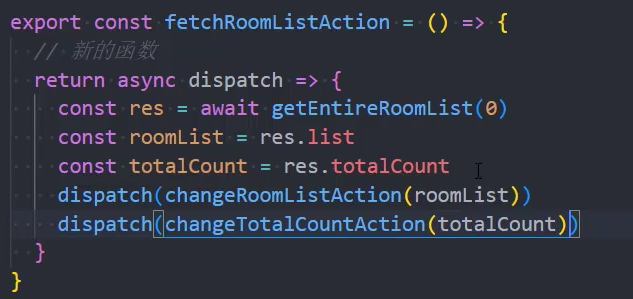
actionCreators

在actionCreators中发送异步网络请求
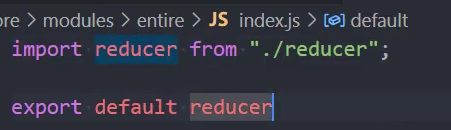
index
3、在组件中调用redux中的异步请求
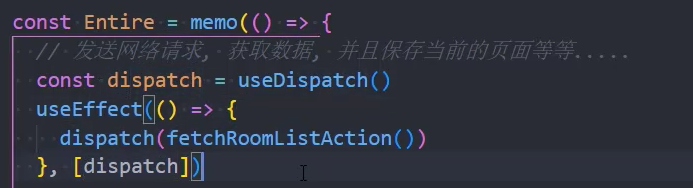
4、通过currentPage动态获取数据
页面布局
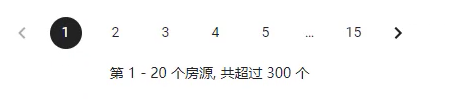
组件:EntirePagination
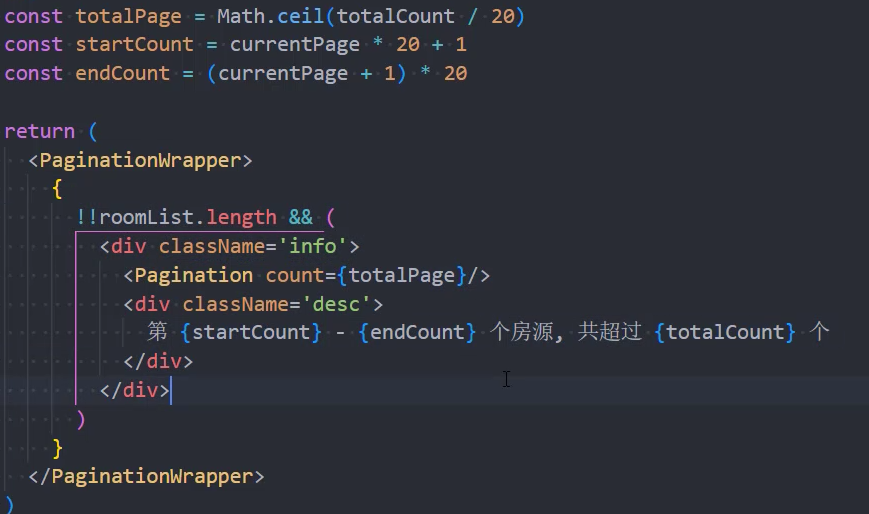
自定义UI组件分页样式
方法一:修改mui的主题色
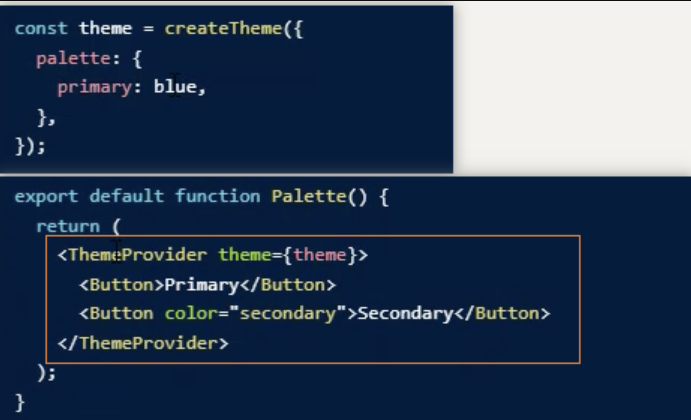
方法二:覆盖mui的样式
  /* 覆盖MUI样式 */
  .MuiPaginationItem-page.Mui-selected {
    background-color: #222;
    color: #fff;
  }
  .MuiPaginationItem-page {
    margin: 0 10px;
    &:hover {
      text-decoration: underline;
    }
}点击分页,实现分页

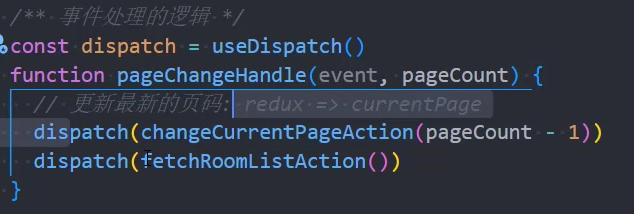
优化
优化: 合并2次dispatch
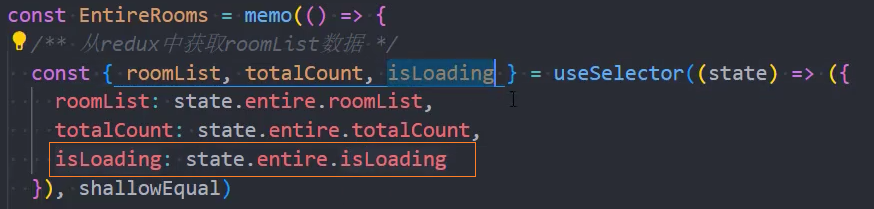
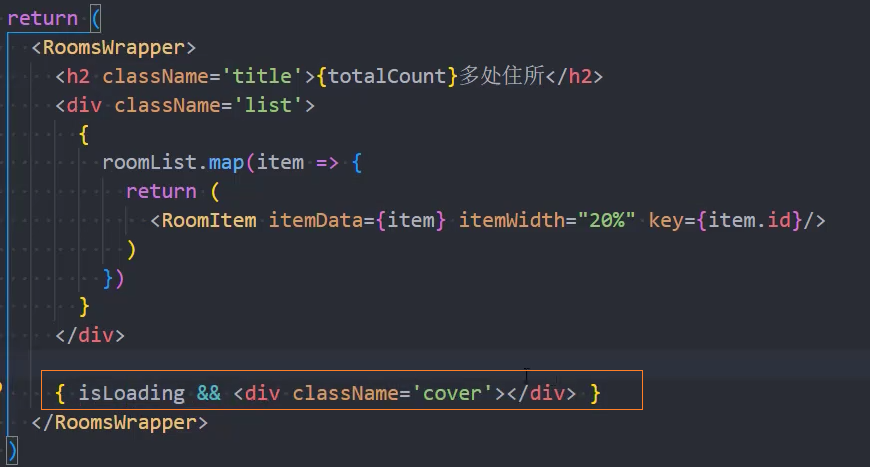
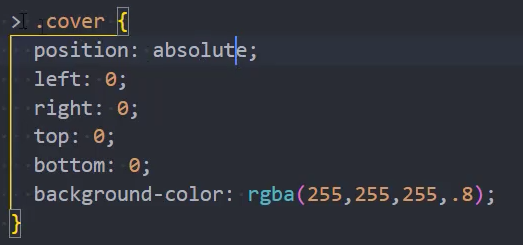
优化: 点击页码后,回到顶部,并添加加载蒙版
1、redux/actionCreators 中生成changeIsLoadingAction

2、redux/reducer中修改isLoading
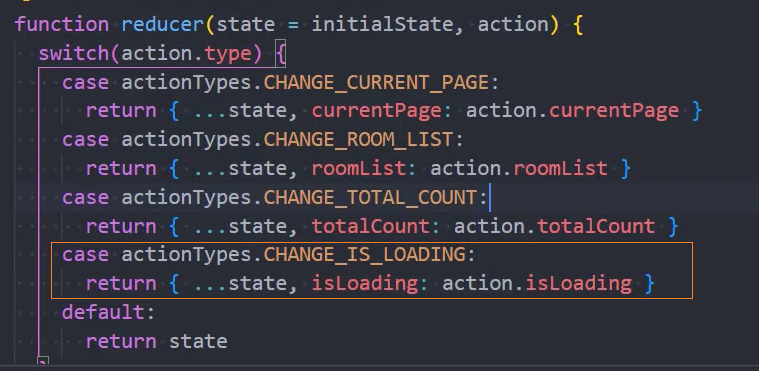
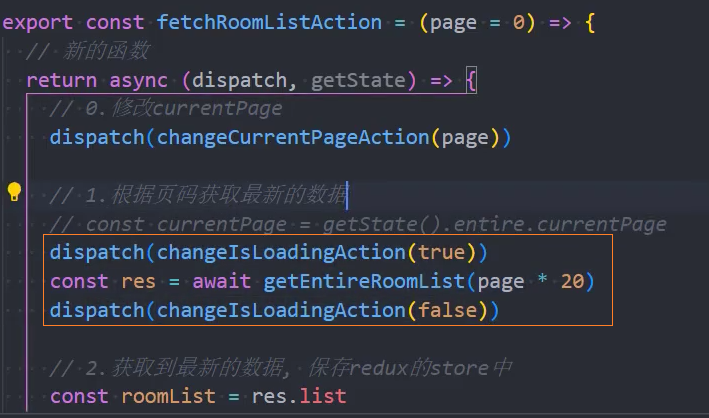
3、在组件中通过isLoading显示/隐藏蒙版
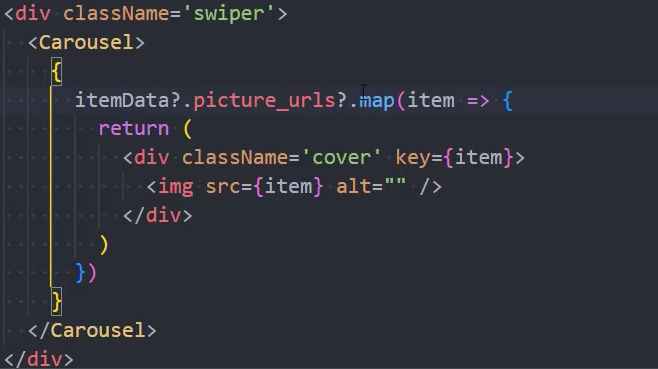
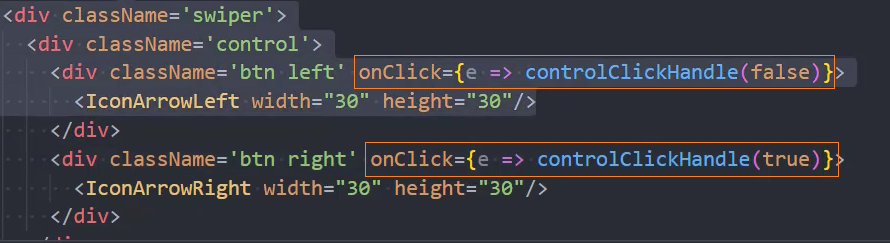
轮播图
页面布局
1、基础使用
2、不显示指示器

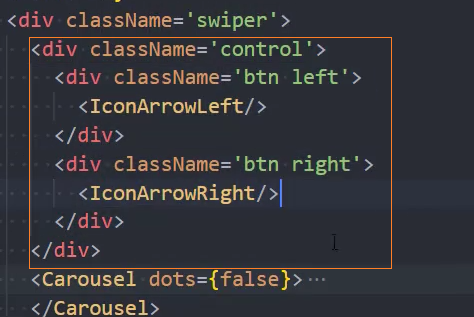
3、显示左右控制箭头
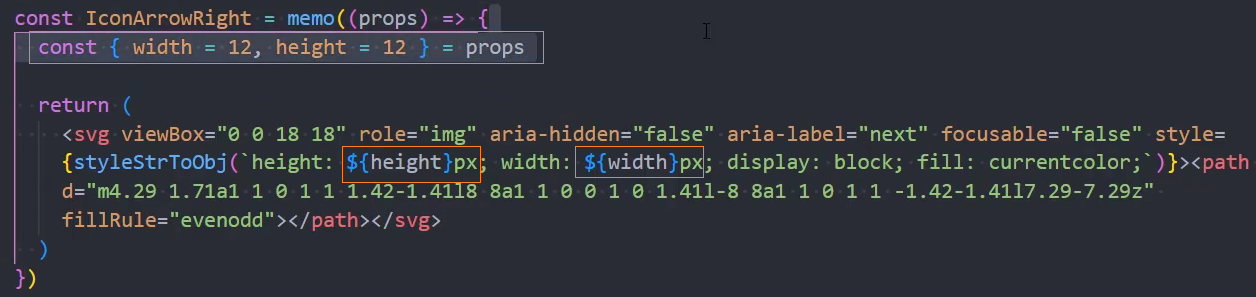
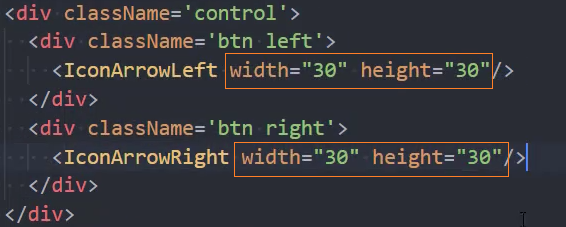
4、修改svg图片的大小
5、修改svg图片的颜色
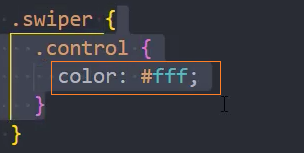
方法:可以通过修改当前元素父元素的颜色来实现
6、控制箭头样式实现
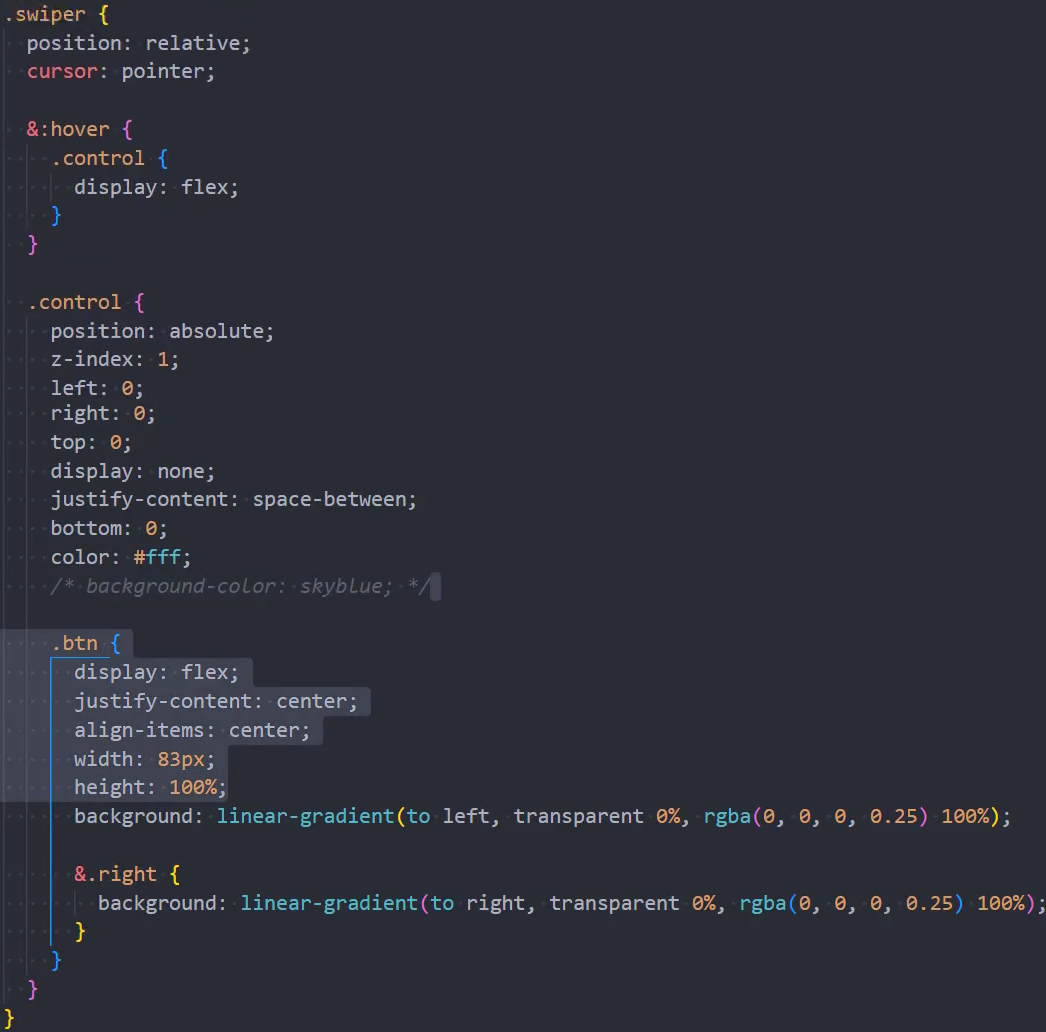
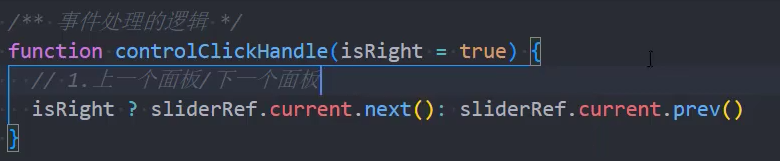
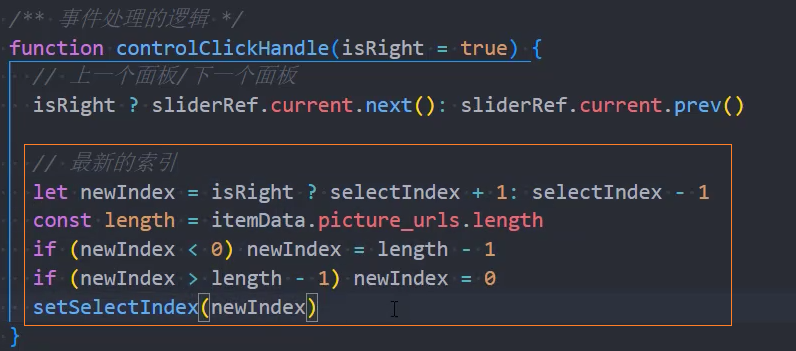
点击控制箭头
1、点击控制箭头,实现图片切换

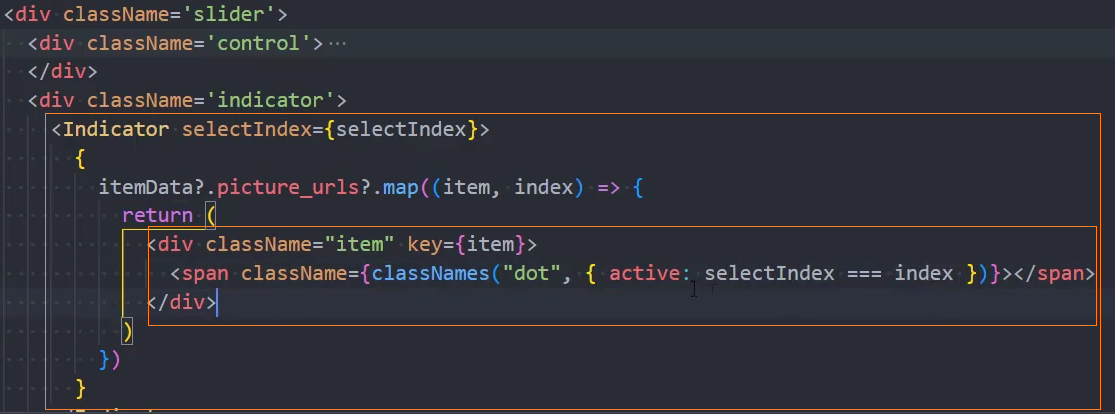
指示器
1、结构搭建
const Indicator = memo((props) => {
  return (
+    <IndicatorCss>
+      <div className="content">
+        {props.children}
+      </div>
+    </IndicatorCss>
  )
})

Indicator.propTypes = {}

export default Indicator2、使用Indicator
const Test = memo(() => {
  const list = ['aaa', 'bbb', 'ccc', 'ddd', 'eee', 'fff', 'ggg', 'hhh', 'iii', 'jjj', 'kkk']

  return (
    <TestCss>
      <div className="control">
        <button>上一页</button>
        <button>下一页</button>
      </div>
      <div className="list">
+        <Indicator>
  +        {
  +          list.map((item, index) => {
  +            return <button key={item}>{item}</button>
  +          })
  +        }
+        </Indicator>
      </div>
    </TestCss>
  )
})3、记录当前选中index
const Test = memo(() => {
+  const [currIndex, setCurrIndex] = useState(0)
  // 事件处理函数
  function btnClickHandle(isNext) {
    // 计算新索引
+    let newIndex = isNext ? currIndex + 1 : currIndex - 1
+    if(newIndex < 0) newIndex = list.length - 1
+    if(newIndex >  list.length - 1) newIndex = 0

 +   setCurrIndex(newIndex)
  }
    <TestCss>
      <div className="control">
 +       <button onClick={e => btnClickHandle(false)}>上一页</button>
 +       <button onClick={e => btnClickHandle(true)}>下一页</button>
		...
      </div>
    </TestCss>
})4、分析滚动位置
5、在组件外部传递选中index到组件内部
+        <Indicator currIndex={currIndex}>
          {
            list.map((item, index) => {
              return <button key={item}>{item}</button>
            })
          }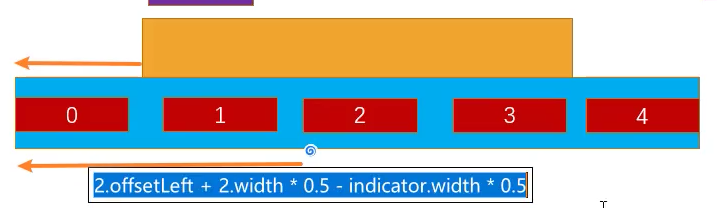
</Indicator>6、在组件内部,根据index计算滚动距离,保证每个当前项都在中间位置
const Indicator = memo((props) => {
+  const { currIndex } = props
+  const contentRef = useRef()

  // 根据currIndex计算滚动的距离
  useEffect(() => {
+    const itemEl = contentRef.current.children[currIndex]
+    const itemLeft = itemEl.offsetLeft
+    const itemWidth = itemEl.clientWidth
+    const contentWidth = contentRef.current.clientWidth
+    const maxDistance = contentRef.current.scrollWidth - contentWidth

    // console.log(itemLeft, itemWidth, contentWidth, maxDistance)
     // 当前项要滚动的距离
+    let distance = itemLeft + itemWidth * 0.5 - contentWidth * 0.5
     // 当前项不移动的特殊情况
+    if(distance < 0) distance = 0
+    if(distance > maxDistance) distance = maxDistance
     // 执行移动动画
+    contentRef.current.style.transform = `translateX(${-distance}px)`
+  }, [currIndex])

  return (
    <IndicatorCss>
+      <div className="content" ref={contentRef}>
        {props.children}
      </div>
    </IndicatorCss>
  )
})样式
export const IndicatorCss = styled.div`
  overflow: hidden;

  .content {
    display: flex;
    flex-wrap: nowrap;
+    transition: transform 200ms ease;
  }
`7、不移动的特殊情况
左边:当distance为负时,不需要移动到中间位置
右边:当distance > scrollWidth - clientWidth时,不需要移动
     // 当前项不移动的特殊情况
+    if(distance < 0) distance = 0
+ if(distance > maxDistance) distance = maxDistance项目中使用指示器
1、页面布局
2、设置样式
3、修改选中索引index
是否显示轮播图
Detail
跳转Detail
1、组件内部点击item
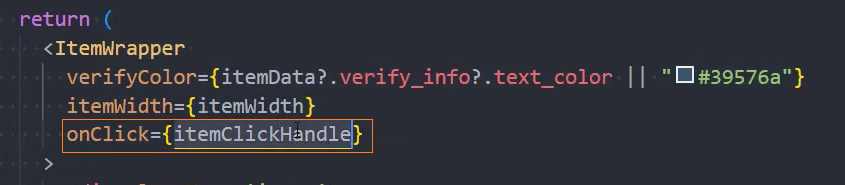
2、传递内部itemClick事件到外部

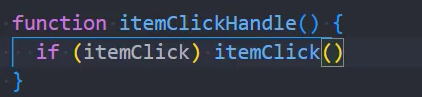
3、在外部EntireRooms中定义itemClick的事件处理函数
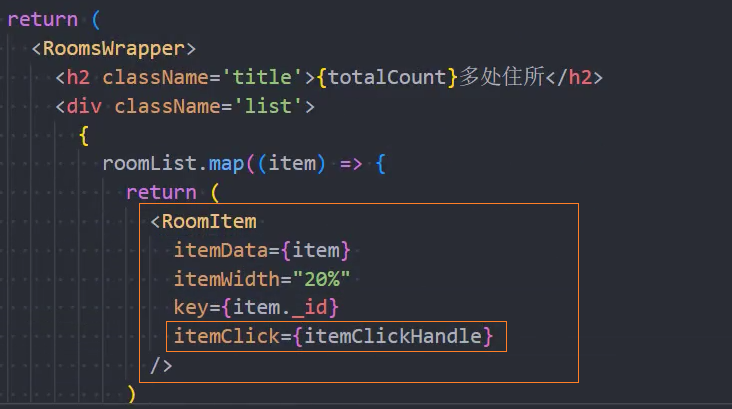
4、跳转时传递参数数据
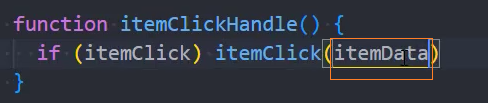
5、由于itemData数据较大,使用redux共享的方式传递数据
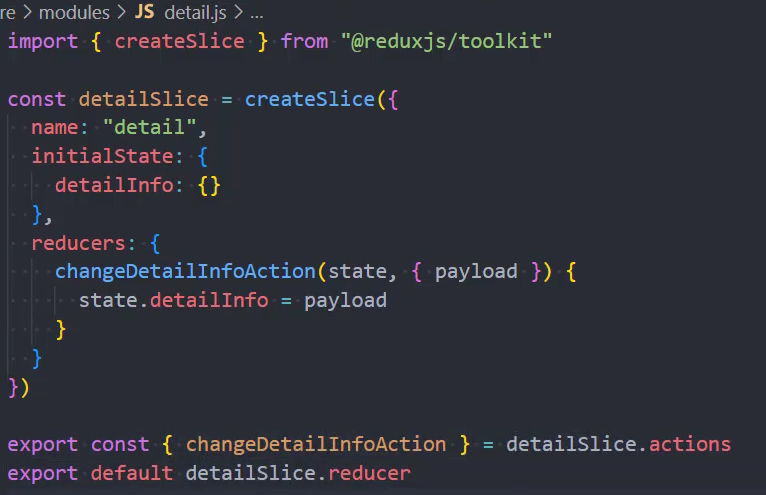
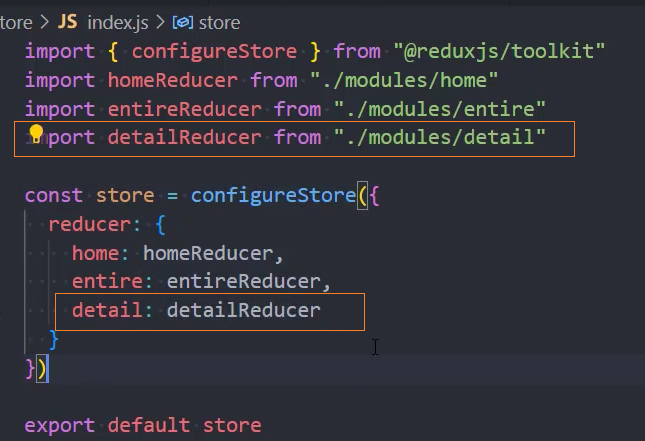
6、在EntireRooms组件中,保存item到redux的detailInfo
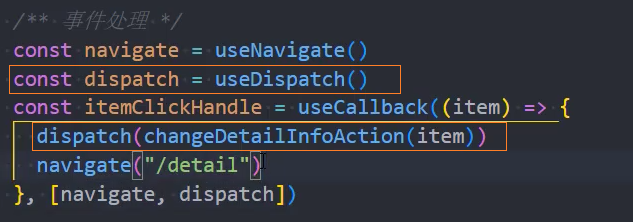
7、在Detail页面中,获取detailInfo
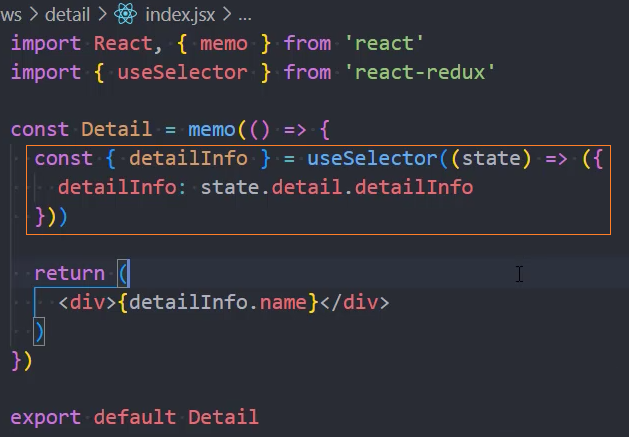
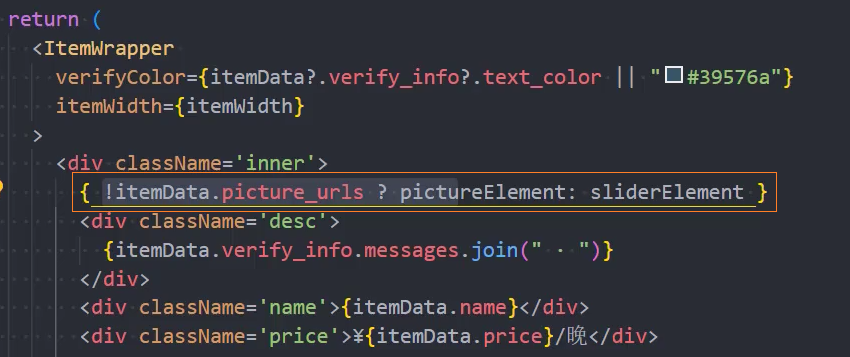
DetailPictures
Detail页面
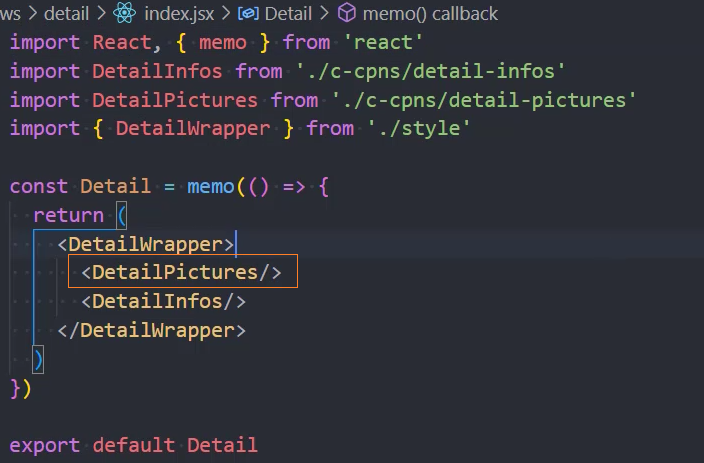
DetailPictures组件
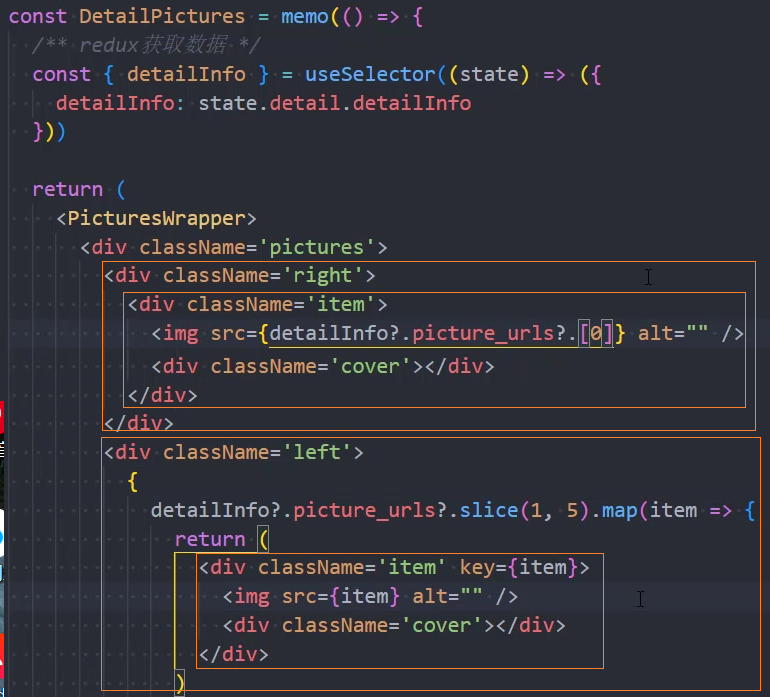
样式
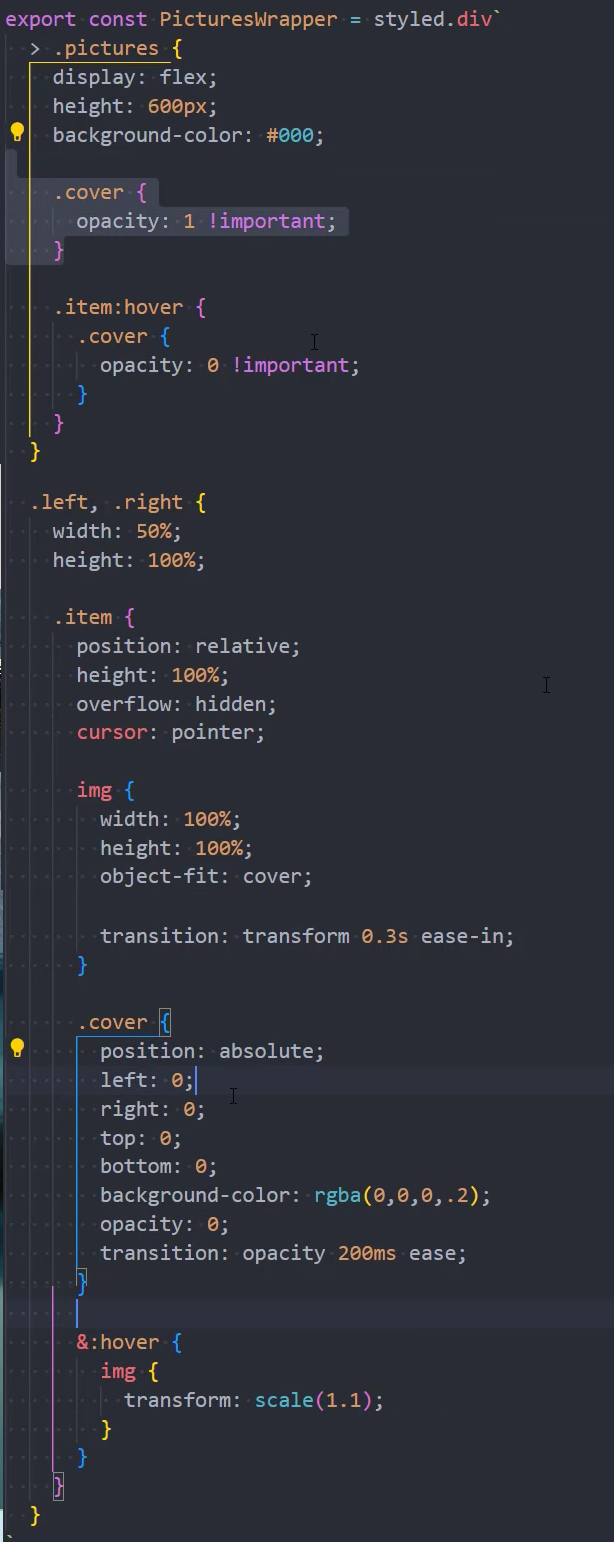


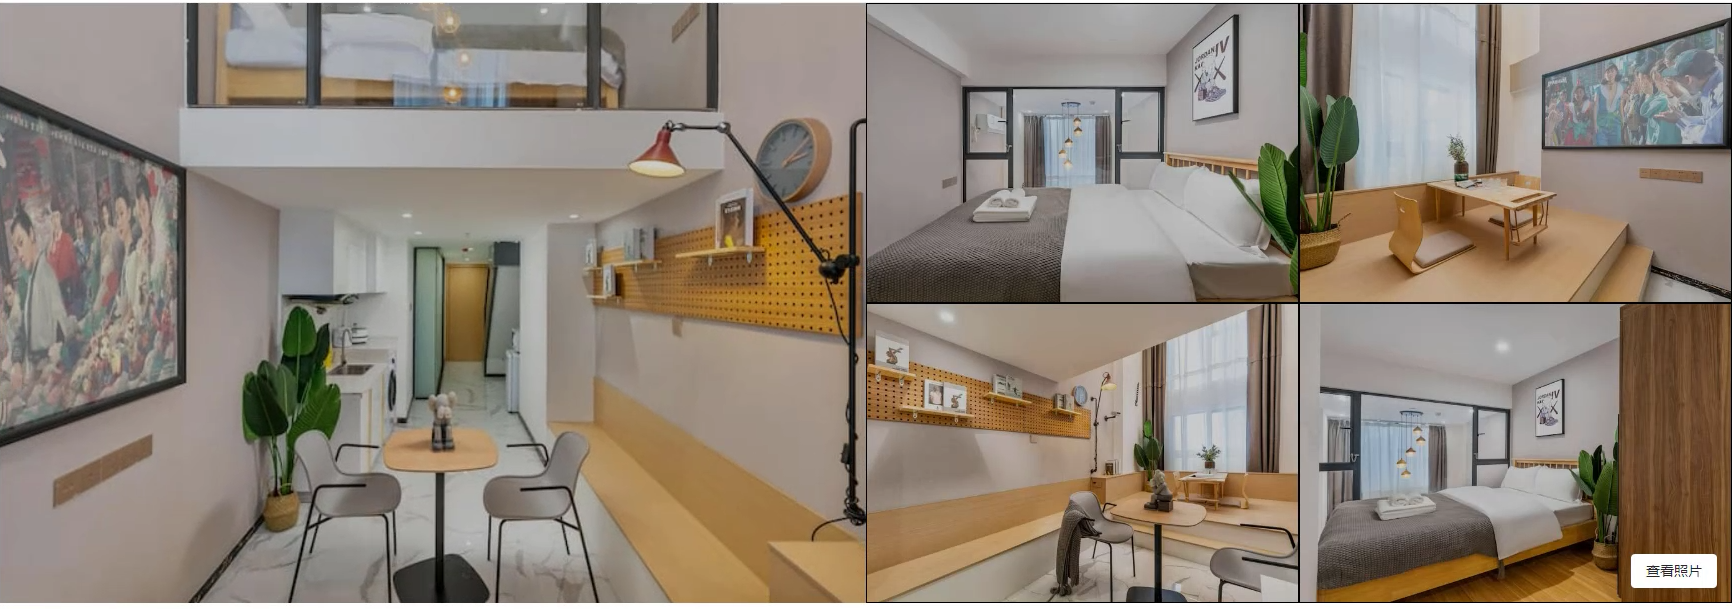
图片浏览器
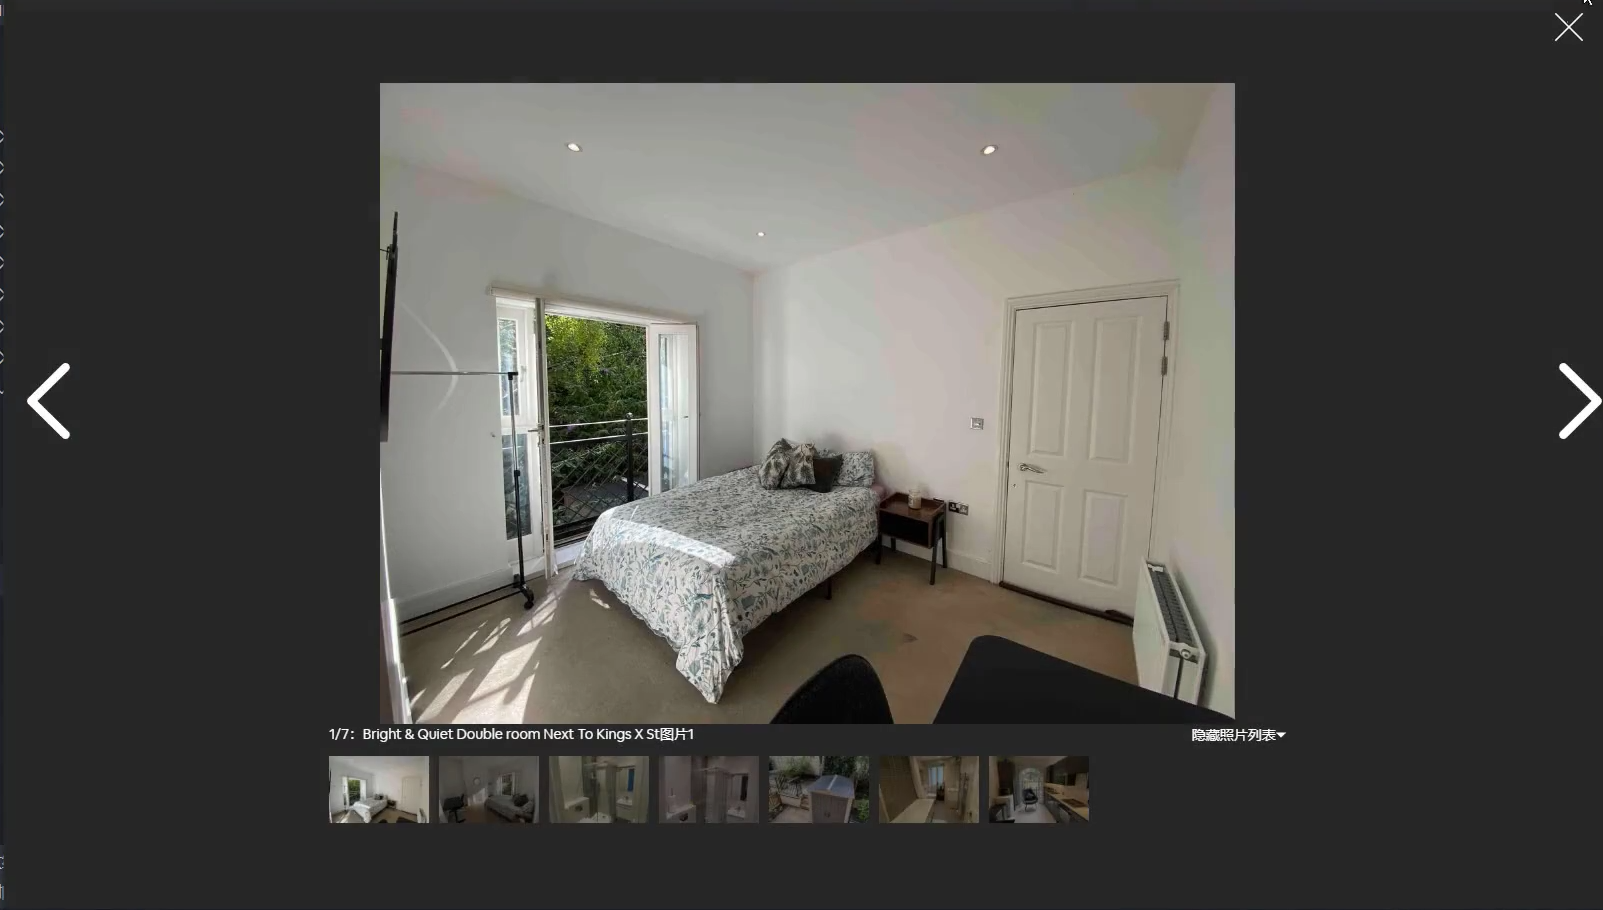
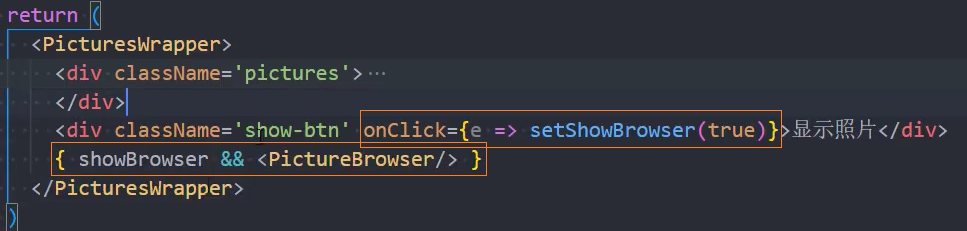
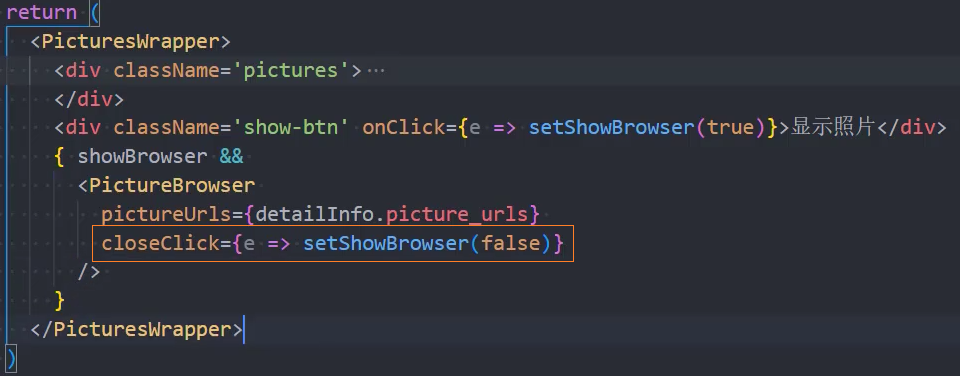
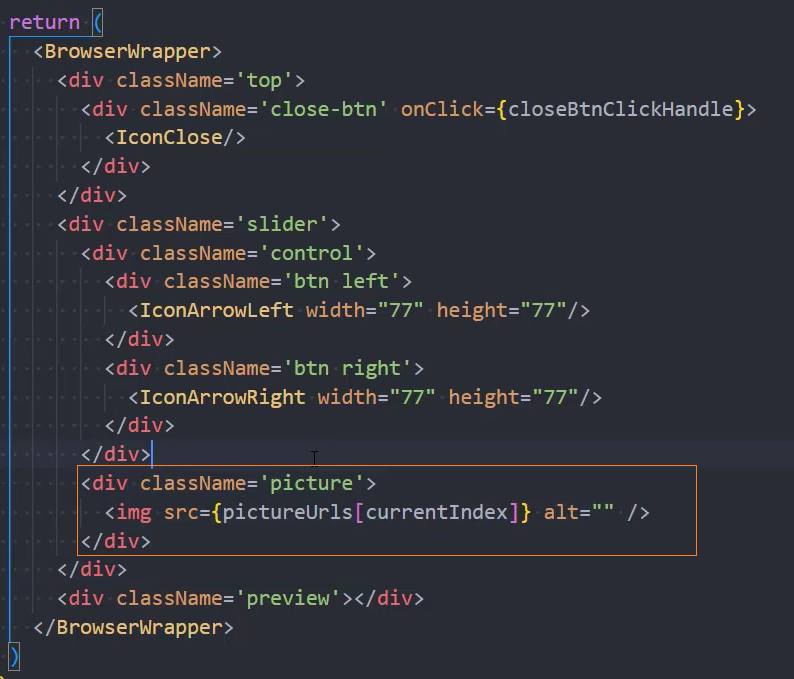
页面布局
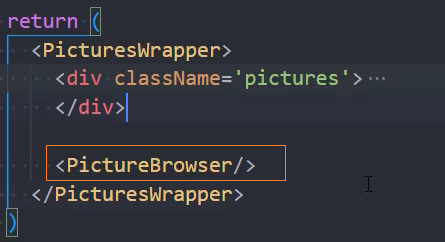
1、基础使用PictureBrowser组件
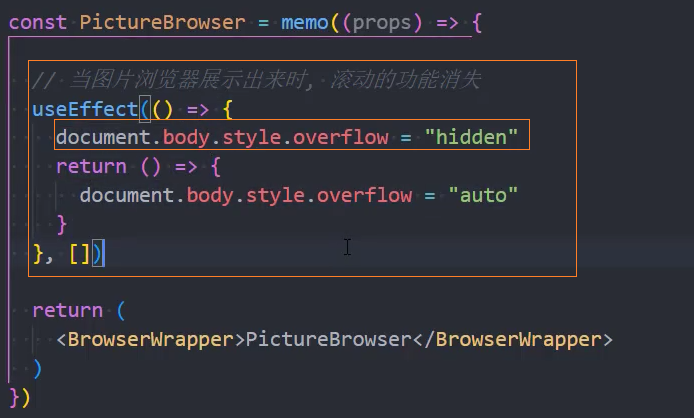
2、让滚动功能消失
3、点击按钮,显示PictureBrowser组件

关闭图片浏览器
1、页面布局

2、监听关闭事件
组件内

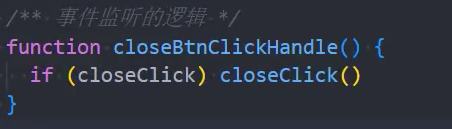
组件外
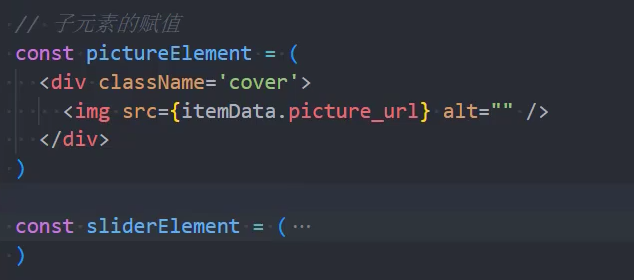
图片展示区
1、页面布局
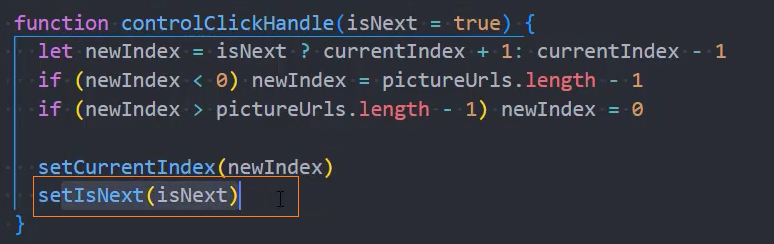
2、上一个、下一个
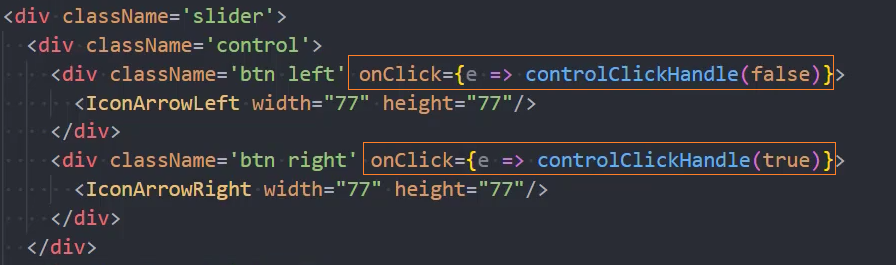
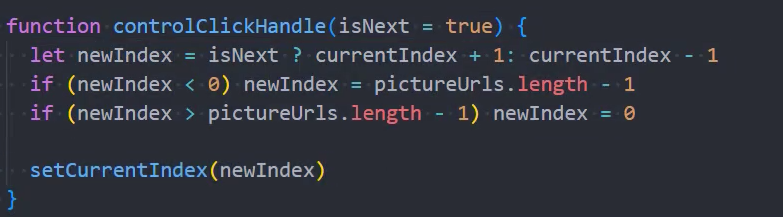
3、图片切换动画
第三方包:npm i react-transition-group

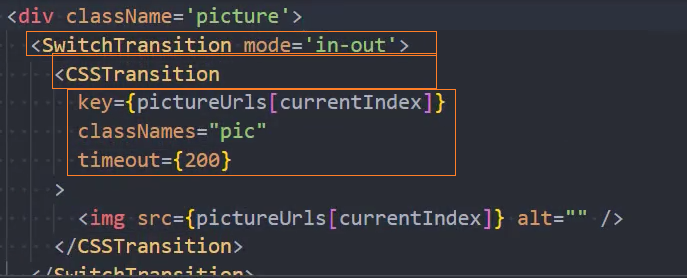
动画样式
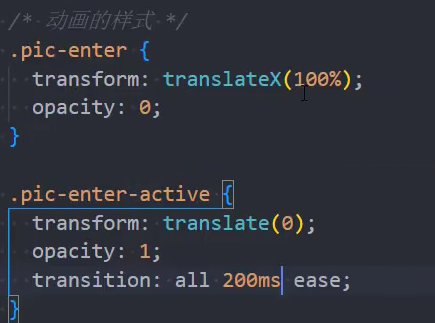
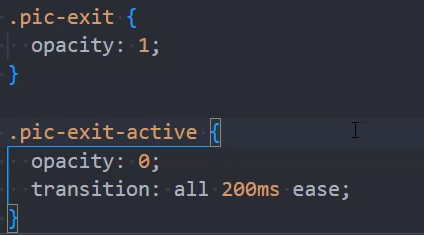
通过isNext,判断动画方向


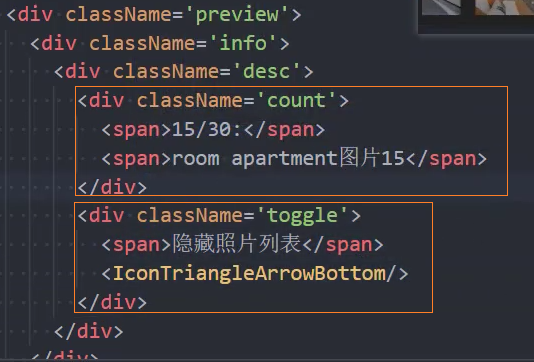
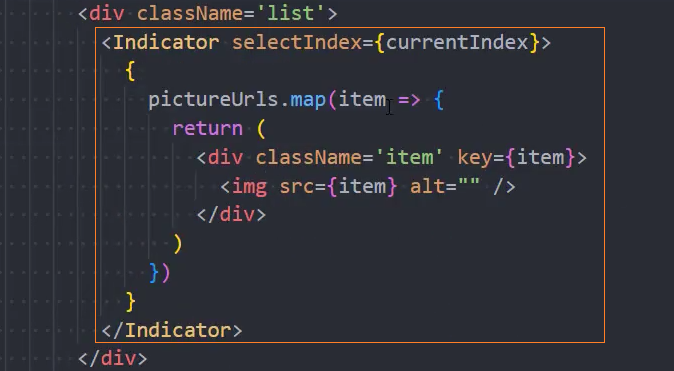
图片预览指示器
1、页面布局
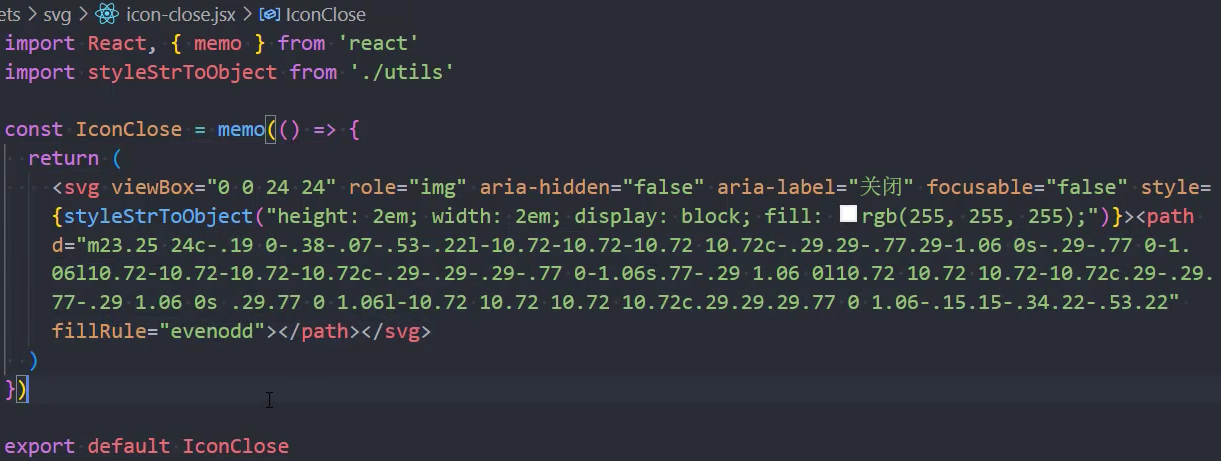
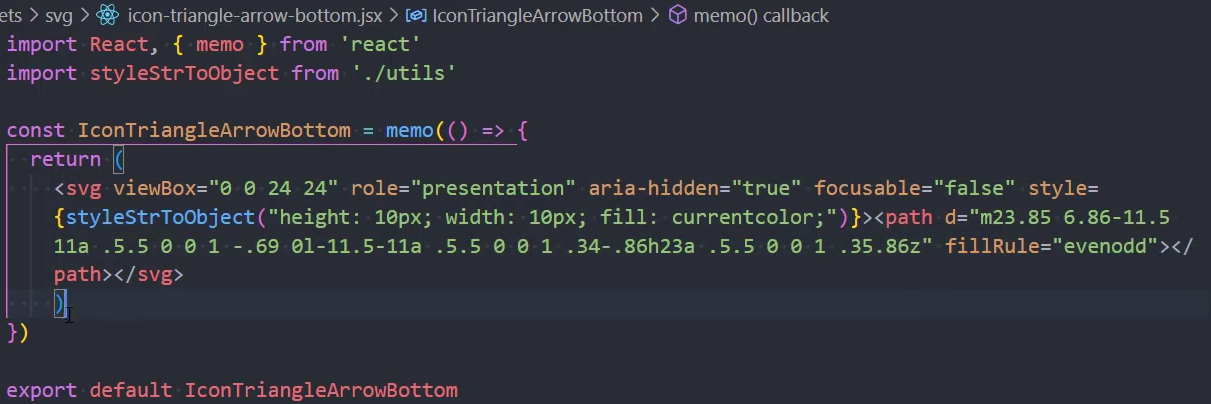
2、svg图片组件
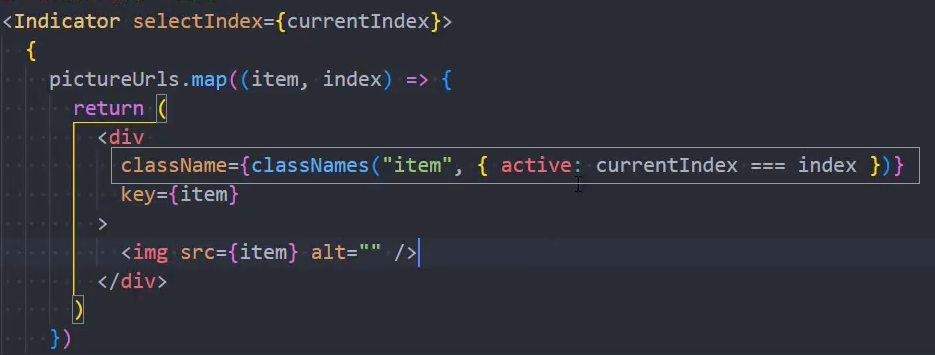
3、添加选中时的样式active
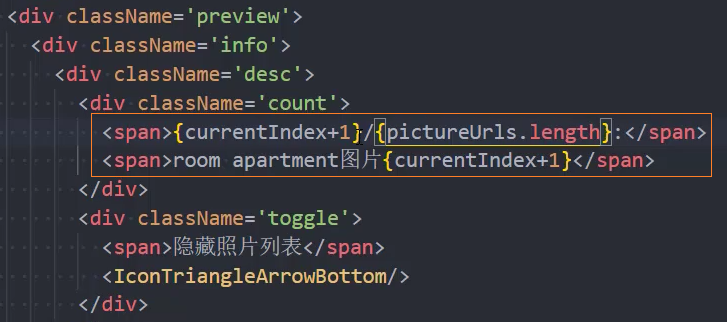
4、动态显示desc中的内容
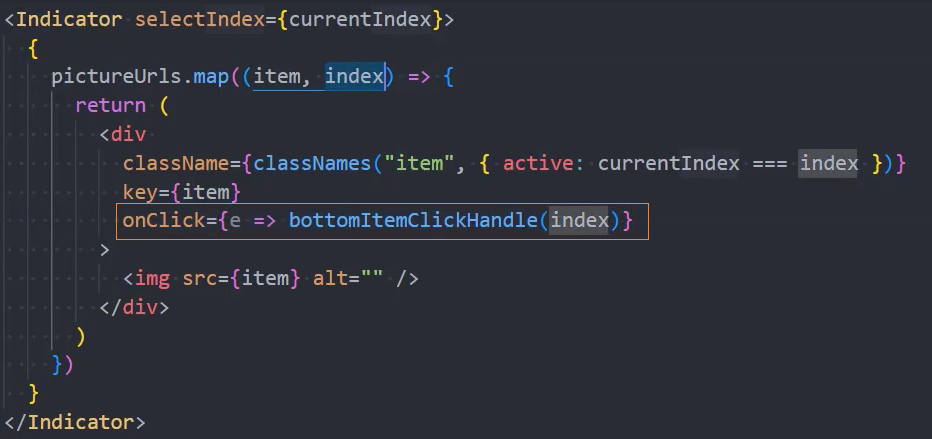
5、点击item指示器,切换图片
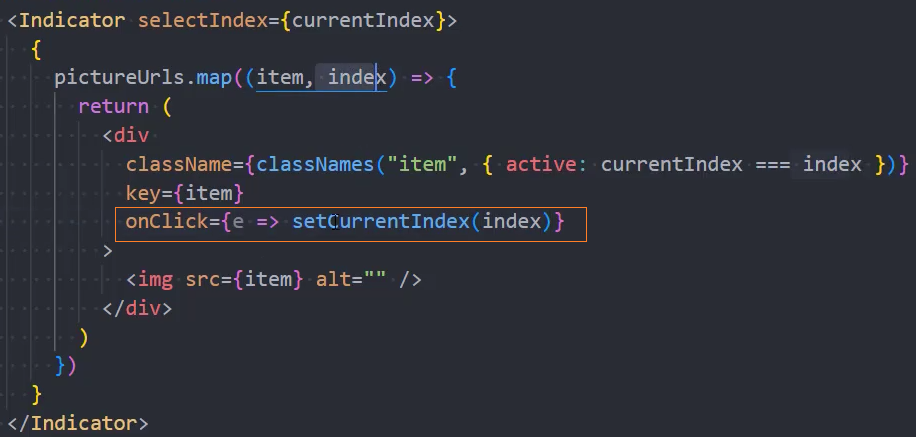
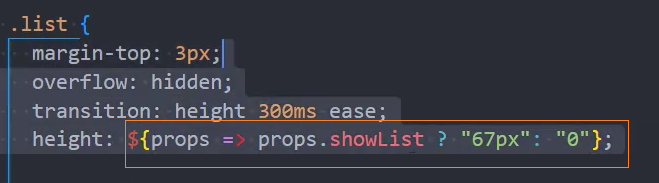
6、显示/隐藏照片列表,并添加动画
这里不要使用display:block/none,因为它不 支持动画。可以使用height 切换


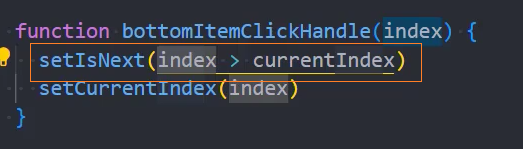
解决点击时动画方向的问题
Extra
点击item阻止冒泡

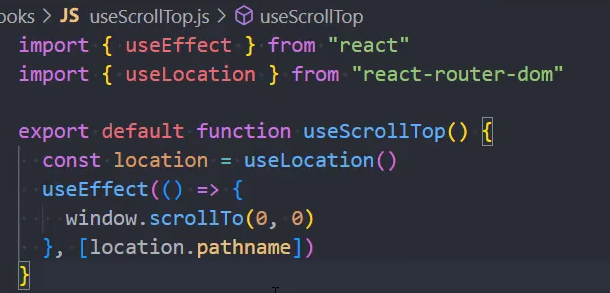
页面切换滚动到顶部
方法: 在App页面监听页面是否发生路由跳转,如果跳转了则滚动到顶部
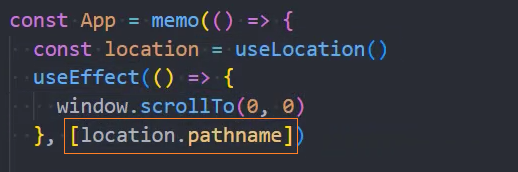
封装成Hook

Header效果
不同页面的fixed效果切换
1、方法一:每个页面都有一个自己的<AppHeader /> 实例
2、方法二:3个页面共享同一个<AppHeader /> 实例【当前使用】
3、redux公共模块main
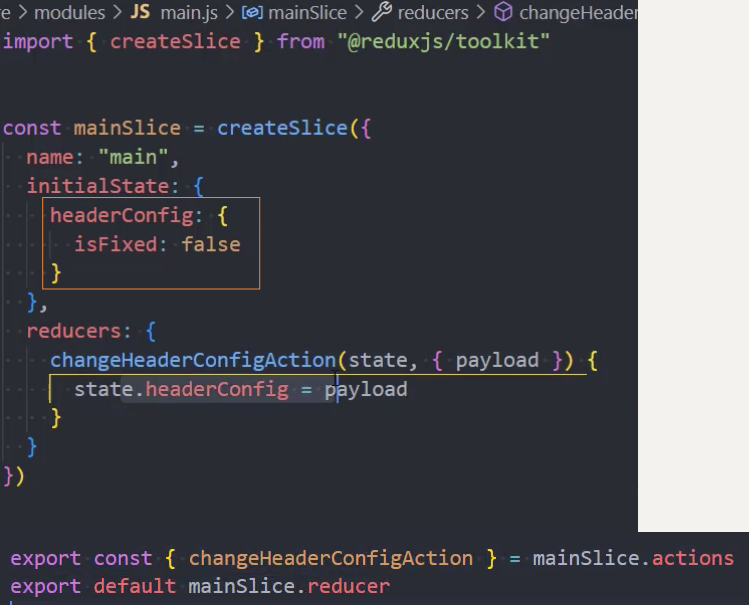
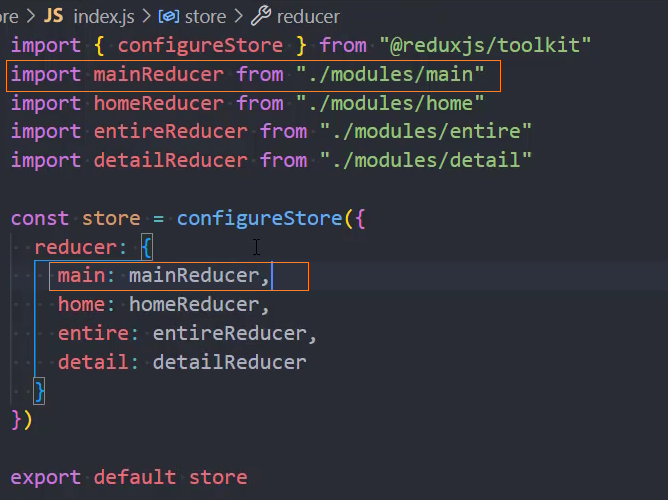
4、设置headerConfig
home页面
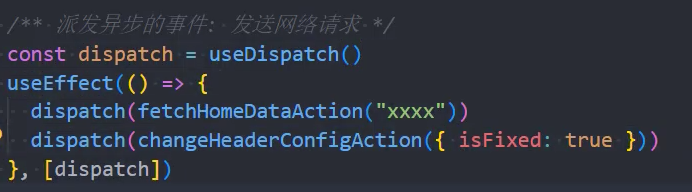
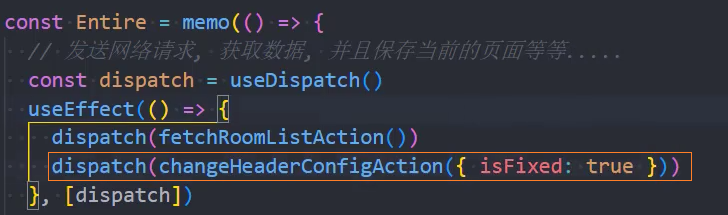
entire页面
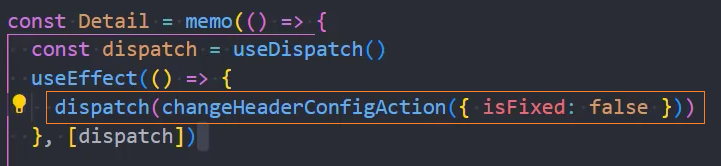
detail页面
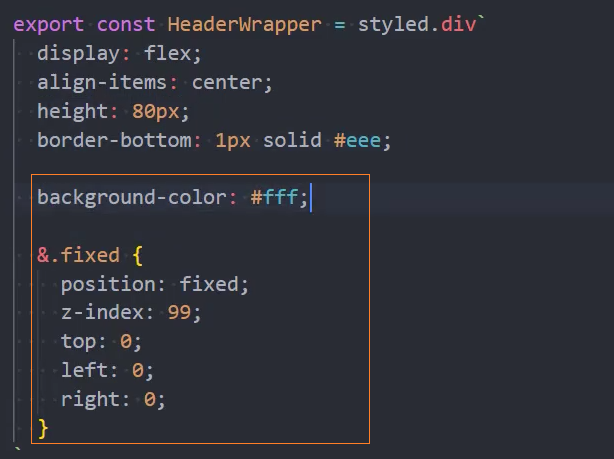
5、在AppHeader中根据headerConfig设置样式
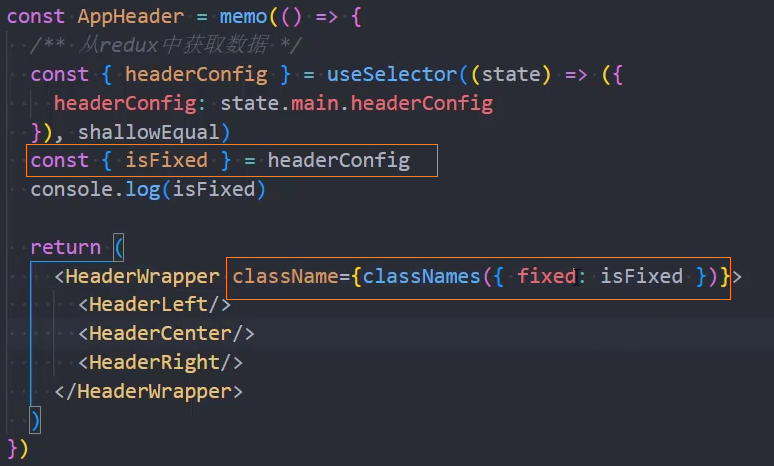
6、设置entire页面Filter组件也为fixed定位
问题: AppHeader没有监听headerConfig的改变
原因: 这是由于home,entire,detail页面是通过懒加载的方式导入的,在加载的时候Suspense 是在Provider 外部,没有被Provider 包裹,所以就不会监听懒加载页面的更新
root.render(
+  <Suspense fallback={<div>Loading...</div>}>
+    <Provider store={store}>
      <ThemeProvider theme={theme}>
        <HashRouter>
          <App />
        </HashRouter>
      </ThemeProvider>
+    </Provider>
+  </Suspense>
)解决: 将 Suspense 放在Provider 内部
root.render(
+  <Provider store={store}>
+    <Suspense fallback={<div>Loading...</div>}>
      <ThemeProvider theme={theme}>
        <HashRouter>
          <App />
        </HashRouter>
      </ThemeProvider>
+    </Suspense>
+  </Provider>
)Header动画效果

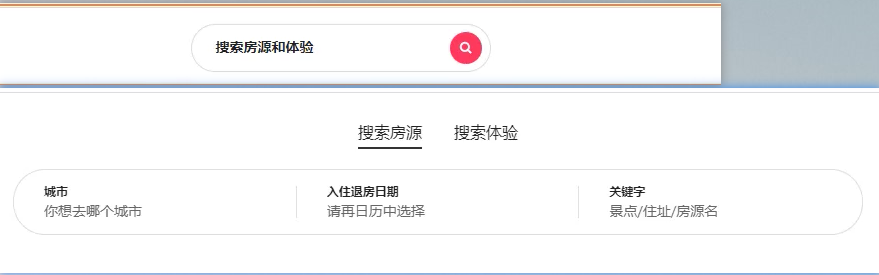
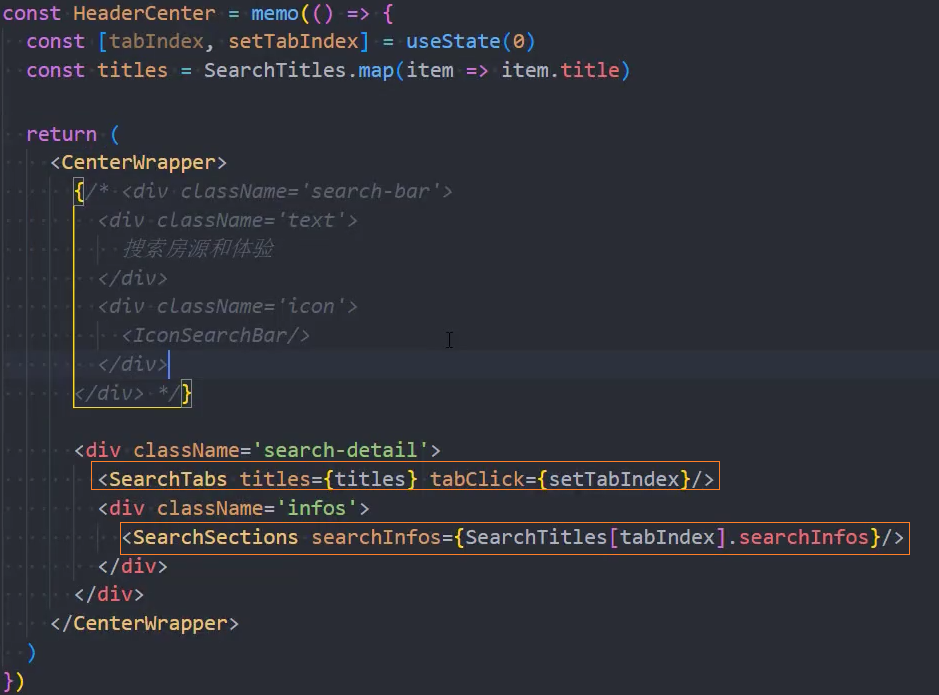
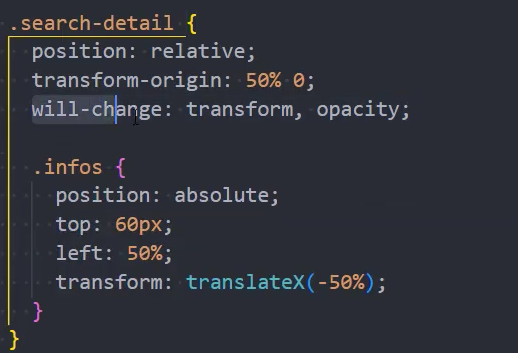
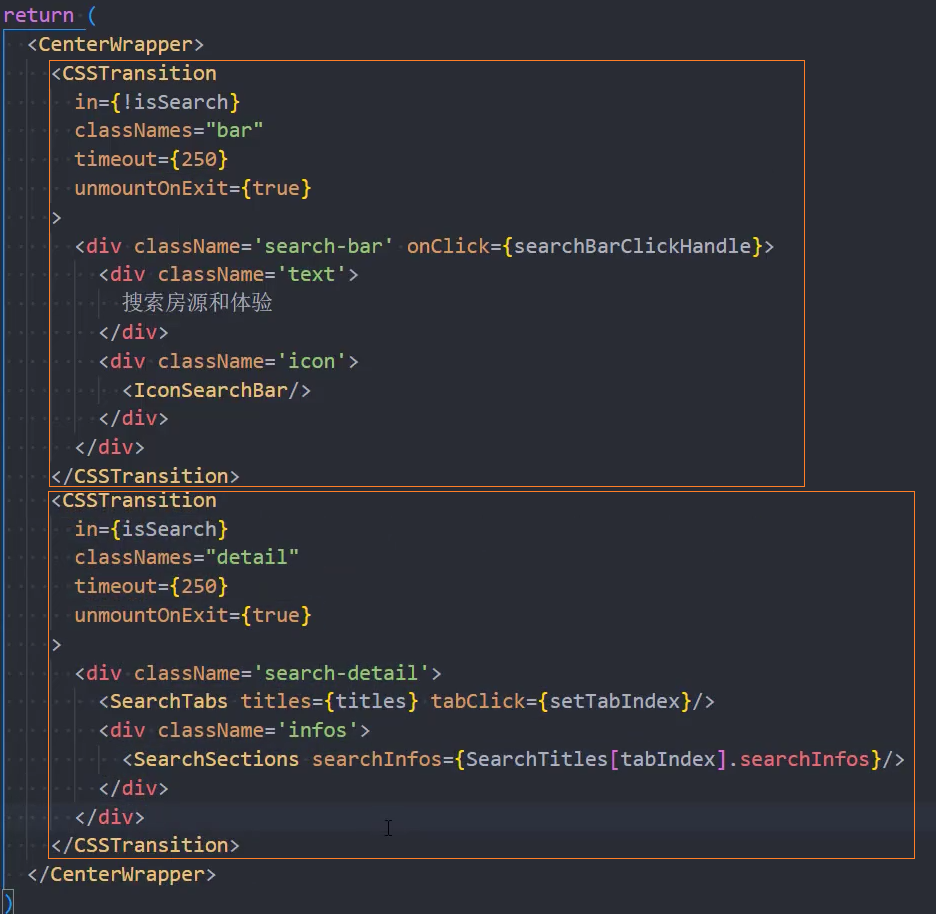
1、页面布局
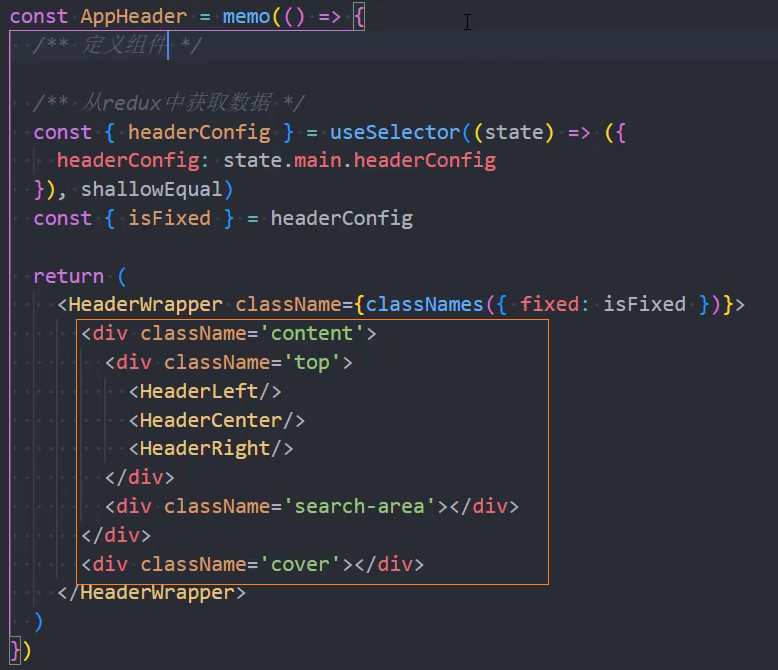
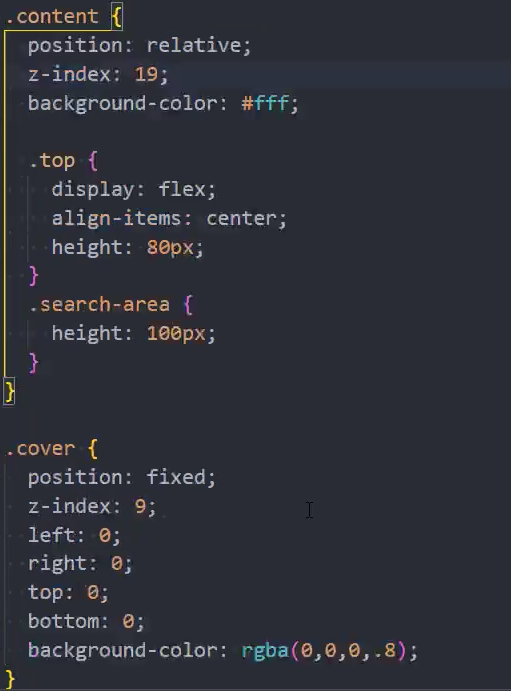
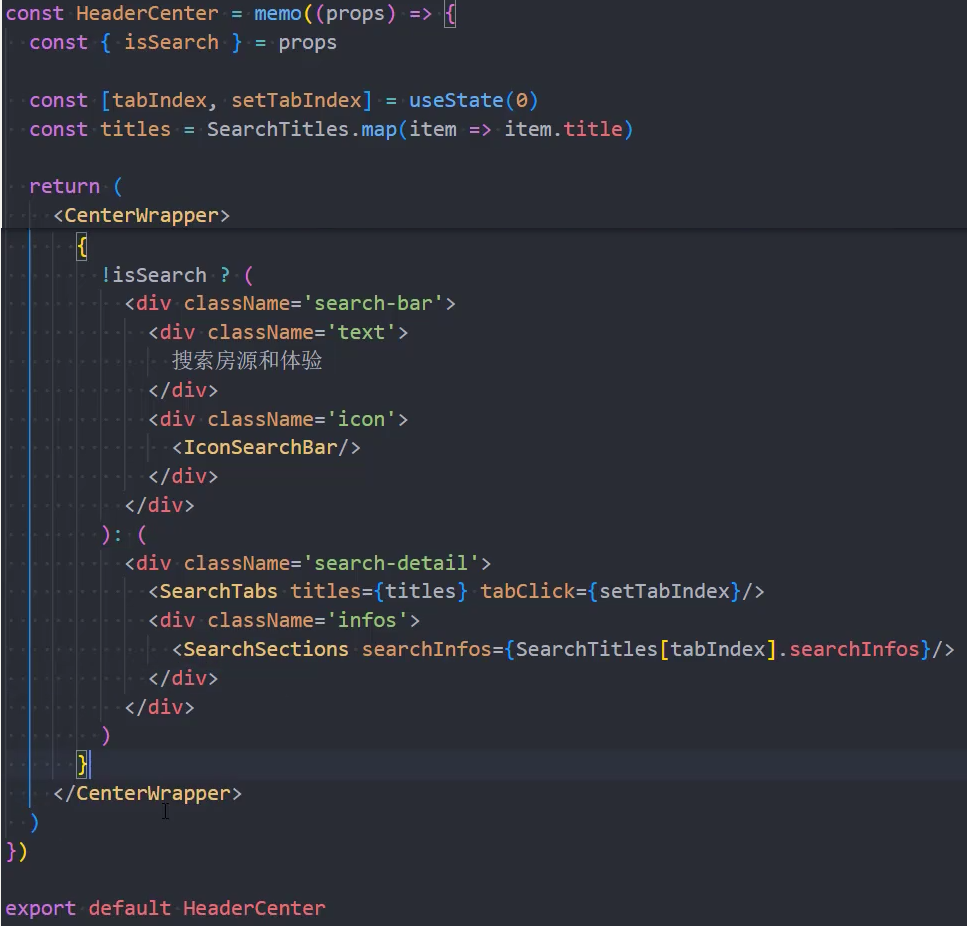
2、HeaderCenter

样式
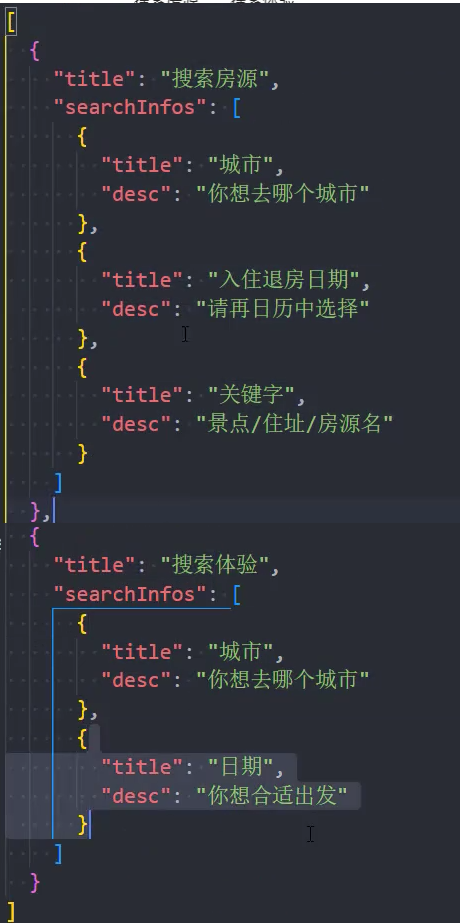
3、模拟数据
4、搜索状态的切换动画效果
AppHeader组件中

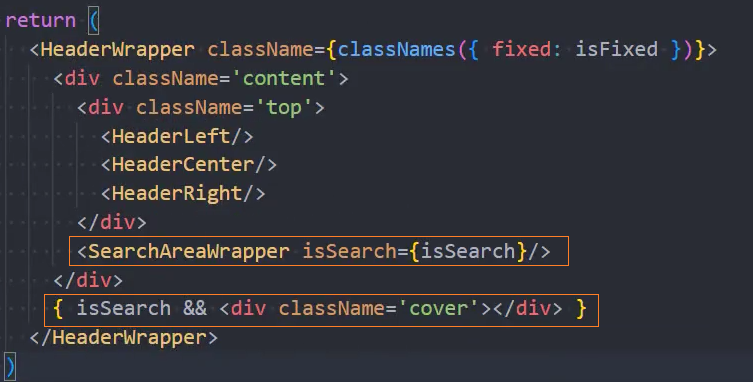

HeaderCenter组件中
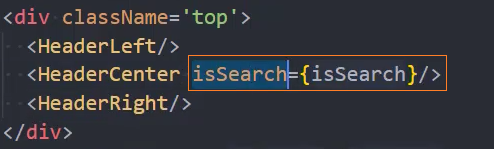
5、点击HeaderCenter,修改isSearch状态为true

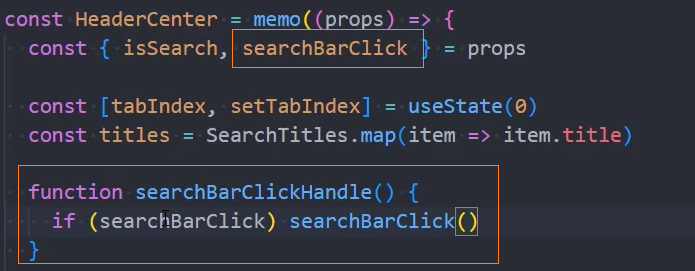
组件外修改isSearch

6、点击蒙版,修改isSearch状态为false

7、动画效果
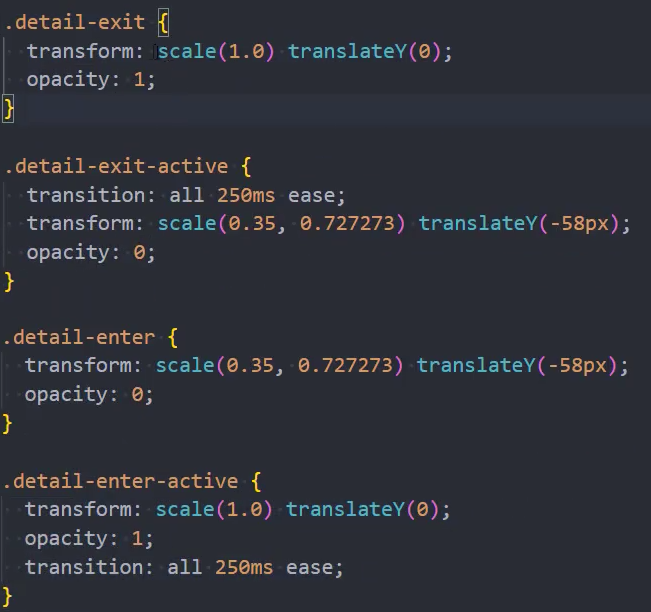
detail动画样式
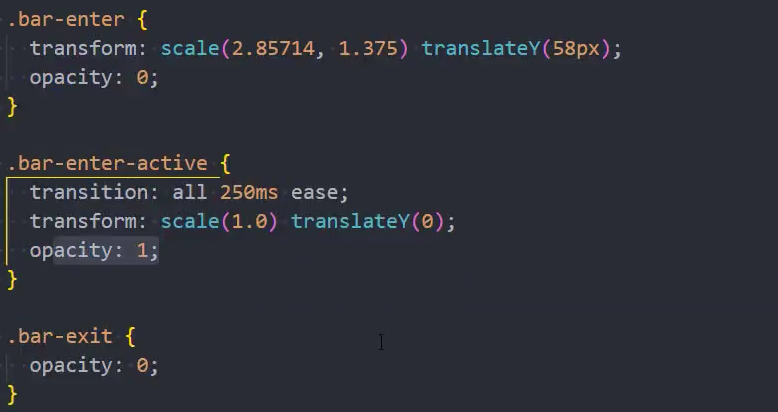
bar动画样式
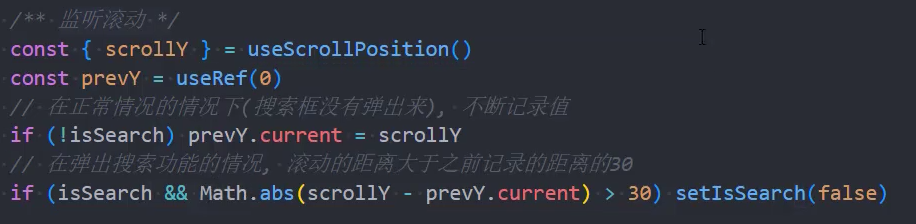
8、监听滚动,search消失
useScrollPosition的hook

为了防止监听滚动太频繁,对事件函数进行节流
- 安装:
npm i underscore

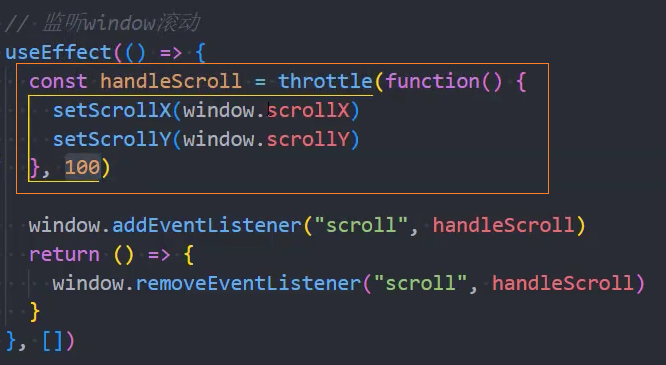
使用useScrollPosition
Header顶部透明效果

1、
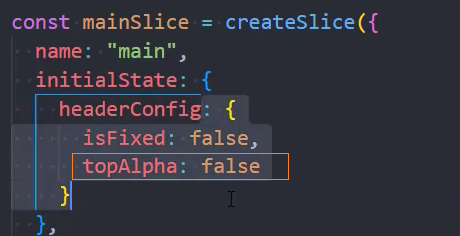
home页面
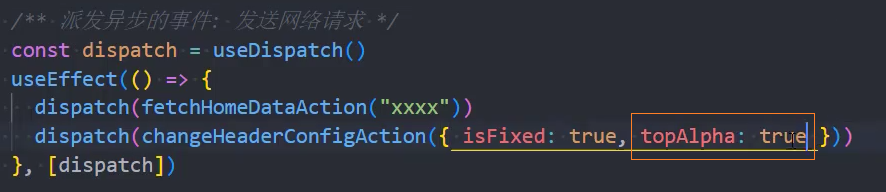
其他页面为false
2、AppHeader组件中通过topAlpha修改透明度


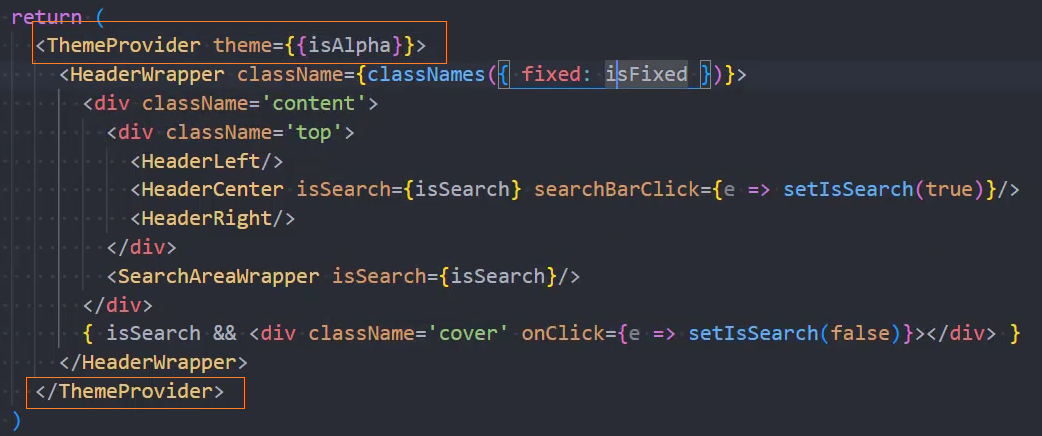
设置样式

其他样式类似
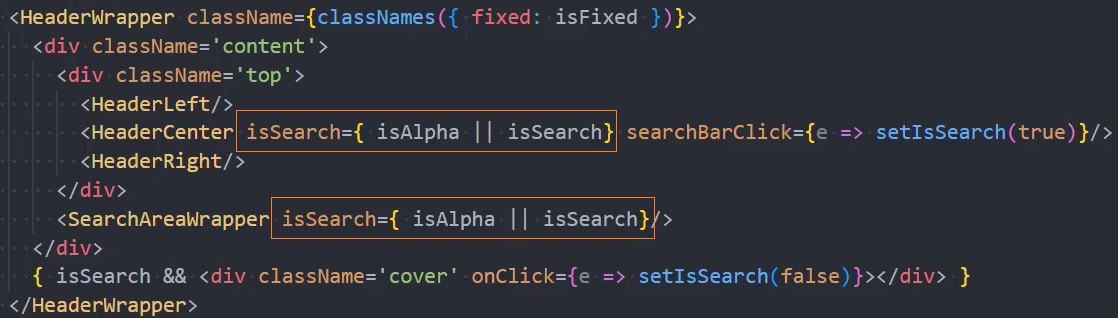
3、当isAlpha=true时,isSearch一定为true
解决suspense时AppHeader会打印2次的问题
解决: suspense不要包裹App,而是包裹useRoutes(routes)